A couple months ago, I claimed that I was done with the Summer of Subs series on The Incomparable. However, Jason came calling again, and we dove again.
Last week, I joined the panel on The Incomparable to discuss 2000’s U-571. If I had seen the film, it was long enough ago that I basically came to it blind. It ended up being an interesting mix of many of the movies I watched this past summer.
While The Incomparable did cover a couple of other films without me, and I believe one more like that is on the way, I do think we’re basically at the end of the Summer of Subs. It’s been great fun to participate in it, and I hope you enjoy listening as much as I did recording.
It’s that time of year: Relay for St. Jude, 2025 edition.
For many years, the Relay community, including my co-hosts on ATP, have joined together to raise money for St. Jude Children’s Research Hospital. We do this during Childhood Cancer Awareness Month, which is September.
Last year, I was overjoyed to be able to visit Memphis twice: once for a St. Jude creators’ conference, and once to participate in Podcastathon 2024. I wrote about my extremely moving experience in the spring of 2024, and I’ve spoken about St. Jude many times on both Analog(ue) and ATP.
Over the years, the Relay community is responsible for over FOUR MILLION DOLLARS raised for St. Jude. Last year alone, we raised over a million dollars. All thanks to the generosity of people like you.
St. Jude’s mission statement is clear: No child should die in the dawn of life.
Let’s help cure childhood cancer, together. I encourage you to donate today.
Later next month, if all goes to plan, I’ll see you for Podcastathon 2025.

Ultimately, it’s all John’s fault.
I was listening to one of my absolute favorite podcasts, and on this particular episode, John was discussing how he wanted a way to be aware of when someone in his house leaves the refrigerator door open. This seems like a very difficult challenge to solve, because refrigerators tend to be not terribly penetrable to radio waves or other means of getting data out of the fridge.
John landed on LoRa, specifically YoLink temperature sensors. These little doodads can sit in the fridge, and send “LOng RAnge” transmissions to the required hub, which in turn can be viewed in their app.
While this ended up being relevant for me due to simultaneous refrigerator disasters, that wasn’t what piqued my interest at the time. What got me intrigued was the alleged range of LoRa: roughly a quarter mile, or around 400 meters.
Our driveway is quite short — less than 20 meters long — but it was annoying going out there a couple times a day just to see if the mail had been delivered. Sometimes we could hear the dilapidated exhaust of the mail truck as it rolled by, but often not.
Surely technology — LoRa specifically — could fix this problem.
I found a YoLink “starter pack” that included two contact sensors and a hub. This was $50 at the time, and had everything I needed to get going. Once it arrived, I attempted to install the contact sensor in the mailbox, but couldn’t quite get the fitment right. So I installed it outside the mailbox instead, on the trailing side, from the carrier’s perspective.
Erin often points out to me how much this looks like it’s wired to explode. She’s… not wrong. But it’s been in place and working for nearly a year now.

This got me to the point that the YoLink app would notify me — and only me — when the mail was delivered. But I can do better.
I’ve become of those people. Sometime last year, I decided that I should give Home Assistant another shot. I had tried it once several years earlier, found it entirely inscrutable, and bailed. I went with Homebridge instead, which was far easier for me to understand. But the call of Home Assistant was strong… especially because the zealots are many, and they are loud.
(One of us! One of us!)
I’m now very much one of these jackasses. I can’t help it. They got me.
(One of us! One of us!)
So, armed with my new contact sensor powered by YoLink, I wanted to see if I could make Home Assistant aware of when the mailbox is opened. This was trivial, as there is an official YoLink integration.
Now that Home Assistant is aware of the state of the mailbox’s door, I could have some fun. However, the door doesn’t tell me whether or not there’s mail within the mailbox; only the state of the door. Can I do better?
Our mail is pretty consistent; it almost never comes before noon. If the mailbox is opened before noon, 99% of the time it’s because we’re putting outgoing mail in there.
This is where my automation can start: the when of the automation is, of
course, when the mailbox is opened. The conditions (And if) is if the
time is after 10 AM, to leave a little buffer.
In YAML form, here’s what we’re working with so far:
alias: Mailbox Opened
description: ""
triggers:
  - type: opened
    device_id: [device ID]
    entity_id: [entity ID]
    domain: binary_sensor
    trigger: device
conditions:
  - condition: time
    after: "10:00:00"
    weekday:
      - sun
      - mon
      - tue
      - thu
      - wed
      - sat
      - fri
Everything was working great; I added a Pushover notification action to my automation, and my phone would now get a push notification whenever the mail was delivered.
However, I was also getting the same notification when the mail was checked. That could not stand. It was time to get smart.
What I landed on was taking note of the last time the mailbox was opened;
that is stored in an input_datetime Helper. Based on this, we
can take different actions.
If the mailbox was last opened yesterday, then we should consider this a new delivery, and notify my phone. If the mailbox was last opened today, then this is probably one of the family going to check it.
My actual automation is a fair bit more complicated than this, but here’s the general gist:
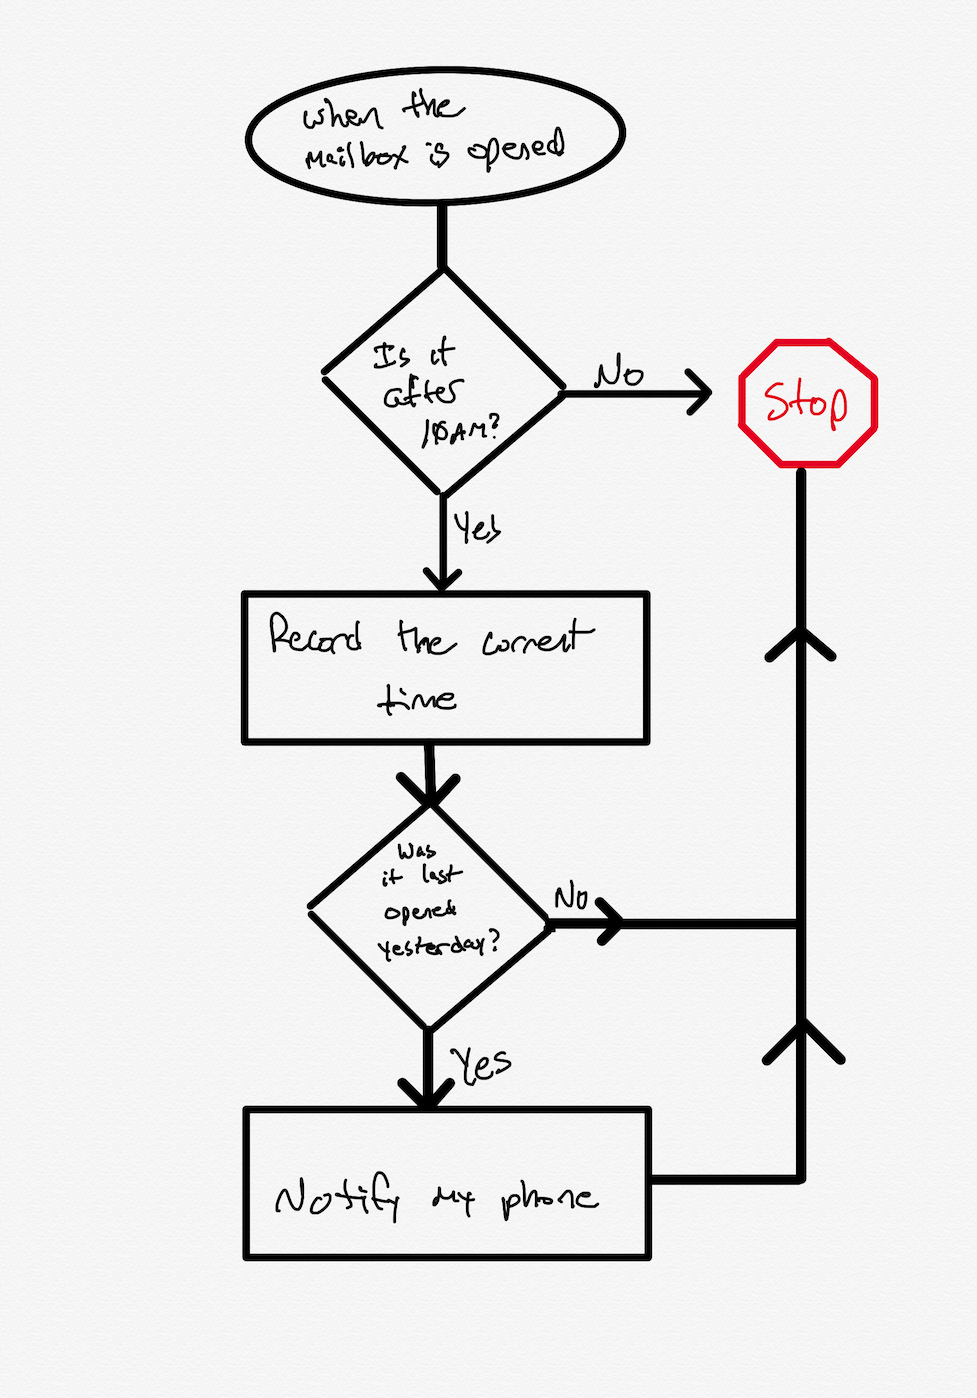
The actual automation — a slightly sanitized version of the YAML can be seen here — is a fair bit more complicated. I’m using MQTT as a bus to drop state-of-the-house information onto, and my automation deals with some of that. (I’ll probably post more about that another time.) The meat of the automation, however, is the above flowchart.
Also not shown in that flow is another neat trick: the YoLink hub has a speaker on it, so you can use Home Assistant to make announcements over the hub. Our hub is sitting in the back of our entertainment center, on the main floor of the house. When the mail is delivered, it will announce that the mail is waiting, and anyone in the family can choose to get it. Mikaela in particular is often excited to go see what’s waiting.
In a stereotypical stroke of absolute genius, Erin pointed out that message should be “You’ve got mail!”. So, on weekday afternoons, when the postal worker comes by the house, the 1990s are alive again.
I’ve recently become a Ubiquiti UniFi disciple, including replacing our builder-basic doorbell from 1998 with Ubituiti G4 Doorbell Pro. This has brought me into the UniFi Protect ecosystem.
Protect is absolutely designed to work with UniFi cameras — as one would expect — but they do have some basic support for third-party cameras that support ONVIF.
It occurred to me that I have a small collection of minicomputers in the house that I’m not using anymore. Further, those minicomputers all have cameras built-in. So that got me thinking, can I use one of these old iPhones as a third-party camera in Protect?
My first step was to see if I could find an app on the App Store that natively supports streaming via ONVIF. If one exists, I couldn’t find it.
However, while researching how to handle this, it became apparent that, to my limited understanding, ONVIF is more of a handshaking protocol. When it comes to video streaming, the assumption is that RTSP will handle the actual streaming.
Which got me wondering if I could do some combination of
RTSP app → some sort of ONVIF wrapper/proxy → Protect
In principle, that should work.
I started by casting about to find an app that would stream RTSP from the phone. I found a couple, but the one that seemed to work best for me is IP Camera Lite. It’s not intuitive, but it has a free tier for me to test with, and once I got my head around how the app works, it was reasonably simple.
However, I needed to prove to myself that it was working. So, I turned
to my dear old friend ffmpegffplay. Once I had
the app running and configured, I tried to play the stream:
ffplay rtsp://admin:admin@192.168.17.189:8554/live
Sure enough, I had a stream of the phone’s camera (and microphone).
Sometime recently I had stumbled upon a Reddit post that explored a person going down a vaguely similar path. They made mention of trying to get a Docker container working to do the ONVIF side of things, but couldn’t make heads nor tails of it.
I figured it couldn’t hurt to see if I could get it to work, as I’ve been using Docker for a few years now.
At first, I was running things attached/live in the console, to see logs and error messages as they came in. After beating my head against the wall for a while, I got the container to the point that it wasn’t erroring on startup.
I had to make a few changes to the config.yaml:
- I switched to
eth4, which happens to be the 10GbE daughter card that I installed in my Synology. You can determine this usingifconfig. - I set the correct IP address and path for the iPhone’s stream
- I absolutely had to set the correct width/height, otherwise it wouldn’t
work. To do so, I just took a look at the
ffplayconsole output from earlier and cribbed the values from there.
After getting things to the point that they seemed okay, I loaded UniFi Protect
on my computer, and navigated to Settings → System → Advanced, where I
had to tick on Discover 3rd-Party Cameras.
Then, in the UniFi Devices section (found in the left sidebar), I would see
the new device. I clicked on Click to Adopt, and was challenged for a
username and password. I used admin for both, which appears to be the default
for the IP Camera app.
At first, I was presented with an endless spinner, as I hadn’t configured things properly. The documentation on Github is enough, but frustratingly, the failure mode I ran into was the video just… not loading. However, I eventually got it nailed down, and now I have a new camera in Protect.
Thanks to this, I can now retire both Surveillance Station and Scrypted, which I was using previously before I moved to Protect.
In the final (?) edition of our three-part Summer of Subs miniseries, I joined the panel on The Incomparable to discuss the three-and-a-half-hour epic submarine film, Das Boot. Somehow, despite having heard of it for as long as I can remember, I had never seen it.
I won’t spoil the episode, but the opinions amongst the panel varied widely. I can say with confidence that I was surprised by my own reaction to the film.
Mercifully, the episode lasts quite a bit less than the runtime of the film, despite us having more to discuss than I initially expected.
Sitting here now, that’s all we have planned for the Summer of Subs, but if you have an idea or request, please feel free to nudge Jason and let him know. Certainly there’s a lot of options to choose from. Tell him I’m ready to serve. 🫡
An ATP listener pointed me to a video that I have absolutely no interest in, but this one segment rang impossibly, incredibly true for me.
Here’s the quote:
Audience capture has a tricky cousin. And their name is criticism capture. Criticism capture is when you create something, and — instead of just saying what you wanted to say — you start adding caveats, disclaimers, little hedges to preempt the negative comments. And the bananas thing is, the imaginary critic starts living rent-free in your head, acting like a director or executive producer in your creative process. And if you create for the joy of it, you can see how that can quickly steal the joy from your work.
What’s funny about this concept is, as I was transcribing what was spoken, I subconsciously changed the direct quote — And the crazy thing is — to the more-agreeable And the bananas thing is. Because of criticism capture.
As a creator, it can (and often does) get the best of me.
I endeavor to be better. I doubt I’ll ever really succeed.
On the most recent ATP, if I’m honest, I spent an entire segment whining about what was ultimately a pretty decent Genius Bar experience. Comically, so far, I’ve gotten almost no negative feedback about that. In fact, I’ve gotten some insightful feedback from former Geniuses that I’ll share on the next episode.
In a later segment, I made an off-handed comment about how I snapped a photo of the F1 movie while I was watching it in the theatre. I was overjoyed because there was a pinball machine briefly featured in the film, and we own that exact same machine! I wanted to quickly capture it to show Erin.
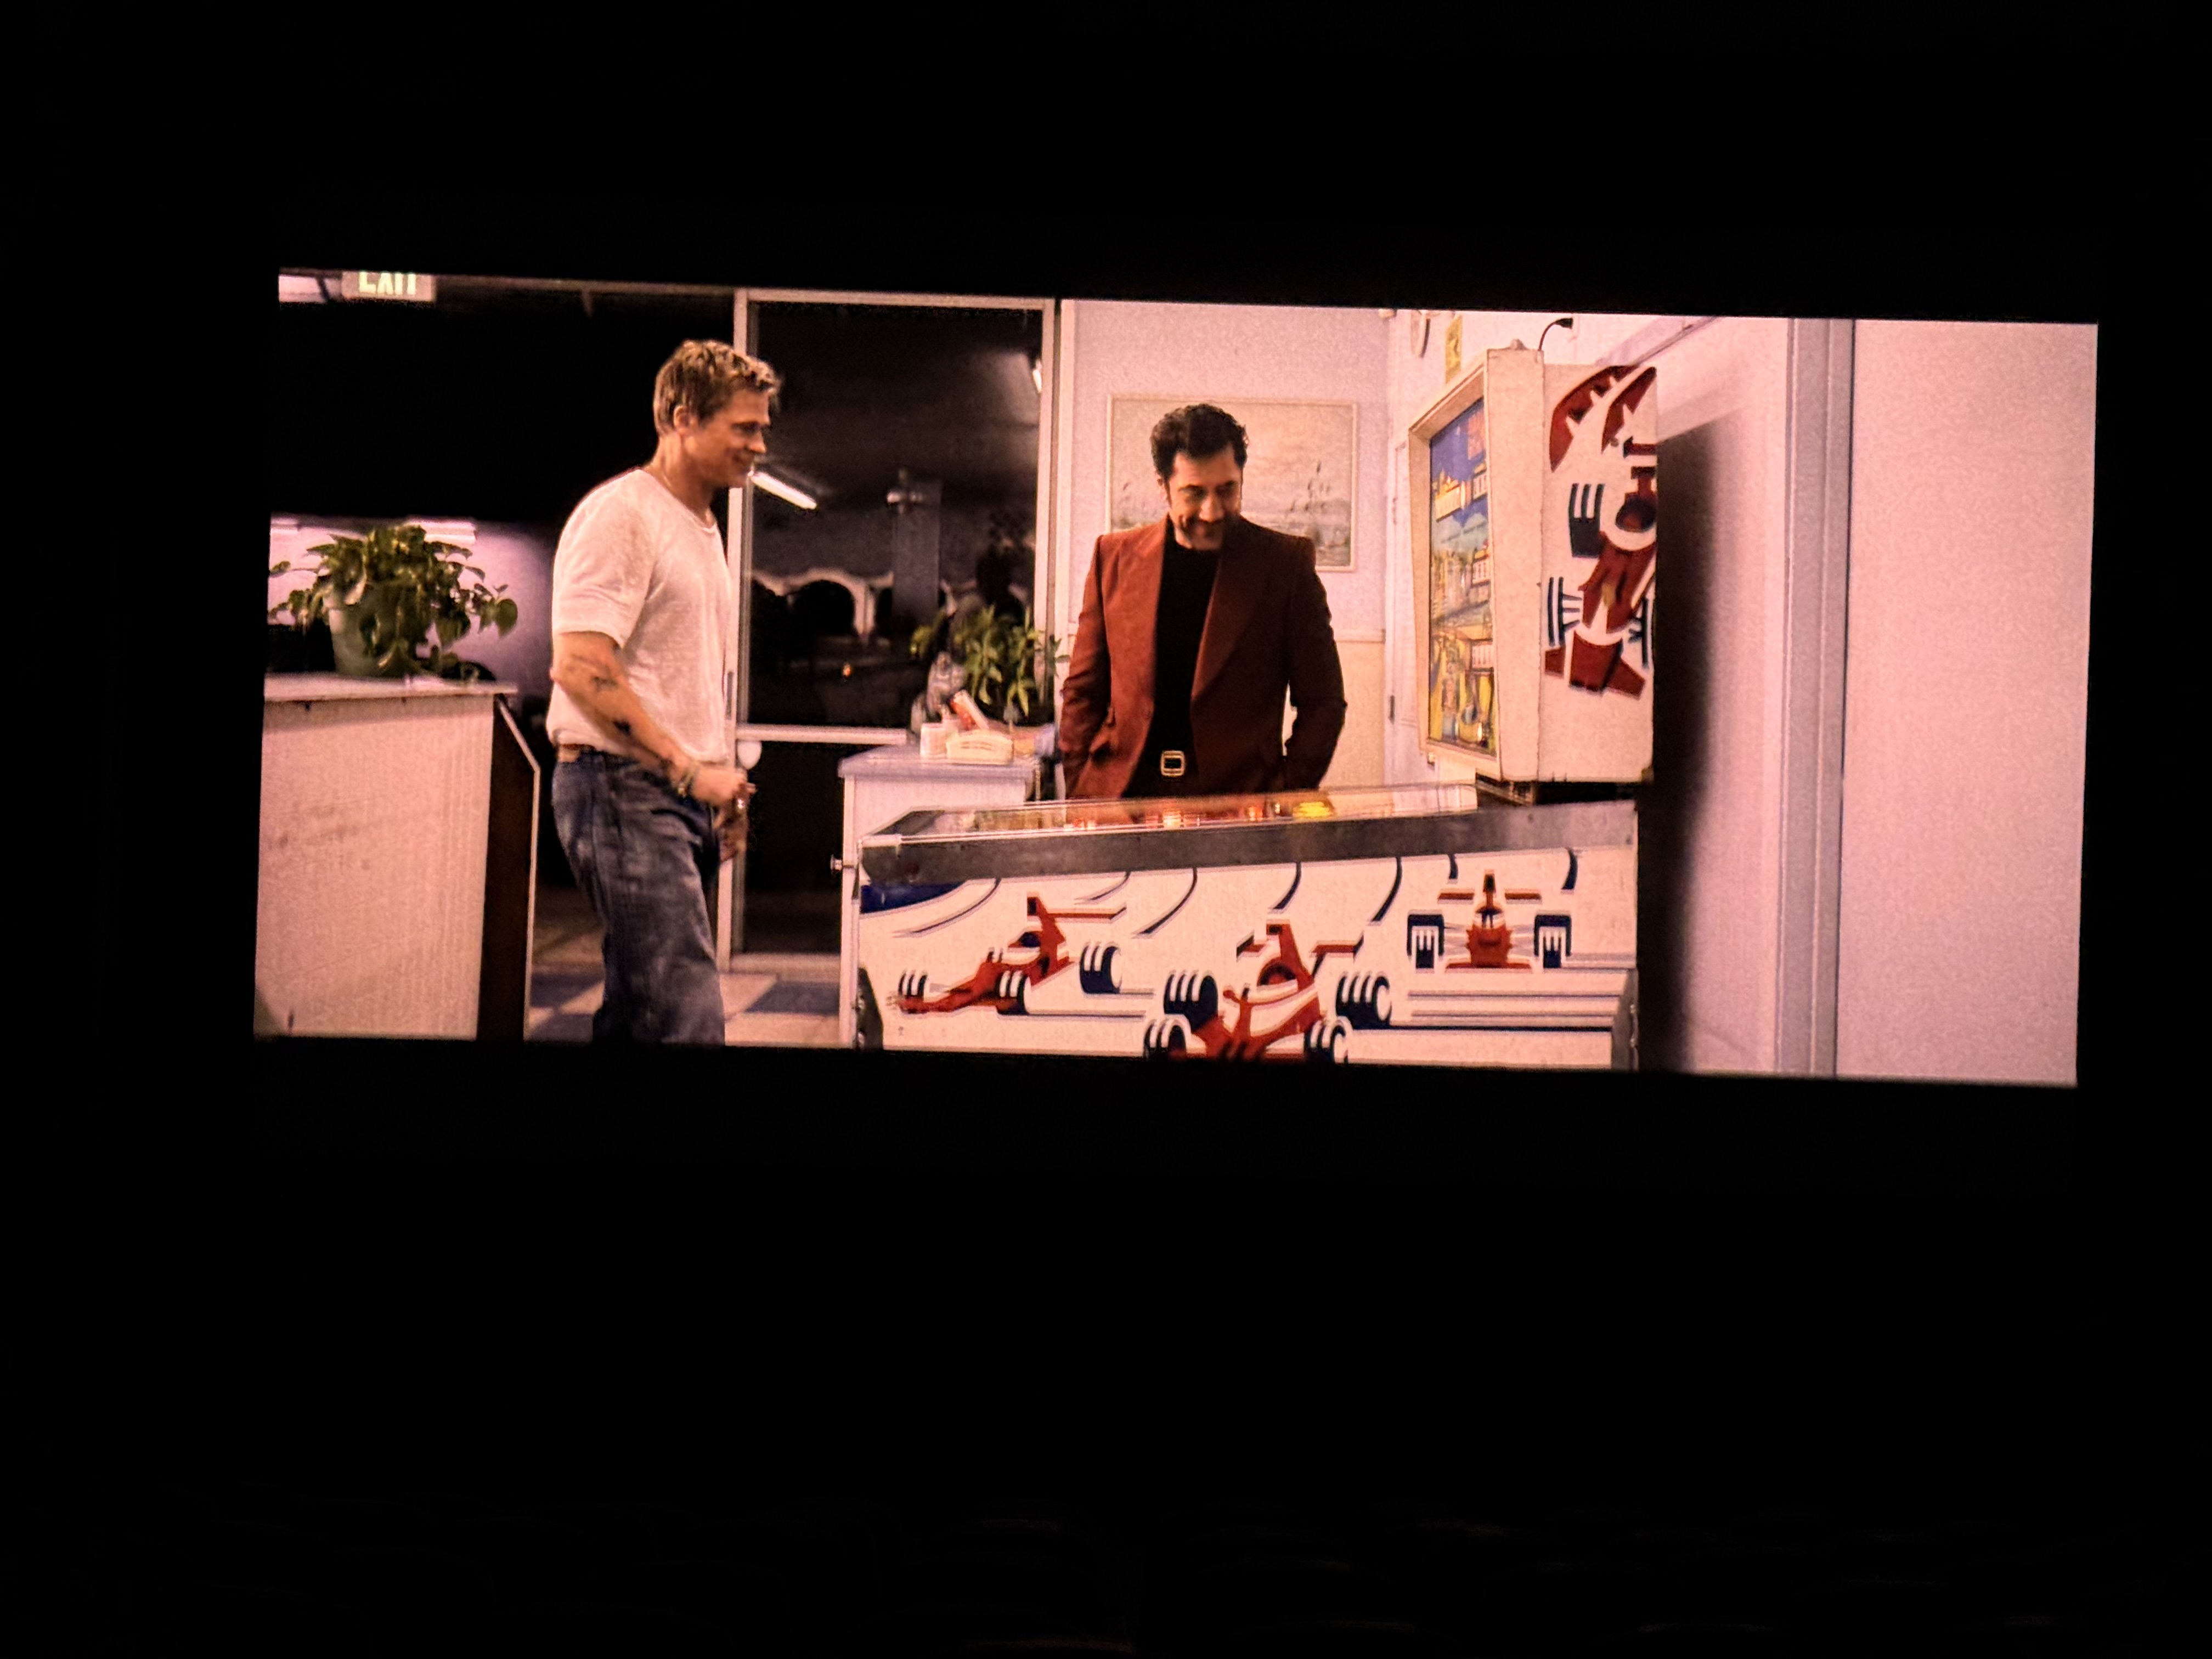
Then I got this feedback:
I’ll give you a pass for the AppleCare screed on the latest episode of ATP, but did you just admit to taking out your phone in a theater to snap a photo?
Please don’t do this. While this was a delightful moment for you, and something you wanted to share, you just pulled attention from the screen for everyone beside or behind you.
As someone who still cherishes the theater experience, I find this kind of blatant disregard for the experience of those around you maddening.
There’s a lot wrong with the above, and a lot of assumptions made about my behavior that are untrue. But that’s not the point.
This feedback really pissed me off, but that’s also not the point. The point is: I hate that this kind of feedback reinforces criticism capture.
I will always and forever endeavor to be better, but it’s feedback like this that greases the already-slippery slope.
And it happens every time you share something with the world.
Callsheet is approaching its second birthday, which is astonishing. Given that it is a subscription app, that means that day-one customers are starting to get “hey, your renewal is coming up” emails.
While working on the marketing site for the app, I wrote the following:
Your first 20 searches in Callsheet are free; after that, you can subscribe for the so-low-I-should-probably-raise-it price of $1 per month, or $9 per year.
I’m not saying that I’m planning to raise prices, but I’m also not… not-saying that.
For the remainder of 2025, and the first half of 2026, I have lots of things planned.
Most especially, getting a few pesky but not show-stopping bugs out of the way.[1]
After that, working on my new design system (“Liquid Glass”) refresh, as well as
some big refinements to the Discover (landing) screen.
Regardless, as I did last year, I’d like to remind my customers what the last year of updates brought.
2024.13
- New OG icon variants
- You can now optionally force the app to be in light mode or dark mode
- When looking at a TV show’s season, you can now use ↑ ↓ to page between seasons
- Improved localizations
- Callsheet will now be shown as a result when you search some basic terms in Spotlight, like “movie”, “tv”, etc.
- Fixes issue where a movie’s local release date was used for calculating cast and crew ages, rather than the international release date
- Fixes issue where adult content was not filtered out of “Known For” sections
- Fixes scroll hitches for TV shows
2024.14
- The “Subscribe” button should no longer flash on-screen for subscribers. Finally.
- Dramatically revamp filtering when looking at a person, so you can hone in on, say, just their movie roles, or TV jobs
- Add awards as a Quick Access link
- When viewing a TV season, use chevrons rather than arrows to page between seasons
- When viewing a TV season, honor the oldest-first vs. newest-first preference
- Change “Safari” → “System Default” in Persnickety Preferences
- Add “Open in browser” item to share sheet menus where appropriate
- More explicit search prompts when searching on-screen by swiping down slightly
- Additional logging around purchase errors
- Allow for instances where a “known for” job isn’t provided by TMDB
- Fix a rare issue where searching by callsheet:// search did not return results if you had trailing whitespace
- Fix workaround by which pinning can be used as a way to get free searches
- Fix a rare issue where a mostly-invalid URL returned from TMDB could cause a crash
2025.1
This was pulled shortly after release, so most users didn’t get it.
2025.2
- MULTIPLE LISTS OF PINS!
- There is only one “active” list at a time
- You can switch lists on the Discover screen
- You can see all the pins in the active list by tapping the list name on the Discover screen
- You can add the same pin to multiple lists
- You can move/copy pins between lists (open your list and then tap-and-hold on a pin)
- You can add/remove pins from non-active lists by tapping-and-holding on the pin button in the toolbar
- Add support for ⌘F on iPad and macOS
- Add ability to “roll the dice” and choose a random pin
- Add support for automatic switchover between dark mode and light mode icons for the OG icon set
- Add shortcuts for Spotlight/Shortcuts
- Add Control Center controls
- Can now un-hide spoilers in Known For
- When looking at a person, long-running series (think Saturday Night Live) are now grouped together. This should cut down on the amount of times you see someone born in 2000 credited for a show in 1975.
- Add Pretty in Pink icon
- Add TipKit to a couple of spots, which will give you hints on how to use every part of Callsheet to the fullest
- Fix episode summaries not honoring spoiler settings
- Fix broken episode counts for roles that have been coalesced
- Small VoiceOver fixes
- Fix oddball case when a Wikipedia title has a question mark in it would lead to Callsheet getting confused when opening Wikipedia
- Fix a plurality mismatch on the pre-sale screen
- Nerds: some work toward Swift 6 Strict Concurrency. This work may never end, however.
2025.3
New Features:
- Full context menus in the Discover screen for adding/removing pins
- Vastly improved and simplified sharing, thanks to the new callsheetapp.com. This includes universal deep link support
- Live activities can be started — manually — for movies and TV episodes. This allows you to one-tap return to Callsheet on your phone
- Fix leaky Finnish translations, particularly when long-pressing the app icon
- Fix Pretty in Pink app icon
- Improve list ordering and make more consistent
- Add missing dark variant icons
- Add VoiceOver/accessibility labels for app icons
- Improve verbiage for buttons in a delete dialog
- The mark used in the years a show ran is now an endash
2025.4
- When viewing a person, TV appearances are correctly placed in the year of their first appearance. The short-lived section for “long-running series” is gone!
- Ages in cast/crew lists now show the person’s age at the time of release and the age they are now
- People who are pinned are now highlighted when looking at cast/crew lists
- New Quick Link to Letterboxd for movies
- Quick Links you don’t want can be hidden
- Added credit counts for people — they can be found all the way at the bottom of the credit lists
- Added tool tips for Quick Links and toolbar on macOS
- You can now paste TMDB URLs in the Search box, and once you hit “Search” Callsheet will jump to the right spot
- Fixed behavior for TV shows with non-contiguous season numbers
- Fixed share links from context menus not using universal links
- People’s “Known For” should now more heavily weight shows and movies you’ve pinned
- Actor heights are now back, where possible
- Searches will trim whitespace by default
- Fix weird visual glitch with the fourth (and only fourth) person on a cast/crew list
- Fix visual glitch with “Released” for TV episodes
- When running on the Mac, now requires macOS 15.0
- German localization fixes
2025.5
- Death year and age added to a person’s credit when viewing a film/episode
- Fix completely jacked-up Upcoming section in people’s filmographies
- Fix wonky quick links presentation on iPad & Mac
- Fix visual glitch in Settings → Select Link
- Fix episode trivia link being off by one. I am now living proof the computer science joke is real.
2025.6
- Add age at death for posthumous credits
- Correct age handling for releases in the future
- Fix collection ordering; in rare cases flipping between movies in a collection was not ordered correctly. (You can do this using the up and down arrows in the top toolbar when viewing a movie such as Star Wars).
- Add missing localization for “Choose Links” in Settings
- Remove a simulator-only workaround for how Apple accidentally busted URLSession in the prior version of Xcode
2025.7
- Fixed issue where the “died age X” calculation — shown in cast/crew lists — was made from birthday to release day, instead of birthday to death day.
I’m really happy with the progress over the last year, and I like to think I’ve more than earned $9. If you’re a current subscriber, I hope you’ll consider renewing. If you’ve never tried Callsheet, there’s no better time than now.
Apple people, FB18031091, I beg of you. It’s affecting my users, and my hands are tied. Help me SwiftUI folks; you’re my only hope. ↩
In episode two of the Summer of Subs mini-series, I joined Jason and pals to discuss 1958’s Run Silent, Run Deep.
When Erin and I were engaged, we lived an hour away from each other. During the work week, I had plenty of time to kill. For a while, I spent that time watching the original versions of then-modern movies. Each week Netflix would deliver a DVD of a very old film, like Gone in Sixty Seconds, The Italian Job, Oceans Eleven, etc.
I… hated all of them.
As such, I didn’t have very high expectations for Run Silent, Run Deep. No matter what, I knew I would have a fun conversation about the movie, and that’s exactly what happened. Especially hearing Erika’s take on one of the characters. 😆
When Jason asks you if you want to be on The Incomparable to discuss a movie you really love, you say “yes”. When Jason asks you to participate in a Summer of Subs [mini?] series on The Incomparable, there is only one answer:

Yesterday, the first episode was released, where we cover a movie I have always loved: Crimson Tide.
When I was growing up, a favorite memory of mine was my dad pulling me out of school early one day. In a maneuver that was very out of character for him, he and I went to the movies. During the school day. We went to see Crimson Tide. It was a seminal point of my relationship with my dad, and a memory I cherish to this day.
While The Hunt for Red October will always be my favorite sub movie — and perhaps my favorite movie bar-none — I have always loved Crimson Tide. To be asked to participate in the Summer of Subs run on The Incomparable is an incredible honor.
This is one of three episodes we’ve recorded. I suspect you’ll like all three.
Just in time for some Fourth of July travel — for Americans anyway — I joined my friends Dan, Mikah, and Shelly Brisbin on Clockwise.
On this week’s episode, we discussed some alarming news about Brother printers, our skepticism about Apple’s approach to accessibility, the possibility of a low-powered (but maybe adorably small?) MacBook, and what we plan to [re?] read this summer.