An ATP listener pointed me to a video that I have absolutely no interest in, but this one segment rang impossibly, incredibly true for me.
Here’s the quote:
Audience capture has a tricky cousin. And their name is criticism capture. Criticism capture is when you create something, and — instead of just saying what you wanted to say — you start adding caveats, disclaimers, little hedges to preempt the negative comments. And the bananas thing is, the imaginary critic starts living rent-free in your head, acting like a director or executive producer in your creative process. And if you create for the joy of it, you can see how that can quickly steal the joy from your work.
What’s funny about this concept is, as I was transcribing what was spoken, I subconsciously changed the direct quote — And the crazy thing is — to the more-agreeable And the bananas thing is. Because of criticism capture.
As a creator, it can (and often does) get the best of me.
I endeavor to be better. I doubt I’ll ever really succeed.
On the most recent ATP, if I’m honest, I spent an entire segment whining about what was ultimately a pretty decent Genius Bar experience. Comically, so far, I’ve gotten almost no negative feedback about that. In fact, I’ve gotten some insightful feedback from former Geniuses that I’ll share on the next episode.
In a later segment, I made an off-handed comment about how I snapped a photo of the F1 movie while I was watching it in the theatre. I was overjoyed because there was a pinball machine briefly featured in the film, and we own that exact same machine! I wanted to quickly capture it to show Erin.
Then I got this feedback:
I’ll give you a pass for the AppleCare screed on the latest episode of ATP, but did you just admit to taking out your phone in a theater to snap a photo?
Please don’t do this. While this was a delightful moment for you, and something you wanted to share, you just pulled attention from the screen for everyone beside or behind you.
As someone who still cherishes the theater experience, I find this kind of blatant disregard for the experience of those around you maddening.
There’s a lot wrong with the above, and a lot of assumptions made about my behavior that are untrue. But that’s not the point.
This feedback really pissed me off, but that’s also not the point. The point is: I hate that this kind of feedback reinforces criticism capture.
I will always and forever endeavor to be better, but it’s feedback like this that greases the already-slippery slope.
And it happens every time you share something with the world.
Callsheet is approaching its second birthday, which is astonishing. Given that it is a subscription app, that means that day-one customers are starting to get “hey, your renewal is coming up” emails.
While working on the marketing site for the app, I wrote the following:
Your first 20 searches in Callsheet are free; after that, you can subscribe for the so-low-I-should-probably-raise-it price of $1 per month, or $9 per year.
I’m not saying that I’m planning to raise prices, but I’m also not… not-saying that.
For the remainder of 2025, and the first half of 2026, I have lots of things planned.
Most especially, getting a few pesky but not show-stopping bugs out of the way.[1]
After that, working on my new design system (“Liquid Glass”) refresh, as well as
some big refinements to the Discover (landing) screen.
Regardless, as I did last year, I’d like to remind my customers what the last year of updates brought.
2024.13
- New OG icon variants
- You can now optionally force the app to be in light mode or dark mode
- When looking at a TV show’s season, you can now use ↑ ↓ to page between seasons
- Improved localizations
- Callsheet will now be shown as a result when you search some basic terms in Spotlight, like “movie”, “tv”, etc.
- Fixes issue where a movie’s local release date was used for calculating cast and crew ages, rather than the international release date
- Fixes issue where adult content was not filtered out of “Known For” sections
- Fixes scroll hitches for TV shows
2024.14
- The “Subscribe” button should no longer flash on-screen for subscribers. Finally.
- Dramatically revamp filtering when looking at a person, so you can hone in on, say, just their movie roles, or TV jobs
- Add awards as a Quick Access link
- When viewing a TV season, use chevrons rather than arrows to page between seasons
- When viewing a TV season, honor the oldest-first vs. newest-first preference
- Change “Safari” → “System Default” in Persnickety Preferences
- Add “Open in browser” item to share sheet menus where appropriate
- More explicit search prompts when searching on-screen by swiping down slightly
- Additional logging around purchase errors
- Allow for instances where a “known for” job isn’t provided by TMDB
- Fix a rare issue where searching by callsheet:// search did not return results if you had trailing whitespace
- Fix workaround by which pinning can be used as a way to get free searches
- Fix a rare issue where a mostly-invalid URL returned from TMDB could cause a crash
2025.1
This was pulled shortly after release, so most users didn’t get it.
2025.2
- MULTIPLE LISTS OF PINS!
- There is only one “active” list at a time
- You can switch lists on the Discover screen
- You can see all the pins in the active list by tapping the list name on the Discover screen
- You can add the same pin to multiple lists
- You can move/copy pins between lists (open your list and then tap-and-hold on a pin)
- You can add/remove pins from non-active lists by tapping-and-holding on the pin button in the toolbar
- Add support for ⌘F on iPad and macOS
- Add ability to “roll the dice” and choose a random pin
- Add support for automatic switchover between dark mode and light mode icons for the OG icon set
- Add shortcuts for Spotlight/Shortcuts
- Add Control Center controls
- Can now un-hide spoilers in Known For
- When looking at a person, long-running series (think Saturday Night Live) are now grouped together. This should cut down on the amount of times you see someone born in 2000 credited for a show in 1975.
- Add Pretty in Pink icon
- Add TipKit to a couple of spots, which will give you hints on how to use every part of Callsheet to the fullest
- Fix episode summaries not honoring spoiler settings
- Fix broken episode counts for roles that have been coalesced
- Small VoiceOver fixes
- Fix oddball case when a Wikipedia title has a question mark in it would lead to Callsheet getting confused when opening Wikipedia
- Fix a plurality mismatch on the pre-sale screen
- Nerds: some work toward Swift 6 Strict Concurrency. This work may never end, however.
2025.3
New Features:
- Full context menus in the Discover screen for adding/removing pins
- Vastly improved and simplified sharing, thanks to the new callsheetapp.com. This includes universal deep link support
- Live activities can be started — manually — for movies and TV episodes. This allows you to one-tap return to Callsheet on your phone
- Fix leaky Finnish translations, particularly when long-pressing the app icon
- Fix Pretty in Pink app icon
- Improve list ordering and make more consistent
- Add missing dark variant icons
- Add VoiceOver/accessibility labels for app icons
- Improve verbiage for buttons in a delete dialog
- The mark used in the years a show ran is now an endash
2025.4
- When viewing a person, TV appearances are correctly placed in the year of their first appearance. The short-lived section for “long-running series” is gone!
- Ages in cast/crew lists now show the person’s age at the time of release and the age they are now
- People who are pinned are now highlighted when looking at cast/crew lists
- New Quick Link to Letterboxd for movies
- Quick Links you don’t want can be hidden
- Added credit counts for people — they can be found all the way at the bottom of the credit lists
- Added tool tips for Quick Links and toolbar on macOS
- You can now paste TMDB URLs in the Search box, and once you hit “Search” Callsheet will jump to the right spot
- Fixed behavior for TV shows with non-contiguous season numbers
- Fixed share links from context menus not using universal links
- People’s “Known For” should now more heavily weight shows and movies you’ve pinned
- Actor heights are now back, where possible
- Searches will trim whitespace by default
- Fix weird visual glitch with the fourth (and only fourth) person on a cast/crew list
- Fix visual glitch with “Released” for TV episodes
- When running on the Mac, now requires macOS 15.0
- German localization fixes
2025.5
- Death year and age added to a person’s credit when viewing a film/episode
- Fix completely jacked-up Upcoming section in people’s filmographies
- Fix wonky quick links presentation on iPad & Mac
- Fix visual glitch in Settings → Select Link
- Fix episode trivia link being off by one. I am now living proof the computer science joke is real.
2025.6
- Add age at death for posthumous credits
- Correct age handling for releases in the future
- Fix collection ordering; in rare cases flipping between movies in a collection was not ordered correctly. (You can do this using the up and down arrows in the top toolbar when viewing a movie such as Star Wars).
- Add missing localization for “Choose Links” in Settings
- Remove a simulator-only workaround for how Apple accidentally busted URLSession in the prior version of Xcode
2025.7
- Fixed issue where the “died age X” calculation — shown in cast/crew lists — was made from birthday to release day, instead of birthday to death day.
I’m really happy with the progress over the last year, and I like to think I’ve more than earned $9. If you’re a current subscriber, I hope you’ll consider renewing. If you’ve never tried Callsheet, there’s no better time than now.
Apple people, FB18031091, I beg of you. It’s affecting my users, and my hands are tied. Help me SwiftUI folks; you’re my only hope. ↩
In episode two of the Summer of Subs mini-series, I joined Jason and pals to discuss 1958’s Run Silent, Run Deep.
When Erin and I were engaged, we lived an hour away from each other. During the work week, I had plenty of time to kill. For a while, I spent that time watching the original versions of then-modern movies. Each week Netflix would deliver a DVD of a very old film, like Gone in Sixty Seconds, The Italian Job, Oceans Eleven, etc.
I… hated all of them.
As such, I didn’t have very high expectations for Run Silent, Run Deep. No matter what, I knew I would have a fun conversation about the movie, and that’s exactly what happened. Especially hearing Erika’s take on one of the characters. 😆
When Jason asks you if you want to be on The Incomparable to discuss a movie you really love, you say “yes”. When Jason asks you to participate in a Summer of Subs [mini?] series on The Incomparable, there is only one answer:

Yesterday, the first episode was released, where we cover a movie I have always loved: Crimson Tide.
When I was growing up, a favorite memory of mine was my dad pulling me out of school early one day. In a maneuver that was very out of character for him, he and I went to the movies. During the school day. We went to see Crimson Tide. It was a seminal point of my relationship with my dad, and a memory I cherish to this day.
While The Hunt for Red October will always be my favorite sub movie — and perhaps my favorite movie bar-none — I have always loved Crimson Tide. To be asked to participate in the Summer of Subs run on The Incomparable is an incredible honor.
This is one of three episodes we’ve recorded. I suspect you’ll like all three.
Just in time for some Fourth of July travel — for Americans anyway — I joined my friends Dan, Mikah, and Shelly Brisbin on Clockwise.
On this week’s episode, we discussed some alarming news about Brother printers, our skepticism about Apple’s approach to accessibility, the possibility of a low-powered (but maybe adorably small?) MacBook, and what we plan to [re?] read this summer.
WWDC 2025 is behind us, and now the work begins.
I thought I’d take a quick moment to collect my thoughts — both as a user of Apple devices and technologies, but also in terms of being an app developer.
For long-form discussion of my knee-jerk reactions, as always, you can check out our coverage on ATP. Below are some things that stood out after having let myself chew on them for the last several days.
User Highlights
I can totally understand how one would think the opening video was cheesy/stupid/dumb/etc. I don’t care. I loved it. As a big F1 fan for the last several years, I was incredibly amused. When Craig took his helmet off, I was cackling.
Liquid Glass has already been very divisive. I’m running iOS 26 on my iPad Pro — more about that in a second — and I have a beta of macOS Tahoe running on a VM on my MacBook Pro. My initial reaction was “that looks pretty but will never work in the real world”. Having used it a touch, I feel like I can see where Apple is going. Further, watching their intro video showed me that they’ve put a lot of thought into how things work in this new design system.
My current opinion is that I’m very optimistic about where things are going. Today, particularly on iPad, there’s a lot of things to fix. But that’s normal! In fact, that’s what we want! I vastly prefer Apple shipping something half-baked to Apple just foisting what they consider to be a completed design upon us.
I am, traditionally, a light iPad user. My 2023 iPad Pro is my preferred computer for when I’m on the couch, or taking with me for unserious travel.[1] I love its flexibility, and how much more nimble it feels compared to my 14" MacBook Pro — even with the trick cantilevered (and very heavy) keyboard attached to it.
However, any time I want to accomplish something serious, I find myself reaching for my MacBook Pro. Until… now?
Apple’s multitasking changes for iPadOS 26 are incredible. They work well with a finger, but work great with a pointing device. The new multitasking mechanism will remove many of the shackles I feel when using my iPad Pro. I no longer feel like I’m trying to wade through wet cement when using it. I don’t feel like I’m bending to its needs — rather, it’s bending to mine.
That said, I now regret not having a 13" iPad Pro. 🙃 It feels like there’s a lot more window chrome to contend with, and I’m definitely feeling a bit pinched in the real estate department.
I also miss Spaces. Wouldn’t it be wild if I somehow end up crawling back to Stage Manager? 😱
Developer Highlights
With regard to developer-specific things, there’s a couple things I’m going to investigate immediately.
I think I may be most excited for “Approachable Concurrency”, which is
highlighted in the What’s New in Swift video. In short, apps
will be assumed to have everything on the MainActor, and can
then opt-in to explicit background processing. This makes so much
sense and I’m super stoked to try it out.
I’ve been kicking full Swift 6 strict concurrency down the road for a year now, and this may be an example of procrastination paying off. 🥳
I’m also very excited to try out the new updates to .searchable().
I hate the way the main/global search looks and works in Callsheet,
and I’ll be overjoyed if I can jettison my custom crap in favor of using
system controls.
I’m not sure what I am going to do with Foundation Models, but I’m really excited to have it available to Callsheet. I’m not sure how to embrace it — if at all — but I keep coming up with random places in the app that maybe just a dash of AI/ML would improve the user experience.
Callsheet
Here’s Callsheet, with zero code changes, built with Xcode 26 beta, running on the iOS 26 Simulator:
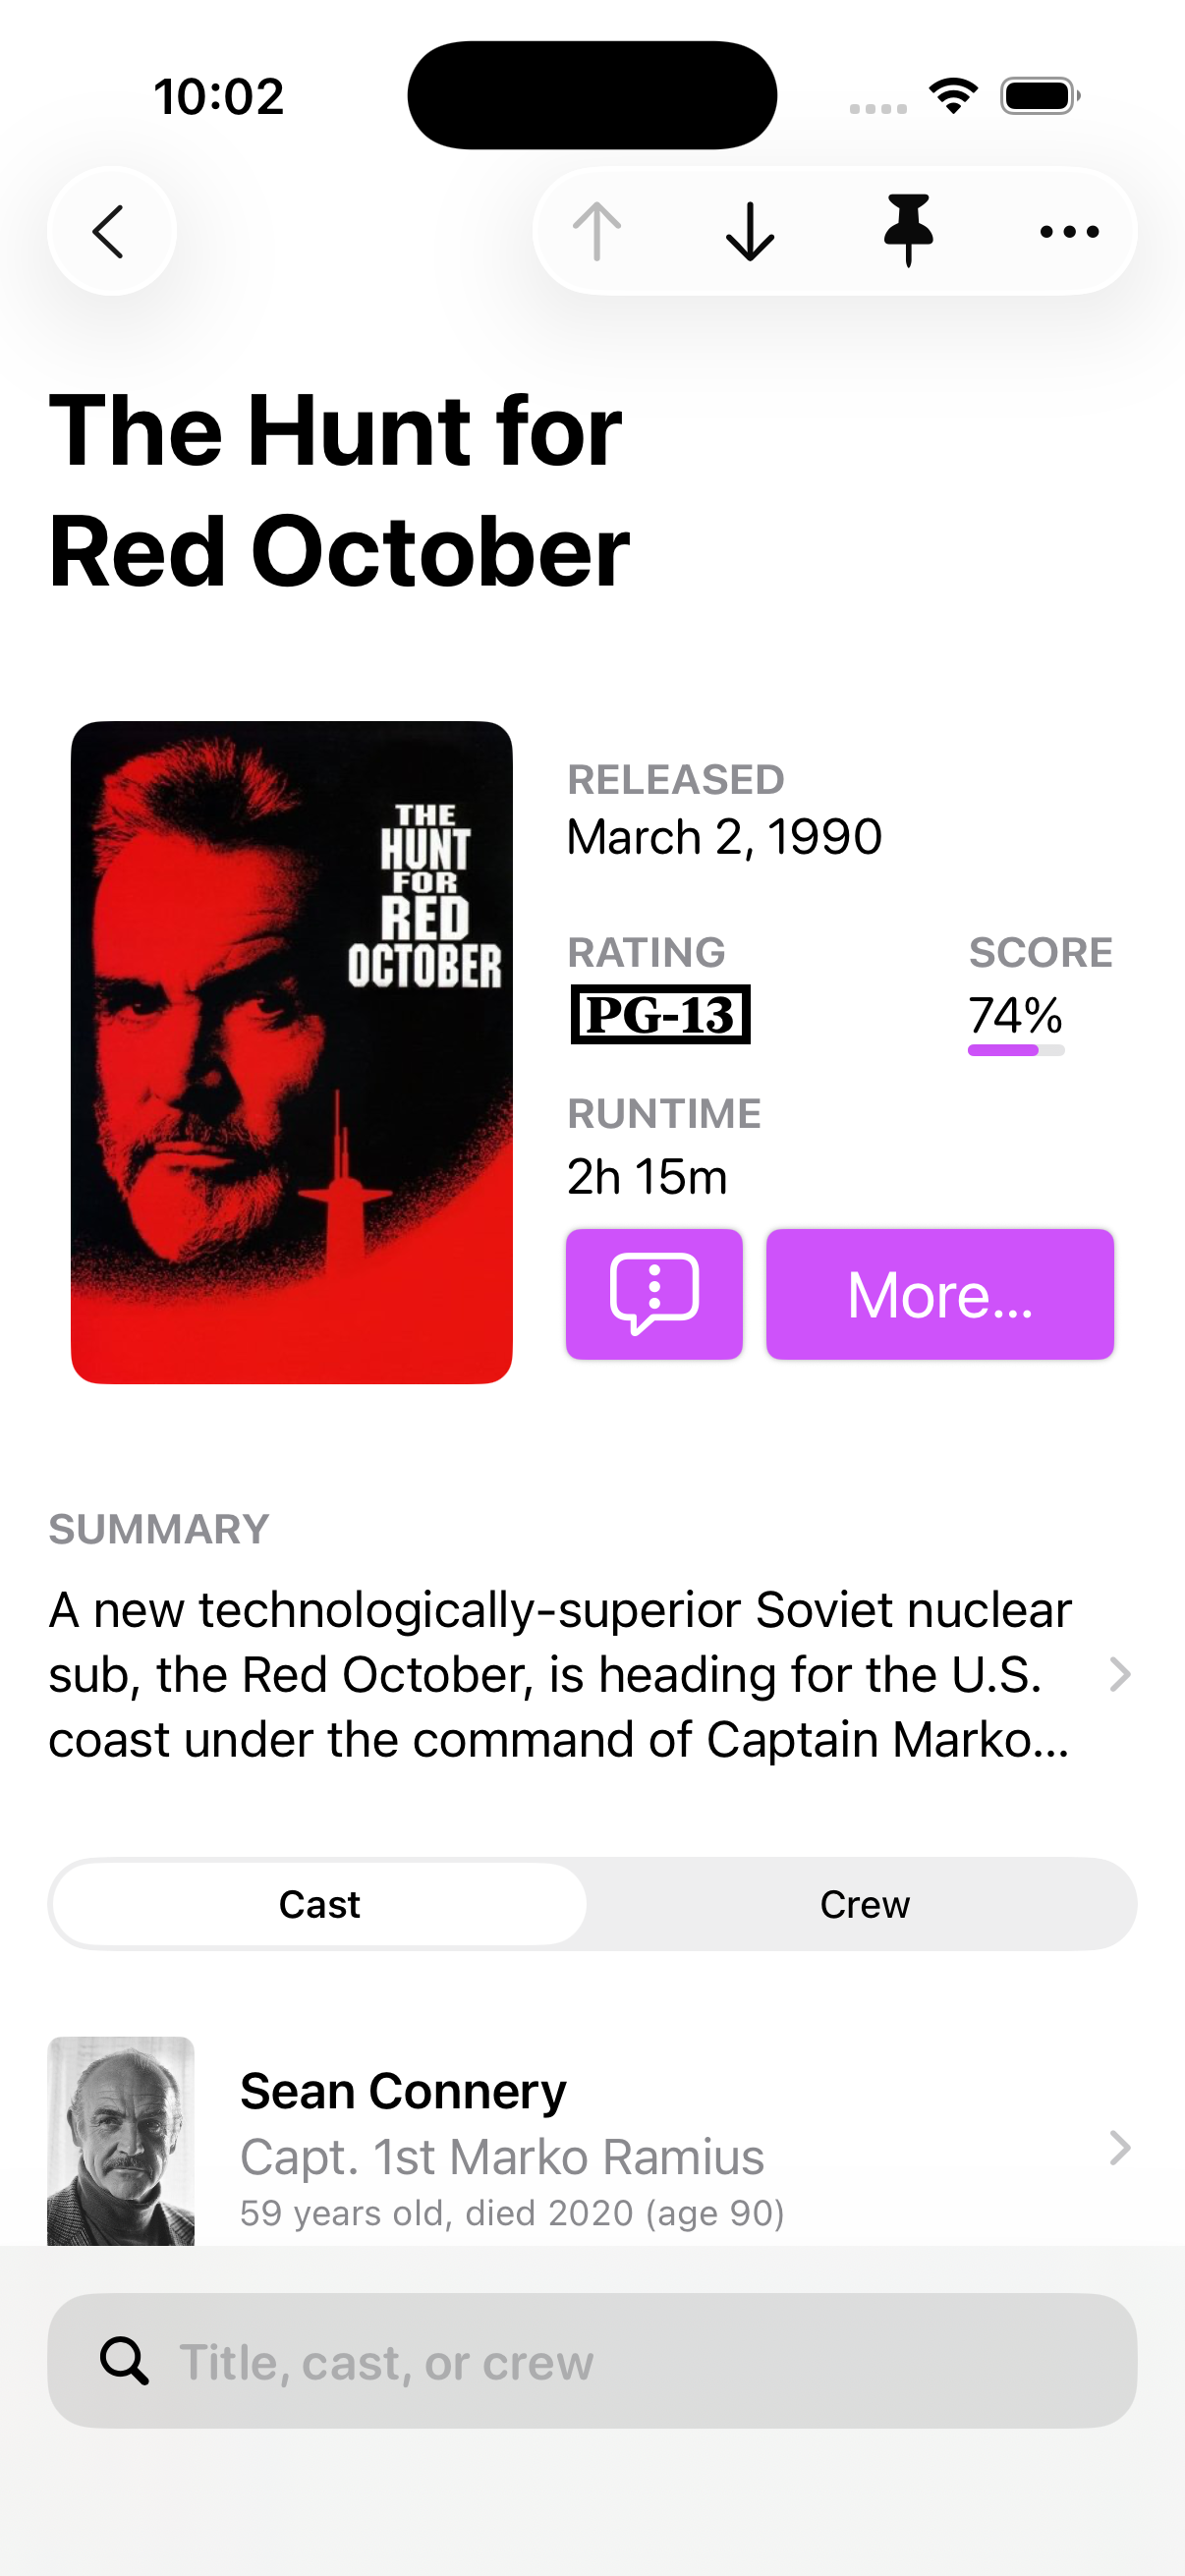
Not bad!
However, the bottom panel sticks out like a sore thumb. That definitely needs some rework. I had two very productive private labs this week, and both the designers and SwiftUI engineers I met with had great tips to try.
While I don’t think I want to make dramatic changes here, I am definitely looking at the new tab bar with a combination of “🧐” and “🤔”. One of the Apple people I spoke with encouraged me not to have the tail wag the dog — and they’re right — but it is probably worth exploring.
Additionally, I need to look at marking the ↑↓ as one unit, so they are grouped together in Liquid Glass. Or, possibly, move them down a bit — perhaps adjacent to the poster somewhere in that “quick info” area. This will allow the pin to stand out more, and leave some more room for the title to breathe.
In iOS 18, if you use the large title (as shown in the screenshot above), as you scroll, the title scrolls too. It doesn’t get “sucked into” the navigation bar by default. I had to add that functionality myself[2], which was a pain. My custom stuff can also get a little thrown off when a title is really long.
I feel like many of the examples shown in the session videos I’ve seen so far seem to hint that this slide-into-the-navigation-bar affordance may be happening at the system level — where it should be. I need to dig into this too.
As mentioned above, I think tasteful and tactical deployment of AI in a couple of cases may be useful. I can imagine it being useful to offer some suggestions for what to rename a list of pins, for example, based on the films contained within the list.
When I was writing the infrastructure for pin lists, I had always assumed I would allow users to associate an icon with their lists. I ended up punting on associated icons, because I didn’t think it’d be very additive. However, seeing Ryan Ashcraft thinking out loud has me thinking, too.
I definitely need to explore more there.
The Way Forward
For the next week or so, I’m going to try to force myself to watch a ton of videos. My natural inclination is to dive into Xcode to play with the new shiny, but I really think it’d do me good to learn first, apply later. Furthermore, I like the idea of letting a lot of what I learn marinate or background process for a few days before I dive straight in.
Happy summer, everybody. It’s time to get to work.
An unusual thing happened last week, and I’m trying to process it. I’m hoping writing about it will help me get some clarity around my thoughts and feelings.
For the second time on this blog, I have the unpleasant task of eulogizing a friend. An internet friend, but a friend nevertheless.
Early Thursday morning, on 22 May, there was a horrific plane crash in San Diego, California. All six aboard the plane were killed. Thankfully, despite crashing into a neighborhood of military housing, nobody on the ground lost their lives.
On board that jet was an internet friend of mine, Daniel Williams.
I didn’t know Daniel super well, but we knew each other. To my recollection, we met only once in person, and if my [admittedly awful] memory serves, it was whilst waiting in line to enter one of the live tapings of The Talk Show at WWDC. At that point, we knew each other a smidge, but mostly only because Daniel very kindly facilitated getting me a discount on a GoPro.
Daniel had spent the last eight-ish years as a senior software architect at GoPro, working on their iOS app. He had actually just accepted a dream job offer at Apple, working in the health organization, and was due to start there on this coming Monday.
Over the last year or two we got closer, though I’m not trying to say that we were close. We often exchanged DMs on Instagram and occasionally chatted via iMessage. I was super excited for him to start at Apple soon, though clearly not as excited as he was. 😊
On Wednesday night, the 21st, Daniel was in New York, having just seen a band he knew play. Daniel’s “former life” was as the founding drummer of the metal band The Devil Wears Prada. He had this to say after I asked him about the show:
Sooooo good!
Their show was insane… it is so crazy to see them go from playing a Chinese restaurant (I was there at their first show lol) with 12 people in it to [Madison Square Garden] with like 20k people. They are such good dudes, they deserve it for sure.
Again, I’m not trying to claim I knew Daniel well. But from what I did know, this is very much him: happy in general, but especially to see others happy and successful.
Daniel sent that, Wednesday night, after sending pictures of him eating at my favorite pizzeria in the world. He went on my suggestion, and was kind enough to send me these three photos, which made me deeply jealous 🤤:
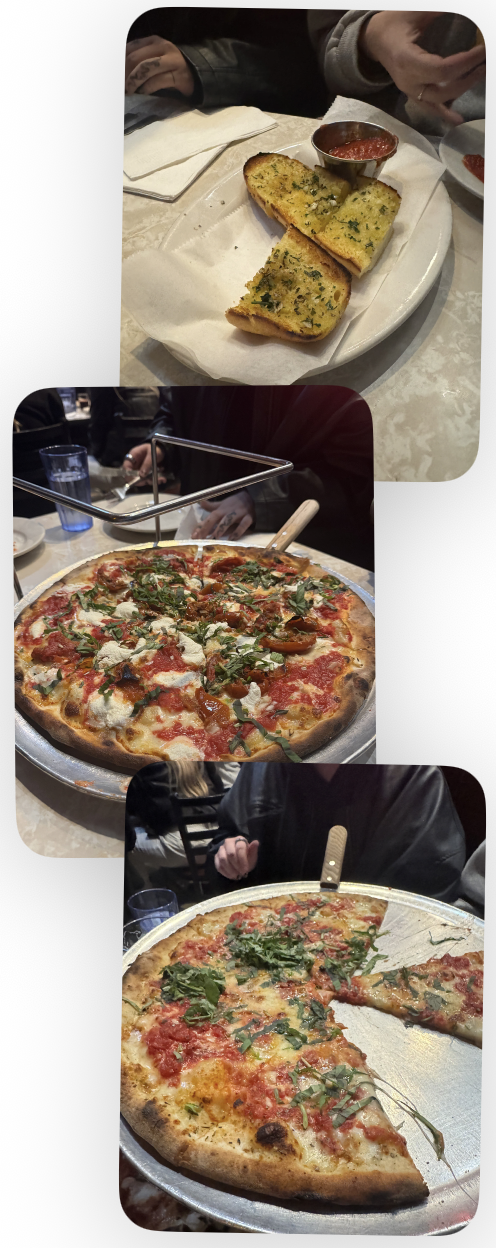
Looking back on these photos now, I can’t help but wonder if they’re photos of his last meal. 😢
Three hours later, he had this to say:
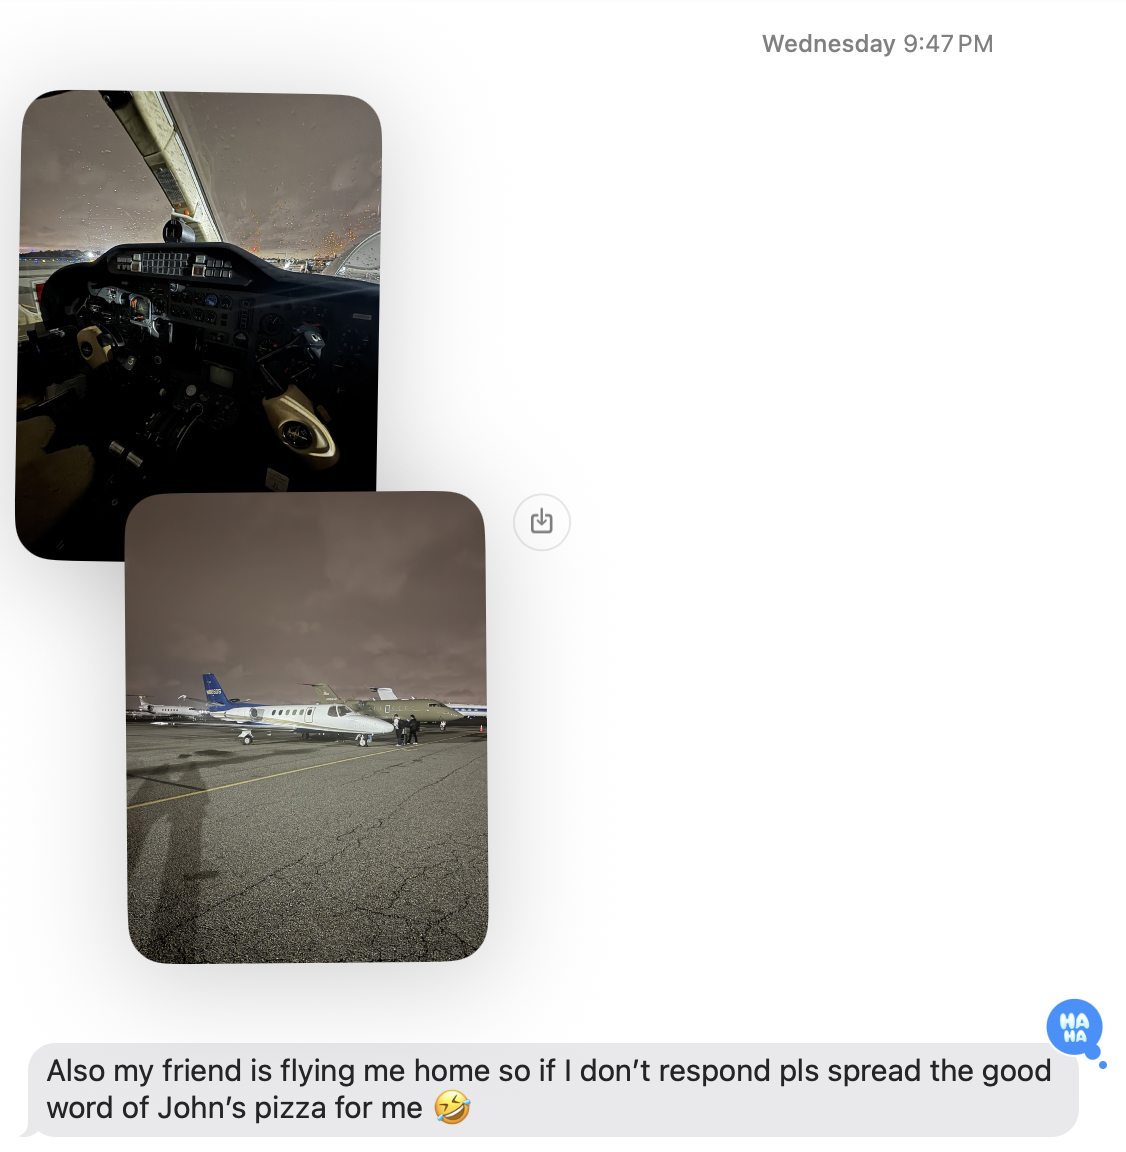
His last message to me just hits different now:

💔
On Friday night — two days after we last exchanged messages, and the day
after Daniel’s tragic accident — I was looking at Facebook, and saw his
image in a news story that somehow landed on my timeline. Then I read the
headline, and the two words jumped out at me: Plane Crash. I had no idea.
I was — and remain — shocked.
The last time I wrote a post like this, it was also about an internet friend. I wrote then:
Jason was like nobody I’ve ever met. Which is an odd thing to say, since we had never actually met in person. Nevertheless, I immediately started to cry upon hearing the news; an odd thing to do for someone who, on paper, was just a voice in my head.
Though Daniel and I did meet the one time, the feelings are all the same. Though this time, they’re complicated by me chatting with Daniel hours before he passed away.
From what I’ve read, the crash was the confluence of a ton of weird events: truly terrible weather, equipment malfunctions, etc. The pilot, Dave, was by all accounts an exceptionally skilled pilot. Sometimes, though, everything conspires against you.
Life is a magical, amazing thing, that can be snatched from you in an instant. You never know when — nor how — your ticket will be punched.
Do yourself a favor and hug your special people close today. From everything I know, Daniel would want you to.
Rest in peace, friend. 💙
School is wrapping up this week here in Richmond, and as such, I’m deeply into Maycember. Thus, it completely slipped my mind to post about my most recent guest appearance.
Last week, I joined my friend and co-conspirator, Ben Rice McCarthy; as well as my internet pal Brian Hamilton on their The Last of Us recap podcast, The Cast of Us.
On the episode, we covered The Price. Both Brian and Ben had played the video games, but I have not, so it was an especially fascinating conversation for me, covering some of the differences between the two.
The Last of Us is a show that I deeply enjoy, despite not being my usual kind of television programming. I tend toward easy watches, which mostly just wash over me. The Last of Us is not that kind of show, and though it’s challenging, it’s also deeply rewarding.
I really enjoyed the conversation I had with Ben and Brian; if you’re watching The Last of Us, I think you will too.
And as a bonus, the next episode features my co-host, John Siracusa!
Callsheet 2025.4 is currently rolling out in the App Store. If you don’t have
it yet, you can open the app in the Store and that should allow you to
Update manually.
So what’s new?
TV Guest Appearance Dates
Users, understandably, have quibbles and feature requests about Callsheet. However, one complaint far-and-away stood out as the most common. It went something like this:
Why is it when I look at Sabrina Carpenter, her appearance on Saturday Night Live is listed… before she was born… back when the show started in 1975?
After a long time, in version 2025.2, I added a hack to help
alleviate this problem: the Long-Running Series collapsible
section on a person’s filmography. I was never happy with this, but
at least it prevented pre-birth appearances.
To properly slot the appearance into the correct year “bucket” would require a zillion calls to The Movie Database’s servers, and thus make Callsheet itself feel quite a bit slower. That juice wasn’t worth the squeeze.
Now, thankfully, after much pleading, the fine folks at TMDB have finally delivered. Thanks to a change on the API side, the information I need is now available, and I can slot a person’s first appearance in a show into the correct year.
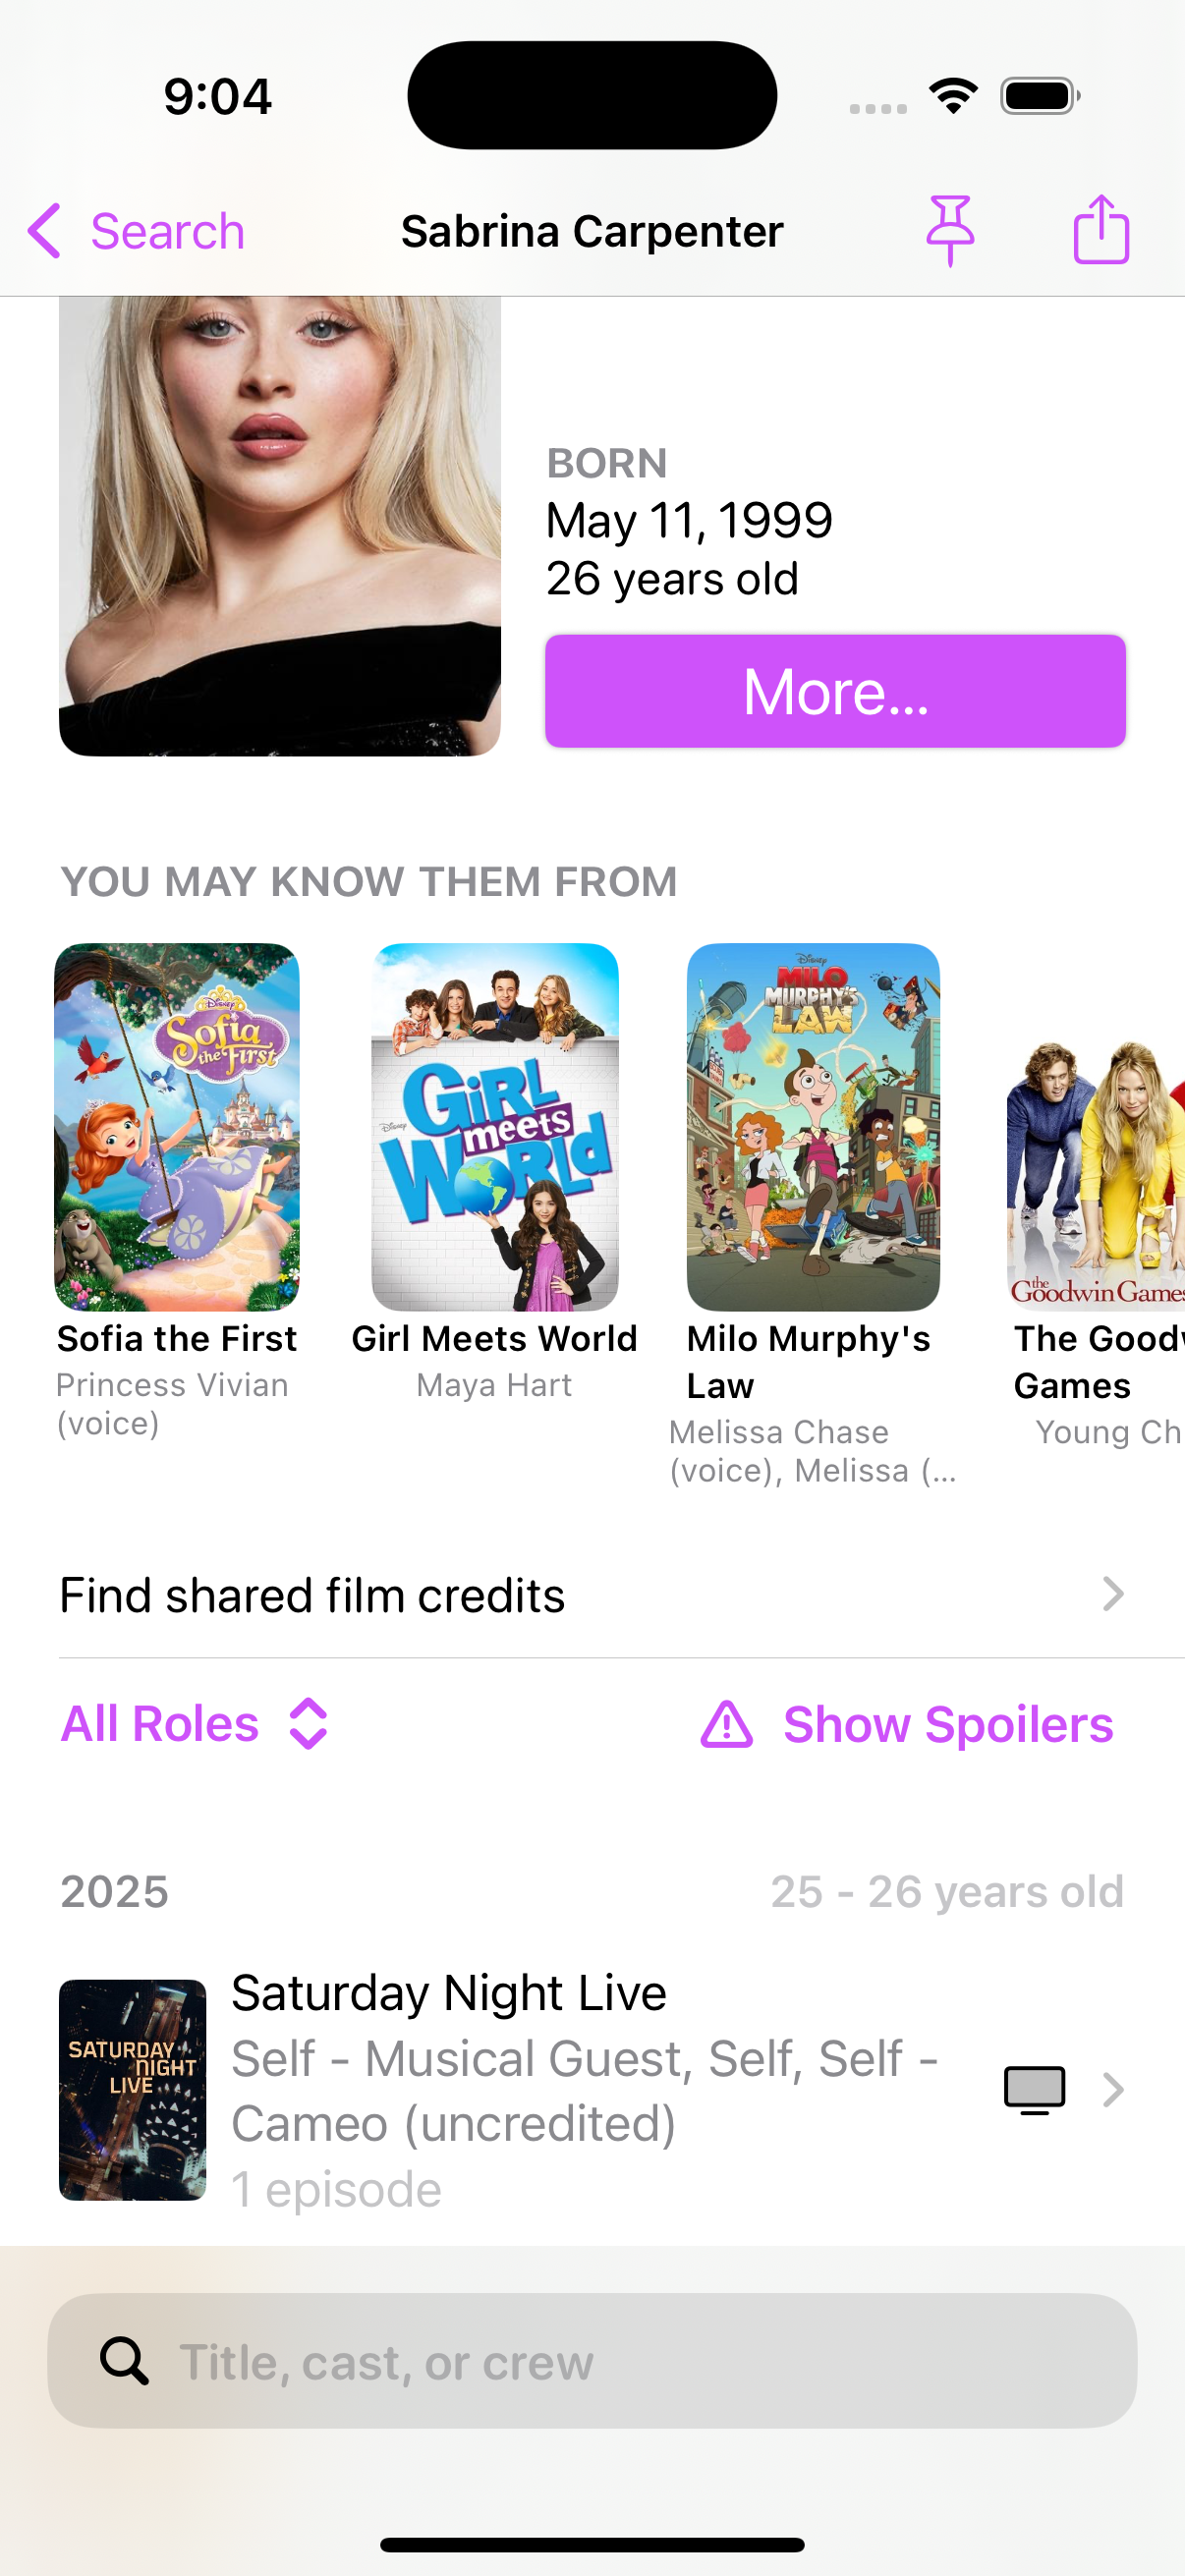
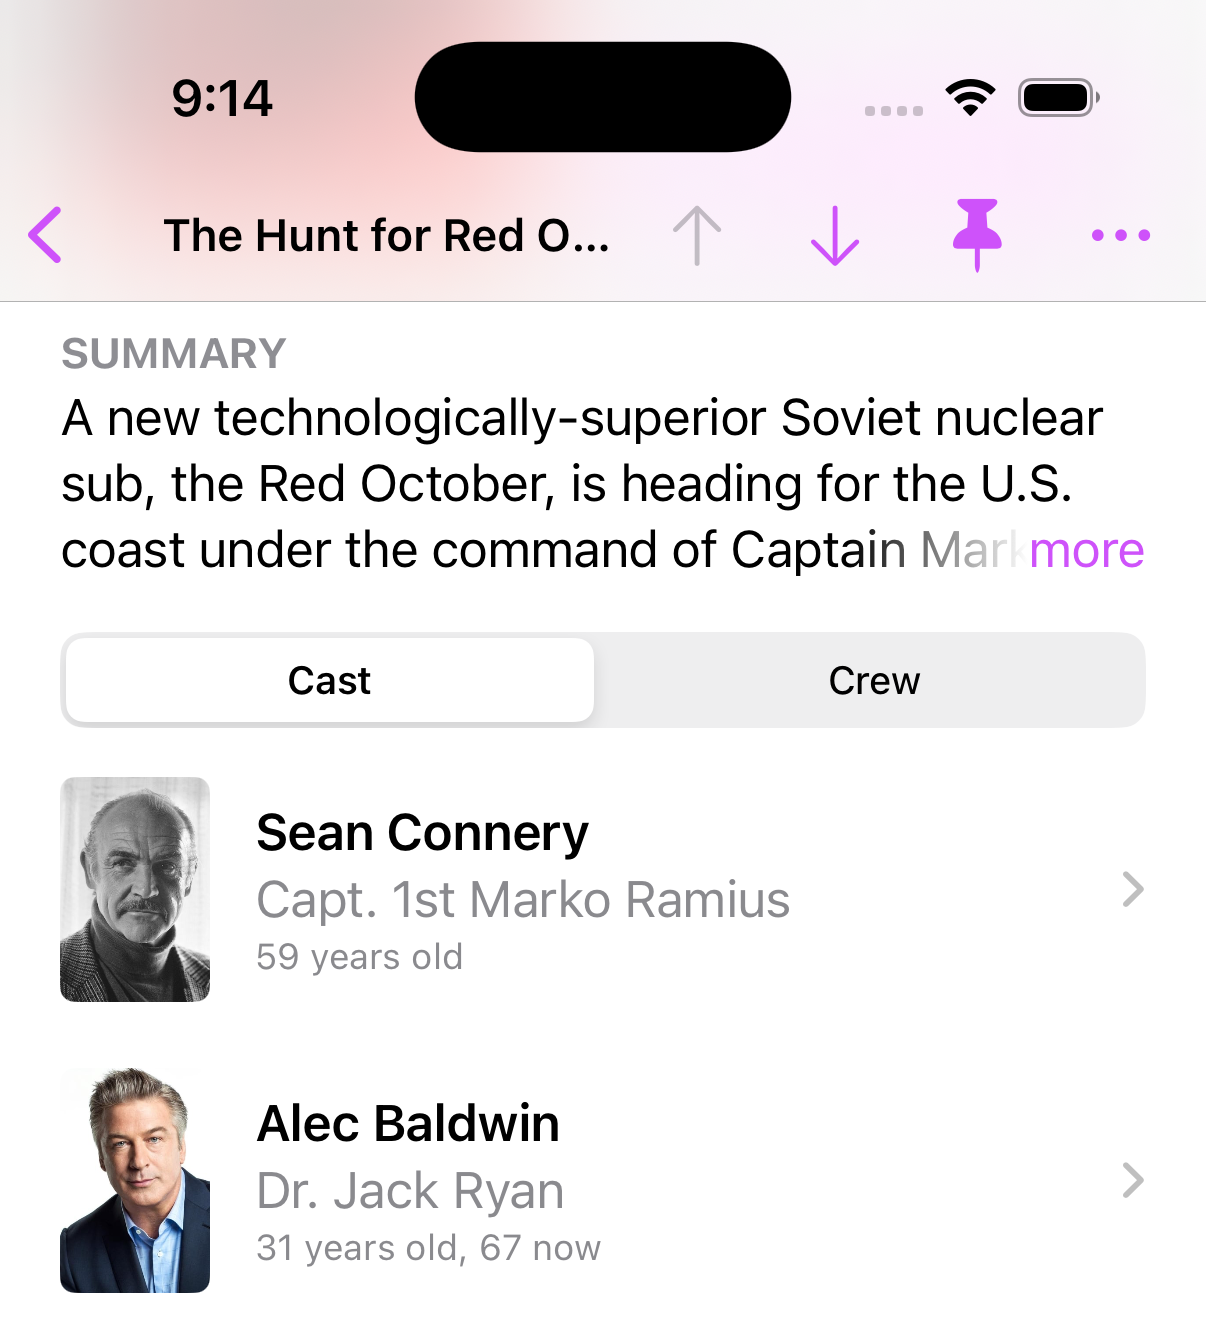
More Ages in Cast/Crew Lists
One of my favorite bug reports to get is when someone writes in to say something like:
Alec Baldwin is listed as 31 years old in The Hunt for Red October, but he’s quite a bit older now.
When I respond to say “that’s how old he was when the movie was released”, the inevitable “🤯” I get in return is always delightful.
However, it should be clearer, and now it is:
Highlights for Pinned People
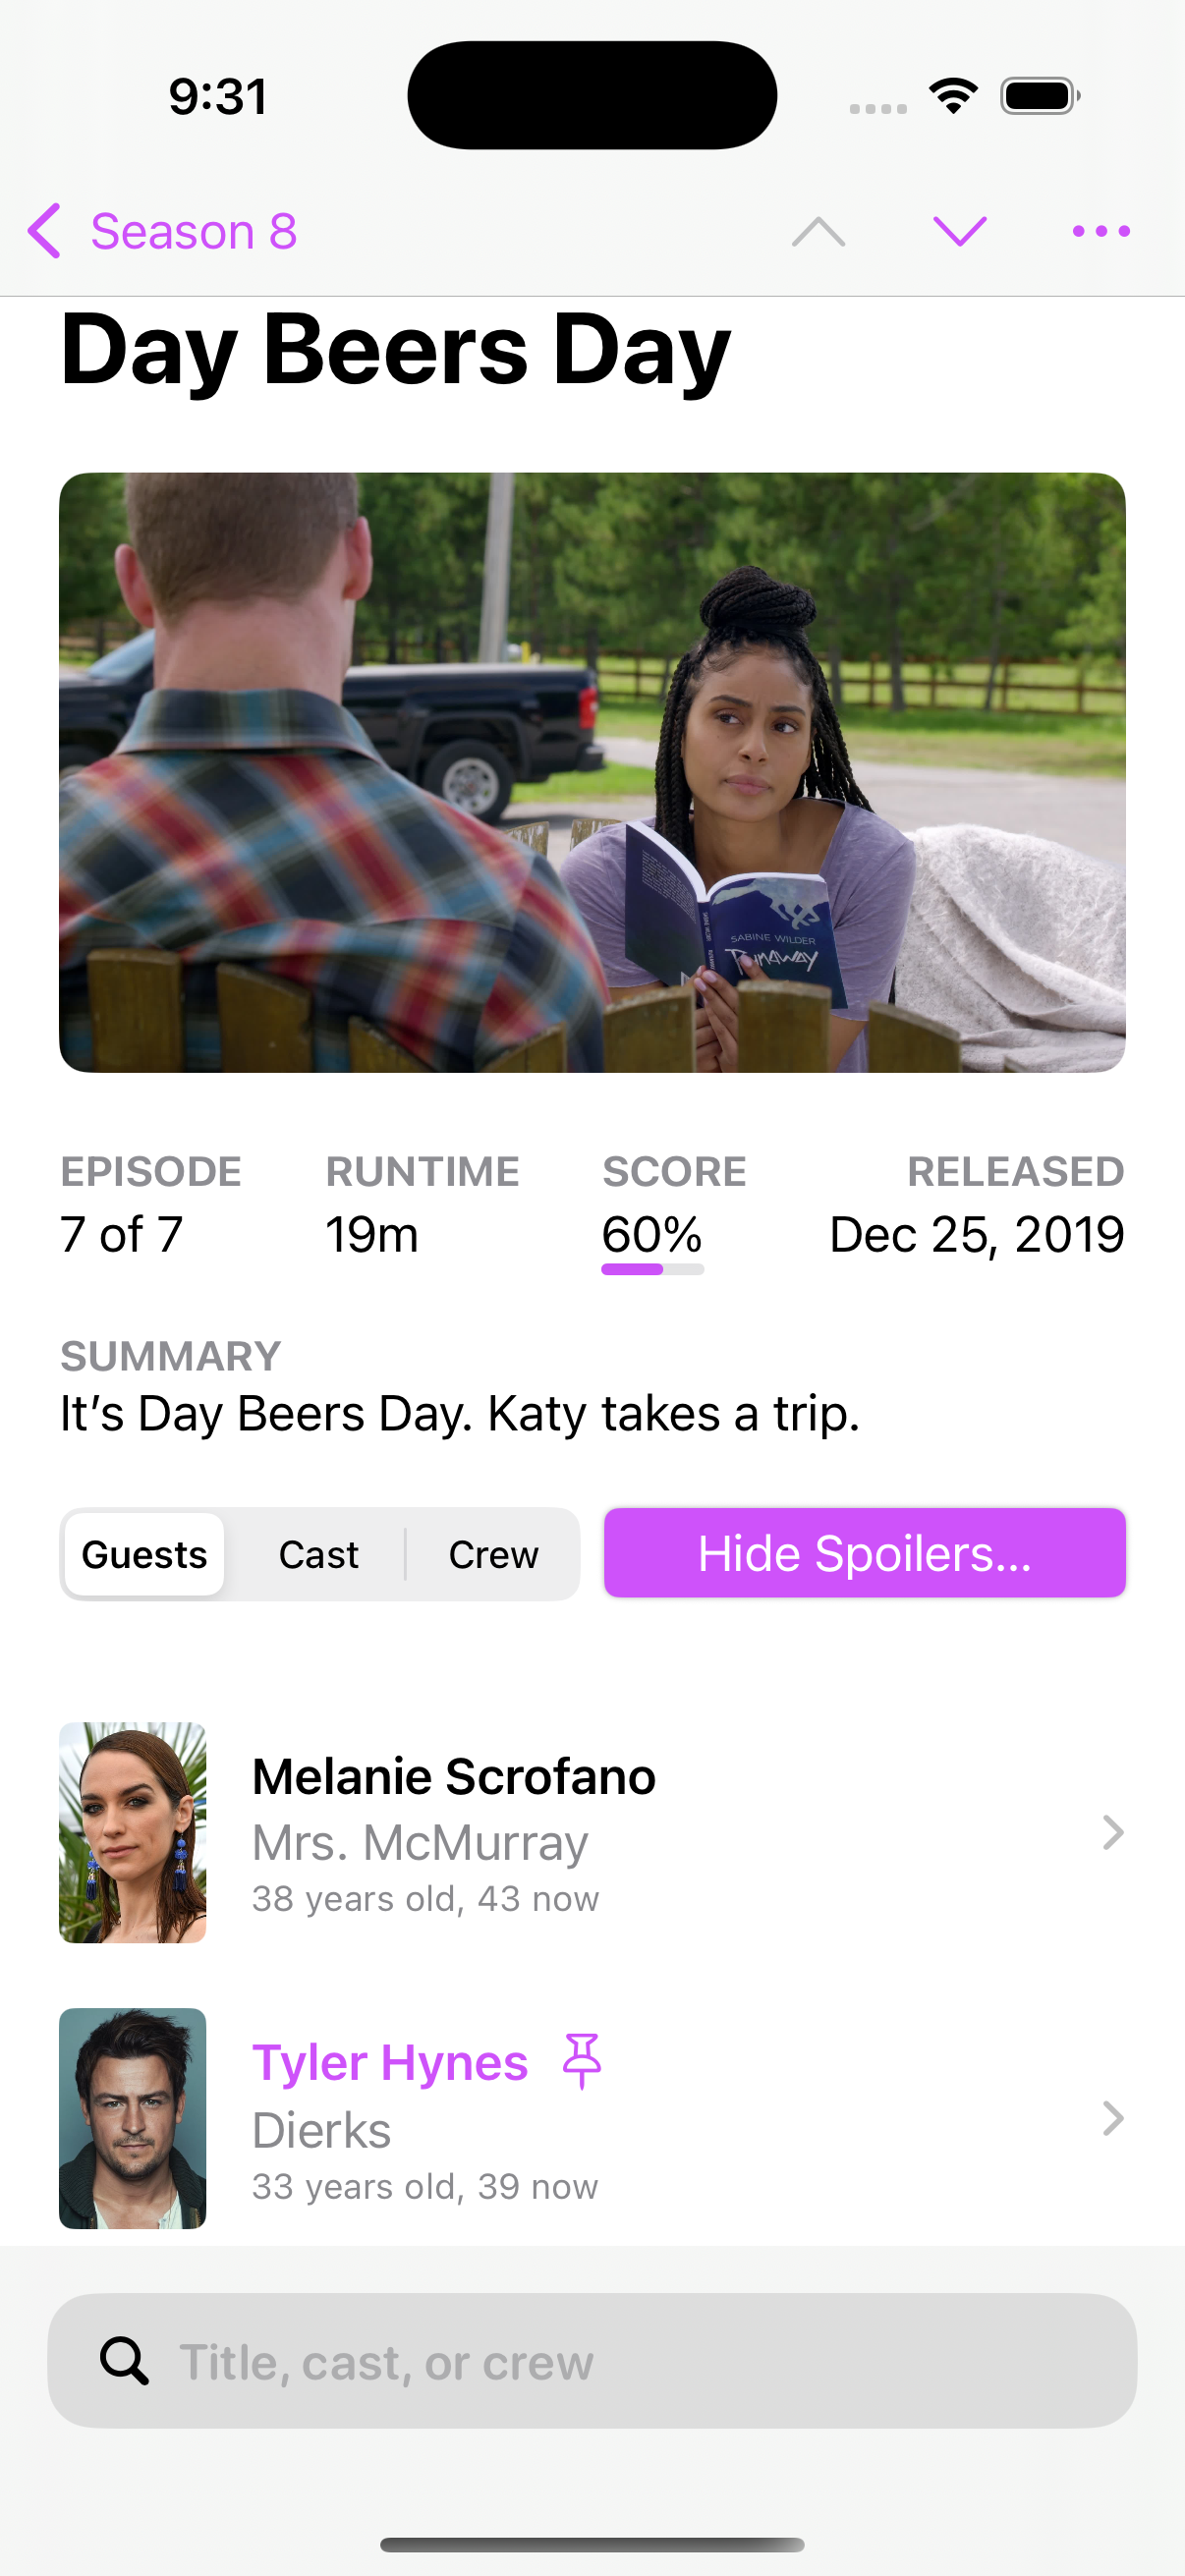
As you’re browsing around Callsheet, it should be smart enough to call attention to people that you’ve previously pinned. Now, Callsheet will do exactly that:
Beginnings (?) of Letterboxd Integration
I’m making 0️⃣ promises, but on the long-term roadmap is to integrate with Letterboxd. As a stop-gap, I’ve added Letterboxd as an optional Quick Link. Thus, you can also make this your Quick Access Link, if you so choose:
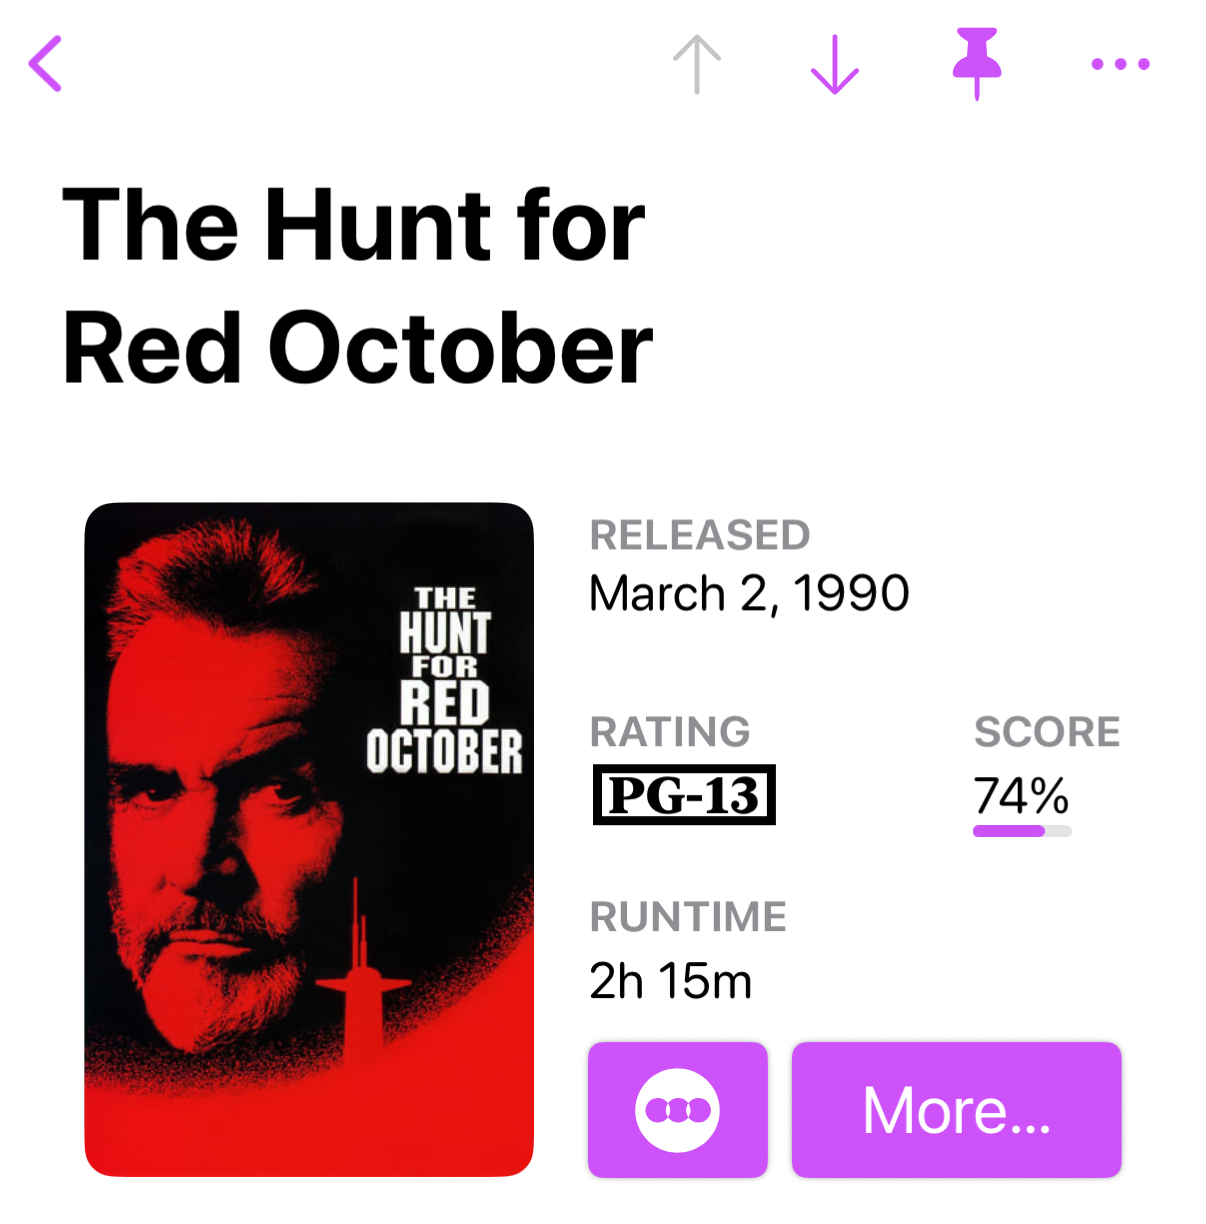
Please note that this link will only show for movies, and not TV shows nor people.
Select Available Links
With the addition of Letterboxd as a Quick Link, the list of possible links is
getting quite long. In the in-app Settings, you can now toggle links on or off.
Note that the Quick Access Link cannot be toggled off, until you switch the Quick
Access Link to a different link.
(There are a couple of minor visual glitches in the selection screen that will be fixed in the next version.)
Quick Hits & Bug Fixes
- Credit counts are now shown at the very bottom of a person’s filmography
- On macOS, tool tips have been added for Quick Links and the toolbar
- You can now paste TMDB or IMDB URLs into the Search box; once you hit
search, Callsheet will show the correct item - Fixed behavior for TV shows with non-contiguous season numbers
- Fixed share links from context menus not using universal links
- People’s “Known For” should now more heavily weight shows and movies you’ve pinned
- Actor heights are now back, where possible
- Searches will trim whitespace by default
- Fix a weird visual glitch where the fourth (and only fourth 🤨) person in a cast/crew list would have no image
- Fix visual glitch with the “Released” for TV episodes
- Now requires macOS 15.0
- German localization fixes
I tend to feel… strongly. That applies to most aspects in life, including when I find a company whose product(s) I really enjoy.
Those products tend to share common traits; they are often simple on the surface, but have surprising depth to them. They can mold themselves to fit my needs, but once that mold is set, they get out of my way. But more than anything else, they tend to be reliable. I fell in love with Apple because, back in the mid aughts, their products really did just work.
I think my appreciation for a product crosses the rubicon into love when it regularly and repeatedly demonstrates one trait: respect for the user.
Even an unreliable product can keep my trust, enthusiasm, and love, if I can tell that those who make it have a deep respect for me.
Many years ago, Eero sponsored my podcast. They were kind enough to send a three-pack of base stations, and I have not looked back. Eero was simple to use, but powerful enough for the needs of a superdork like myself. It largely remains so to this day.
However, a few years back, Eero fell victim to every corporation’s favorite thing: recurring revenue. Eero started quietly pushing Eero Plus, a subscription service that I was largely uninterested in.
Over the years, this has gotten more and more aggressive, and, annoyingly, more and more has been gated behind Eero Plus. I love that I can see totals for downloaded and uploaded data in the app, but every time I want to dig deeper, I see this upsell, and I grumble.

This is not respect for the user. This is enshittification. It’s a foot gun.
As I write these words, I still use Eero in my house. I still recommend it to most people. But instead of an unequivocal, no-caveats “get this”, my advice is now “get this if you’re not a power user”.
I plan to replace my Eero setup with Ubiquiti equipment later this year.
Sonos is the classic example of “once you experience it, there’s no going back”. I was able to buy some Sonos equipment at a steep discount, and I was woefully unsure if I had just wasted a still-considerable amount of my money.
Within the first 48 hours, I was a Sonos superfan, and started evangelizing their products to anyone who would listen. All it takes is walking a portable speaker from one end of the top story of my house, past the music playing in my office, past the music playing in the living room, past the music playing in the porch, to the backyard. Somehow — by ✨ magic ✨ — the music was perfectly synchronized the whole way. The speaker in my hands was perfectly synchronized with the office, the living room, and the porch. Incredible.
While that still remains true today, the Sonos app has been an utter disaster. Around this time last year, Sonos put their own needs over their users’, and foisted a completely-rewritten app upon their entire userbase. This app was (and remains!) deeply maligned. At this point, a year later, it’s usable, and I generally don’t have problems with it.
What was once an unequivocal recommendation to friends and family — “You should get a Sonos system; just tell me how much you want to spend” — has now become “well, I still recommend a Sonos system, but there’s some things you should know…”.
It didn’t have to be this way. This is not respect for the user. While I wouldn’t go so far as to say this is enshittification, I will say it’s 100% a footgun.
Indiana Lang said it extremely well:
We need systems that prioritize stability over flashy new interfaces, and functionality over form.
This week, the chickens that have been wandering around have come home to roost. Synology, of whom I’m such a fan that every time I bring them up on ATP, Marco hits a vibraslap for both humor and emphasis.
Synology were kind enough to send me a filled, 8-bay network attached storage device back in 2013. Within a couple months I was in love. Having infinite storage available really changes how you think about your digital life. While a Synology is not for most people, it’s 10000% for people like me. I would not and did not stop talking about them. I’ve personally sold countless number of Synology units by my enthusiasm alone.
This week, things finally changed, officially. Synology will be restricting features for those who do not use Synology-branded drives. Drives that are bog-standard enterprise hard drives, possibly with some custom firmware in them.
Why? For more revenue. Footgun.
I’m not sure if I was more of a fan of Synology or Sonos, but suffice it to say, I was a superfan of both. I just replaced my original Synology last year, and I’m sad to say that the one I just got is likely to be my last. While I love having a place to store files, run Docker containers, and handle Dropbox, I don’t want to be on this ride. I don’t want to reward their greed. I’m out.
Whenever this Synology dies, I’ll be replacing it with a UNAS Pro.
Synology have turned off so many of their most ardent evangelists. Just so they can sell some overpriced hard drives.
It doesn’t have to be this way, and we saw that earlier this year from Apple, of all people. The kings of margins; the kings of SeRvIcEs ReVeNuE.
Up until the recent release of the M4-powered MacBook Air, a simple question always had a difficult answer: “What computer should I buy?”.
The answer depended on what you were doing with it, how much you wanted to spend, how long you wanted to keep it, and more. Maybe it’s a MacBook Air. Maybe a MacBook Pro. And even if it is an Air, you should definitely upgrade the RAM, and possibly the SSD.
It was complicated.
Now, as of the $999 M4 MacBook Air? “Buy a M4 MacBook Air. Upgrade the RAM or SSD, in that order, if you have the means. But it’s okay if you don’t.”
Done.
The opposite of a footgun. A problem solved. Solved by respect for the customer.
Capitalism sucks, but it’s the system we have, and I don’t know a better one. But as a small-time capitalist myself, I keep wondering why Callsheet has been so well-received in the market. A lot of it is luck, but I think it boils down to two simple facts:
- IMDB does not respect its users, which it demonstrates in new and fantastic ways every time you use it
- Callsheet does.
I endeavor to keep it that way, for as long as y’all will let me.