Callsheet — my app that’s like IMDB but for people with taste — uses iCloud for several things, notably, storing your “pinned items”. Internally, I call pinned items “favorites”, so in this post I’ll refer to them interchangably. Regardless, today, there’s only one list of pinned items.
My most-requested feature is to add support for multiple lists. Generally, so people can have things like To Watch, Watching, and Did Watch. Naturally, your particular needs may differ, but this request is common… and constant.
Due mostly to life obligations (all is well), but also my fear of how much work this will be, I’ve been kicking this can down the road for a while now. (See also: compliance to Swift 6’s strict concurrency). This week, I’ve started to really dig in.
Today I hit a wall, and I’m too tired and exasperated to do a long and involved write-up with pictures and stuff. The short-short version is:
Make sure you add indexes before adding data that you need to query that relies on those indexes; if you don’t, they may not work as expected.
When tackling multiple lists of pins, the first thing I did was to add a
new record type (“table”, sorta-kinda) called FavoriteList, which is peer
to the pre-existing Favorite. Then I added a new field (“column”,
sorta-kinda) to Favorite that contains a CKRecord.Reference
to the favorite/pin’s parent list.
Once I got the schema updated in development, I started writing code. Thanks
to some genuinely (and uncharacteristically for Apple) helpful sample code,
I was able to put something together quickly. However, it didn’t work. Thanks
to some genuinely (and uncharacteristically for Apple) helpful error messaging,
I quickly realized I needed to add an index to Favorite; specifically for
this new reference field I added.
I added the compulsory indexes, and then went back to writing code.
Quickly, I was flummoxed; things still weren’t working. Now, for a different
reason: in trying to get favorites that are part of a given list, I was coming
up short. No matter what I tried, no records were being returned. When I looked
at the records in the iCloud Developer Dashboard, it appeared everything was
good. I could click from the field in Favorite and it would load the list
in FavoriteList. But whenever I tried to query using my code, it wouldn’t
work. I would come up with no records.
In chatting with some incredibly kind folks on Slack, one of them asked me to try to replicate the query I was doing in code on the Developer Dashboard. I got the same empty results. This was a critical tip, because it led me to believe that my own code was not — for once — the issue.
After a couple hours of this, and in desperation, I deleted all my existing
Favorite and added new ones. I tried my queries again, and they worked no
sweat. Both on the dashboard and in my code.

Thinking about this some more, and in chatting with the good samaritans on Slack, we all came to the same conclusion: the index probably didn’t properly… uh… index… whatever data was already there before the index was created.
So, if you’re ever in a situation where you’re getting wonky results (or no results at all) from a new field in CloudKit, consider whether the data you’ve added was done so before or after you added the corresponding index.
Apple folks, FB15563372.
Since we last spoke about Tailscale, my post was linked by Tailscale themselves, and I’m pleased to report Tailscale has sponsored one of my podcasts a couple times.
With that in mind, I want to make it clear that they do not know I’m writing this post, and have not requested anything of me with regard to my website.
I just cleanly solved a weird problem that’s been nagging me for a very long time, and thanks to Tailscale, I was able to do so quite easily. I thought it was a great case study in what makes Tailscale so amazing.
The Issue
My parents have a network attached storage that they use for, among other things, recording security cameras locally. As such, they will occasionally access it remotely, and thus having a SSL certificate is pretty much required these days.
Thankfully, Synology makes it easy to request a Let’s Encrypt certificate. However, to do so requires you to have the router forward ports 80 and 443 to the Synology. Generally speaking, I do not want those ports forwarded anywhere, so I only turn on those forwards when renewal time comes around.
Messing about with their in-home router is not easily accomplished from my house, 45 minutes away from theirs. Furthermore, Let’s Encrypt certificates have to be refreshed every 90 days, so this dance happens quarterly.
The Complication
My predicament is complicated by my parents’ oddball ISP-issued router refusing to respond to network requests coming from outside the network. Even over a traditional VPN hosted in their house, the router would not respond to requests from my house. This very well could have been user error, but that was what I experienced.
I needed a way to have packets from my computer appear to be originating on my parents’ network.
Solution #1
My first solution to this was to host a docker container that basically exposed Firefox via the web. Yo dogg, I heard you like web browsers in your web browsers. So, the process was:
- Get on the VPN hosted at my folks’
- Get on the Firefox docker image via
http://192.168.1.x - Make the port forwarding changes to their router
- Request a certificate renewal on their Synology
- Undo the port forwarding changes
This worked just fine, but it was… involved.
Enter Tailscale
Tailscale is many many different features, all rolled into one product. A core tenet of Tailscale is that you should be able to migrate to Tailscale incrementally; you shouldn’t have to go all-in from the get-go. Tailscale has some features that help facilitate incremental adoption.
One of these features is Subnet routers; they are summarized quite well in the Tailscale documentation:
In cases [where you can’t install Tailscale on every device], you can set up a subnet router to access these devices from your Tailscale network (known as a tailnet). Subnet routers act as a gateway, relaying traffic from your tailnet to a physical subnet.
In short, if you have a subnet router, you can route
local network → tailnet → subnet router → remote network
So, in principle, I could enter my parents’ router’s IP address into my browser, and it will load.
A New Complication
The way subnet routers typically work is that they effectively bridge two networks
together. My parents’ network is 192.168.1.x; mine is 192.168.17.x. On the
surface, this seems fine, but so many networks are 192.168.1.x. I suspect
there will come a time one of my portable devices is on a 192.168.1.x network,
and I may want to reach local devices on that network. By default, a basic
subnet router will intercept all requests to 192.168.1.x and try to serve them
via my parents’ network. That could easily make things wonky, and lead to
my devices not being able to reach local peers.
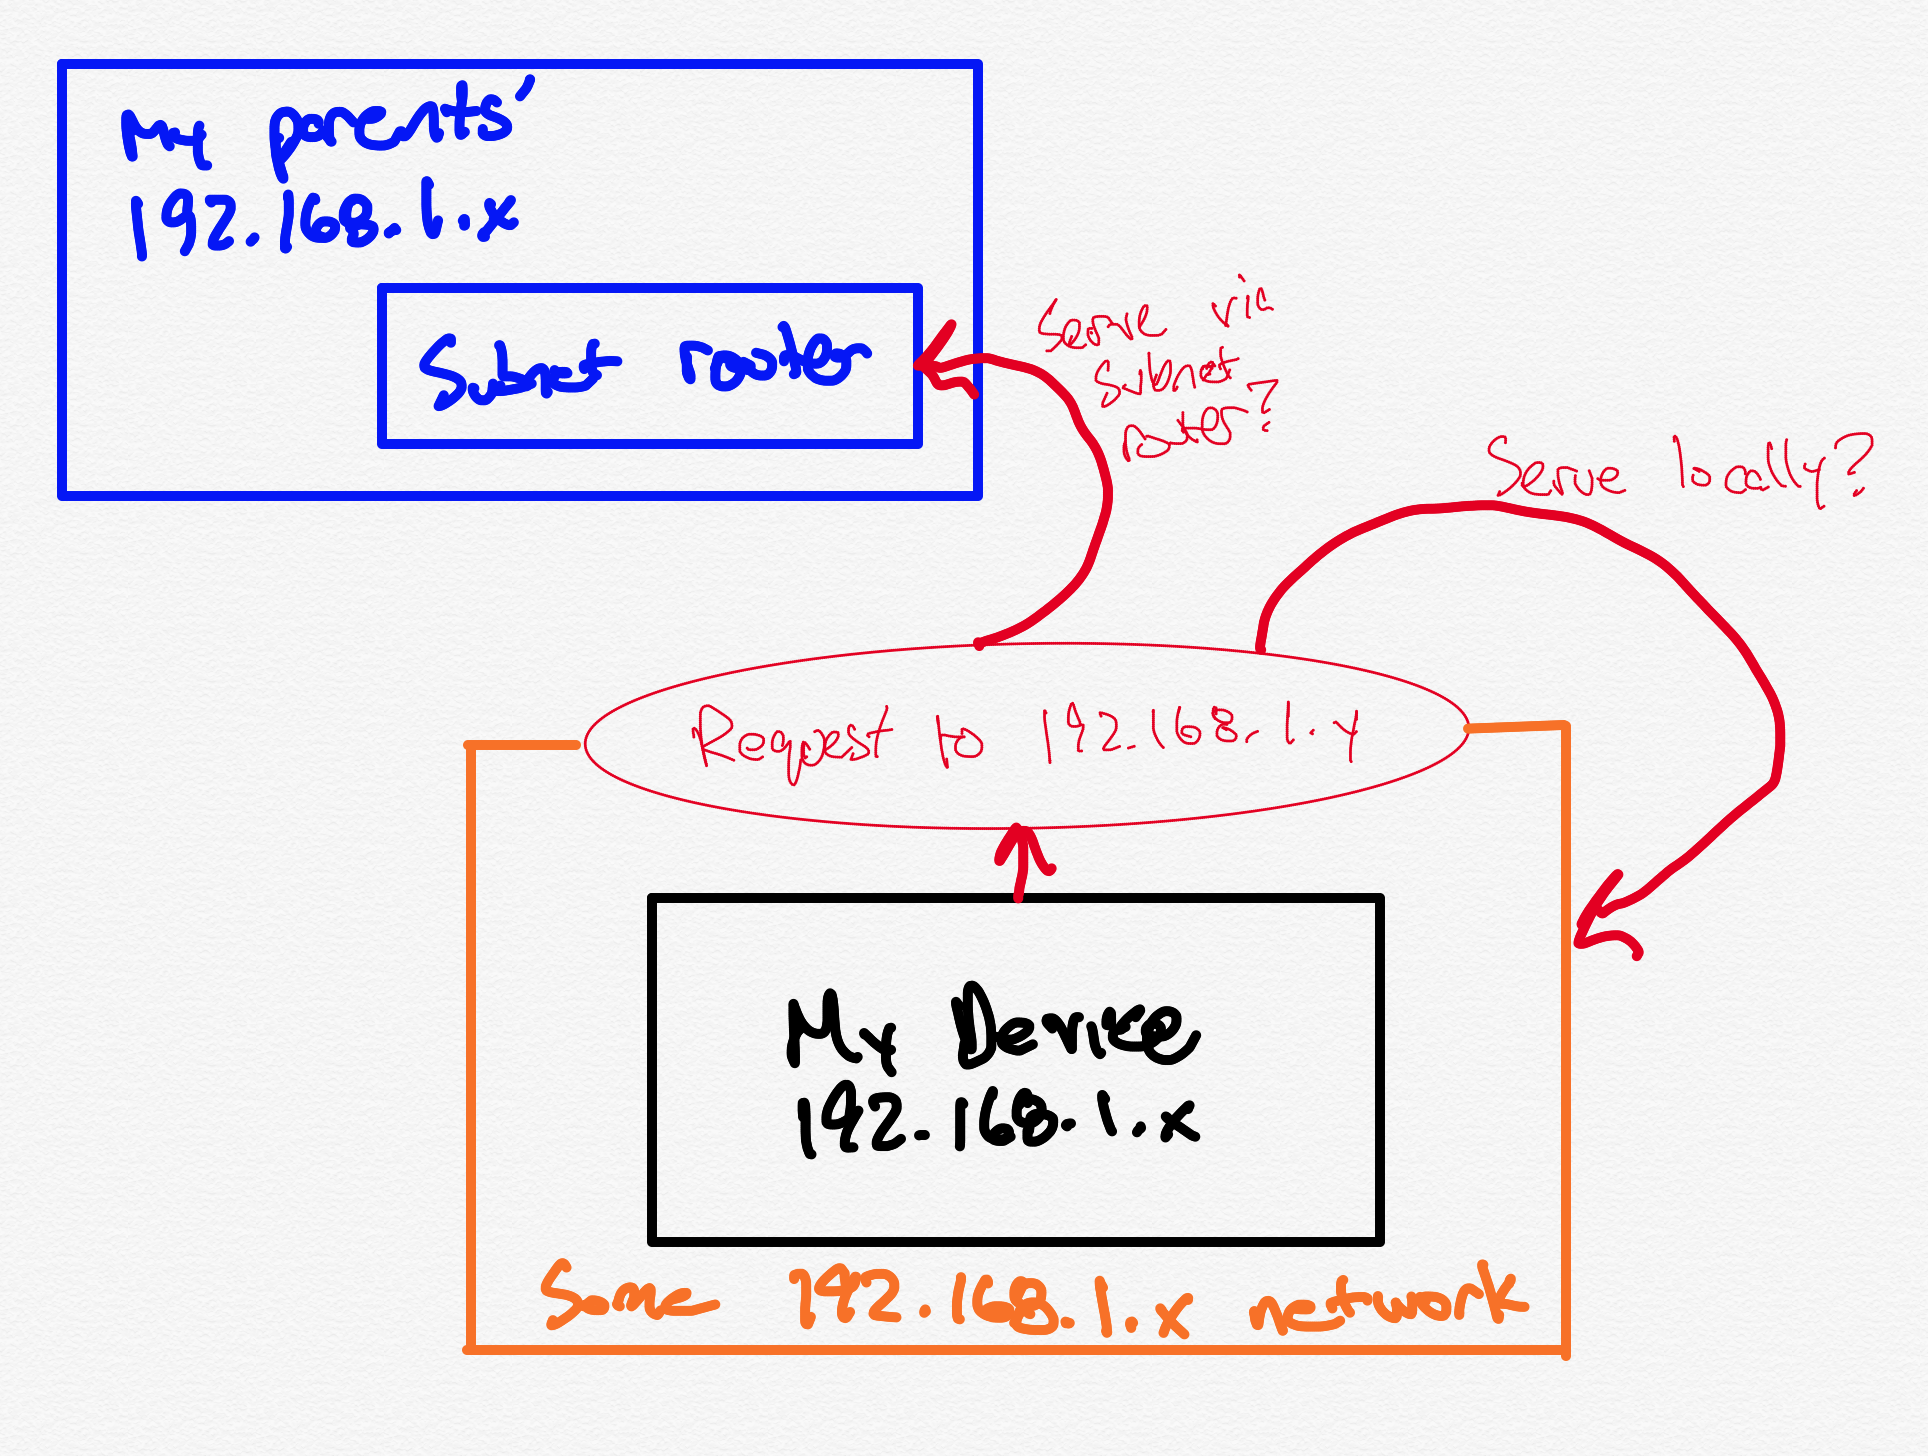
I’d like my parents’ network to stay… at my parents’ house. I’d just like to be able to peek into it for the purposes of tweaking their router’s settings every now and again.
A New Solution
Tailscale has another trick up its sleeve that I realized would be a perfect fit for this scenario. Tailscale offers “4via6” subnet routers. It occurred to me recently that this is the fix I’ve been looking for.
Tailscale’s problem statement is this:
In a large network, you may have existing subnets with overlapping IPv4 addresses. If there are two entirely separate virtual private clouds (VPCs) using the identical set of IPs […]
That’s the scenario I’m worried about: I’m on a 192.168.1.x network, but my
parents have already “claimed” the 192.168.1.x address space.
4via6 routers solve this by:
The 4via6 (“4 via 6”) subnet router feature provides an unambiguous, unique IPv6 address for each overlapping subnet, so a Tailscale node’s traffic is routed to the correct device.
In short, I told the subnet router at my parents’ “I’d like you to expose this [otherwise internal] network on the tailnet only as IPv6”. That means all the IPv4 addresses in my parents’ house are exposed using a special IPv6 address:
fd7a:115c:a1e0:b1a:0:XXXX:YYYY:YYYY
Where:
fd7a:115c:a1e0:b1a:0= a special Tailscale prefix to indicate 4via6XXXX= the identifier for the target subnetYYYY= the IPv4 address represented in hex
So, if I’ve designated my parents’ house as 123 (which is 7b in hex), then
192.168.1.1 would be:
fd7a:115c:a1e0:b1a:0:7b:c0a8:101
Progress! However, an IPv6 address is not particularly memorable, which kinda stinks.
MagicDNS
Tailscale also offers “MagicDNS”, which does many things, but it will also convert/resolve specially formed hostnames into the appropriate IPv6 addresses.
So, if my tailnet name is smiley-tiger.ts.net, then I can open my parents’
router’s configuration page by entering this URL into a browser on my computer:
http://192-168-1-1-via-123.smiley-tiger.ts.net/
That will automatically get resolved by MagicDNS to
http://fd7a:115c:a1e0:b1a:0:7b:c0a8:101
…which in turn lets me log into my parents’ router remotely, anytime, without any fiddling nor Docker containers required.
I can do this no matter what network my computer is on, as long as my subnet router at my parents’ is also on. Tailscale connects everything together.
It’s ✨ Magic ✨
This is what makes Tailscale so great — once you can connect your devices together, it opens a world of possibilities. Those possibilities easily extend to the devices on your tailnet, but they can extend to devices beyond your tailnet, with just a little bit of work.
Seriously, Tailscale is so great; you really should try it.
At some point, I should probably look into automating some (all?) of this certificate renewal process, but for right now, I’m happy to bask in the work being far quicker and easier than it’s ever been before.
Just under a week ago, on this past Friday, I played a part in raising over $130,000 for St. Jude Children’s Research Hospital.
On the nearly 12-hour livestream, we participated in a series of ridiculous
hijinks. We smashed a ridiculous “gaming” PC. We played Jenga. We ran two Relay
relay races. I sat in on an episode of Robot or Not. A champion
was crowned belted for one of our co-founders. Fun was had.
But more than anything else, money was raised.
I’ve discussed St. Jude before here on my blog, and everything I said then remains true today. St. Jude is a collection of amazing humans, whose singular goal is beyond reproach:
No child should die in the dawn of life.
Compared to the awe-inspiring work that the St. Jude staff does, our intense but short-lived twelve hour marathon was… well… nothing. But it makes my heart incredibly happy to try to raise money for such a worthwhile organization.
During my time at St. Jude last week, I got to sit in on a presentation by three St. Jude doctors, each discussing some of the work that they’ve done at St. Jude. Some of the quotes from these doctors are really incredible:
I wasn’t happy because [a six-year treatment] took too long
We’re not happy with a 75% success rate
We’re curing kids at a price; [how can we make treatment gentler]?
We’ve proved [a revolutionary new treatment] can work; now we need to make it work
We’re [working to] end the diagnostic odyssey
It’s not just the clinicians and researchers at St. Jude making a difference, though. There was an entire army of ALSAC employees working tirelessly behind the scenes to make the Podcastathon run without a hitch. To everyone we worked with, but especially Jill, Jolie, and Ricky, your efforts are noticed, and they’re appreciated. 💙
I’m so honored I was asked to participate this year, and I’m doubly pleased that we figured out a way to rope Erin into the festivities. 🥰 It is a rare privilege to be able to do something that is so noble, and also have fun doing it. It’s a double bonus to be able to do all this with some of your closest friends.
As I write this, it’s still September, which means Relay’s campaign is still live. If you have even a couple dollars extra, I strongly encourage you to throw them St. Jude’s way.
Let’s cure childhood cancer… together.
Over the summer this year, developer Nolen Royalty made a website that was One Million Checkboxes. The idea was that there were a million checkboxes on the page, and if someeone changed the state of a box, it was changed for everyone.
The site got picked up pretty quickly on several mainstream media outlets, which led to an interesting exercise in urgent optimization. However, the thing that really made me smile — a lot — was a story about a bunch of intrepid teens.
You can read the story, or spend a little under ten minutes to watch Nolen tell it. Either way, I don’t want to spoil it, because it’s such a great journey.
In the last month or so, I had the pleasure of guesting on two different podcasts.
First, on 7 August, I filled in for my good friend Lex Friedman on his daily podcast, Your Daily Lex, episode #780. It was an absolute pleasure making fun of his crappy football team on an episode his own podcast. Sorry, not sorry. Go Giants!
Today, I joined Dan Moren, Mikah Sargent, and Karrisa Bell on Clockwise. On this episode, we discussed how we purchase/read ebooks, what pet-related technology we use, our favorite iPhone accessibility features, and what tech features we’d implement/fix if we had the magic to do so.
Callsheet launched just shy of a year ago, which means that annual subscribers are going to be getting renewal emails soon, if not already. Callsheet has exceeded my wildest dreams — it is a multi-award winning app, having collected both an Upgradie and an App Store Editor’s Choice award. The feedback from users has been extraordinary, and I’m so thankful for the praise it’s received. 🥹
Over the last year, I’ve added a ton of new features, and made a bunch of improvements. Some favorites include Plex and Channels integration, native visionOS support, search within lists, as well as quietly launching “cast union search” — the ability to see what movies two actors both appeared in.
So, when the Apple renewal email rolls in, I’d really love it if you’d promptly ignore it, and let your subscription continue. 😏 Callsheet has been a highlight of my career, and I have vast plans for year two — starting with vast improvements to the pinning system. 🫣
For the record, here’s what your $9, or local equivalent, has gotten you this year:
2024.2
- Support season-level cast for ensemble shows like Fargo, True Detective, etc. You can see this in an episode’s cast list.
- Attempt to prevent spoilers from showing while data/images are loaded
- Account for spoiler settings in “You may know them from” section
- Add shortcut in search to load by TMDB ID: “tmdb[m|s|p]:#”. For example, “tmdbm:1669” will jump you directly to The Hunt for Red October. Use ‘s’ for shows and ‘p’ for people
- Fix an issue (that most of you probably didn’t see) wherein character names were always hidden on episode cast lists
- Fix a rare issue where a TV show had a Specials season, but it wasn’t being displayed
- Fix issue where using the search URL scheme wouldn’t work when the app is not already in memory (It would previously ignore your search if the app wasn’t backgrounded).
- Fix icon selector not showing the correct state in some circumstances
- Fix hang in “More Purchase Options” screen when reached via Search History
- Fix issue where releases without associated ratings were being ignored, leading to incorrect release dates
- Add debug logging around language/region overrides and iCloud status
- Update to latest version of TelemetryDeck package
- Use native SwiftUI review requests rather than dropping down to UIKit
2024.3
- Fix broken segmented control on TV episode view when using larger font sizes
- Fix episode counts not being summed for actors that have multiple roles on the same show
- Fix ages being shown in movie/episode details even if “Show Ages” was disabled in Persnickety Preferences
2024.4
- You can now pull-down-to-search on movies, TV shows, and TV episodes! This is far and away the most frequent request I get. Now it’s there!
- When you share a person/movie/show/season/episode, you’ll now be presented with a menu, offering to share a web link, or a Callsheet link. The latter is super useful for sending to other Callsheet users.
2024.5
- The same pull-down-to-search on movies from TV shows, and TV episodes in the last version is now added to people as well!
- Fixes an issue where up/down chevrons for TV episodes weren’t refreshing the cast/crew lists
- When you do a pull-down-to-search, the app will scroll to the cast list automatically; this is particularly useful for regular-sized phones
- Fixes an issue where the Cast/Crew label was tappable if a person has only cast or only crew credits
- Pins will now be hidden if you don’t have any AND you’ve searched 10+ times, or, now, if it’s been at least a week since you’ve purchased
2024.6
- Fixes an issue with the layout/behavior or spoiler settings
2024.7
- Add heights to actor screen, where possible. Not every actor will have their height listed, but many will.
- The units are specified by your phone’s settings. Within the Settings app:
General→Language & Region→Measurement System - However, to see the alternative unit, simply tap the actor’s height. If the height shown is in feet/inches, the popover will show centimeters, and vice/versa.
2024.8
- Now available on visionOS! If you’re subscribed to this version, you’ll automatically be subscribed on visionOS once you download the app there. (Note that in visionOS the icon is different!)
- Now requires iOS 17.0
- Attempt to show buttons for all quick access links rather than one and the More… button. This is most visible on People and on everything on iPadOS
2024.9
- Slightly change the default icon. The original is available in the in-app
Settings→Persnickety Preferences→App Icon. - Hide search box when an image is zoomed in
- Some refinements to the TV season carousel: when a show has only one season, the larger button is used — the same as multiple-season shows; when a show has more than 10 seasons, the dates of those seasons are now shown.
- When you scroll laterally in the main/Discover screen, and then drill into a movie/show, and then return to Discover, it should remember[-ish] your scroll position.
- When you are in an episode view and switch between Guests/Cast/Crew, and then drill into a person, and then return to the episode, your prior G/C/C selection is no longer ignored
- Tapping an item in Search History will move it to the top of the list.
- Fix edge case where, if an actor was in a show and movie with the same ID number, only one would show on their filmography. In this case, Bruce Willis, Die Hard, and The Ellen Degeneres Show
- Fix some small layout issues, mostly in iPad
2024.10
- Movie/show titles will show in the language you specify in Language Override, or your device’s native language, whenever possible.
- To see titles in a movie/show’s original language, tap the title when looking at the details of that item.
- If you tap on a movie or TV show’s rating, a popover will show the genres for that movie/show
- Small accessibility improvement for TV ratings
- Performance improvements for movies & shows
- Add ugly in-app log viewer; you can see it by opening callsheet://logs in Safari
- Fix presentation for instances where a popover element on visionOS is used but there isn’t actually a popover. Say, a movie or show that has ratings but no genres.
2024.11
- You can now search for films that two people worked on together. Tap the “Find shared film credits” on a person’s details. Note this only works for films and not shows.
- Add Pride & Trans icon sets (see Persnickety Preferences)
- Loading people was slow due to the request that tries to load a person’s height. That’s now been separated out, so the view should load far faster.
- Rejigger purchase detection in order to add lots more logging and also be more forgiving.
- Add context menus for zoomed-in posters & profile photos
- Fix issue where some bad data coming back from a search result would cause all results to be ignored
- Fix issue with TV episode titles not updating when using the up/down chevrons
2024.12
- Localize for Dutch, French, German, Hebrew, Italian, Norwegian, Polish, Portuguese, Russian, Spanish, Swedish, Ukrainian
- New dark-themed OG icons
- Add ↑ ↓ buttons to page through movies that are part of a collection/series. (Say, the nine Star Wars movies)
- Add spoiler prevention option for summaries, as some of them have no chill. (Looking at you, Handmaid’s Tale season 5)
- Slightly rearrange Settings & add a link to set the app’s language (shown only if you have more than one language enabled on your device)
- Fix Spoiler Settings insta-closing the first time you open it
- Fix weird kerning issue in Spoiler Settings
- Some improved logging around subscription verification so I can see if me blaming StoreKit2 is justified or not 😇
Not a bad deal for $9.
In the last week or so, my pals Jelly and Ste have posted about their small but very important roles in the creation of Callsheet.
First, Jelly writes:
I was listening to Accidental Tech Podcast one day, and my good mate Casey Liss was chatting away about his upcoming app, Flookup. […] So I found myself opening up Sketch and getting to work. Could I make an icon before the episode was done?
Jelly’s post also outs my piss-poor rendition of the icon that he ended up making so very pretty.
Next, Ste writes:
Fast forward to the WWDC keynote in early June, where they briefly discussed the Vision Pro. At one point, they flashed a large set of app icons on the screen. […] An icon that I created appeared (if ever so briefly) in the WWDC keynote. Achievement unlocked!
Callsheet would look — and feel — very different without the efforts of these two incredible friends. 🥰
Today, the folks over at Sketch — the incredible design/prototyping platform that is the industry-standard — published an interview with myself and design guru Ben McCarthy.
Freddie asked some really great questions, which had me revisiting some of the decisions that I made — as well as ones Ben and I made together — while Callsheet was being built. This led to some fun realizations, like me distilling what makes indie software development so great:
It’s stuff like this that I think makes all indie software so fun — I doubt you’ll see an actor’s height front-and-center on IMDb, but I can make the choice to do it in Callsheet and have nobody to stop me.
Appearing on Sketch’s blog is an immense honor. It was Ben’s designs that got us there, but I like to think it was my execution that sealed the deal. I’m so pleased and proud that our work was featured there, and so thankful to Ben for helping me make Callsheet quite a bit better.
If you want help making your app that much better, Ben is available for design consulting!
During the pandemic, everyone seemed to come up with something wasteful
dumb frivolous to spend time on. For a ton of people, it was sourdough.
For me, it was an extraordinarily convoluted garage door alert system. To
each their own.
Growing up, my dad always had a project — no once-in-a-hundred-years pandemic required. As a former professional mechanic, that project was often a car. But he went through phases: an audiophile’s stereo system, refurbishing pinball machines, an absolute obsession over his diet, wiring the house for ethernet in the mid-90s, and so on.
I think my acorn didn’t fall far from the tree. While I don’t need a project in the same way he does, I do find myself working on something silly from time to time. Often with a dedication that is borderline obsessive.
This year, that project has been the Tailgate Tub™.
Well over a decade ago, I decided to get my wife Erin (and me) season tickets
to UVA football. The UVA campus grounds are about an hour from
home, which makes a day trip for a football game far easier than it is for
my alma mater. I thought we’d do it for the year, and that would be that.
As it turns out, we’ve been season ticket holders for over ten years now. Oops.
Over the years, our tailgates have changed considerably. Led by our dear friend Brian, our beginnings were humble. A folding table, an orange and blue Jambox, and some food. Shortly, Brian got a grill, and his ability to cook in a parking lot progressed from basics to genuinely impressive fare. Several years back, Brian decided to really up our game, and we transitioned from amateur level to professional: he bought a generator. His generator, and our TV, and suddenly this tailgate became pretty serious business.
For several years, the combination of the TV and an over-the-air antenna were more than enough. Eventually, particularly after a long stretch of noon games, we realized we wanted to be able to watch things that weren’t carried over-the-air; most especially, ESPN.
Last year, thanks in part to our desire for access to more TV channels, the tailgate got a bit out of control. Really, it’s all Quinn’s fault. But I’m getting ahead of myself.
After realizing we’d really prefer to have access to the whole of cable TV, it occurred to me that this is actually quite workable. At home, we watch TV using the incredible Channels app. Channels works in concert with my HDHomeRun to replace my cable box with an app. An app that works on my Apple TV, iPhone, and [cellular] iPad. In combination with a hilariously expensive dongle, we could watch our home’s cable on the tailgate TV, via the iPad or iPhone.
But we also need music.
Yes, we could just use a bluetooth speaker, but that’s not as refined as it could be. And further, it requires someone’s phone to play the music. And drain its battery. Isn’t there a better way?
Enter Quinn Nelson. This video of his absolutely incepted me, and within minutes of finishing it, I had a travel router on order. This travel router is capable of slurping up internet from ethernet, as you’d expect, but it can also rebroadcast a wireless connection (useful for hotels), or tether to an iPhone/iPad/MiFi and share that connection. It occurred to me that if I set the travel router to have the same SSID and password as home, all my devices would think they’re at home and be completely content. Including my Sonos Move. Thus, it can handle music playback entirely on its own, no phone involved. Solid.
But wait — there’s more! If I already have a travel router at our tailgate, that means I have Wi-Fi and ethernet available for use. That means that it’d be trivial to add an Apple TV to the mix. Which would have the advantage of letting me change the channel via remote control, rather than having to get up and tap around on the iPad or iPhone connected to the TV. Win/win.
So, as of the end of 2023, our tailgate now includes the following:
- Generator
- Television
- Travel router
- Apple TV
- Sonos Move
This is pretty great, but it’s a lot of cabling. Cabling that needs to get set up and torn down every time we’re at a tailgate.
Could we do better?
Yes. We can do better.
During this off-season, I self-assigned a new project: The Tailgate Tub™.
It seemed to me that the connections are consistent each week:
- Router ↔ iPhone (or iPad) for internet[1]
- Router ↔ AppleTV via ethernet
- Power → router
- Power → AppleTV
- Power → TV
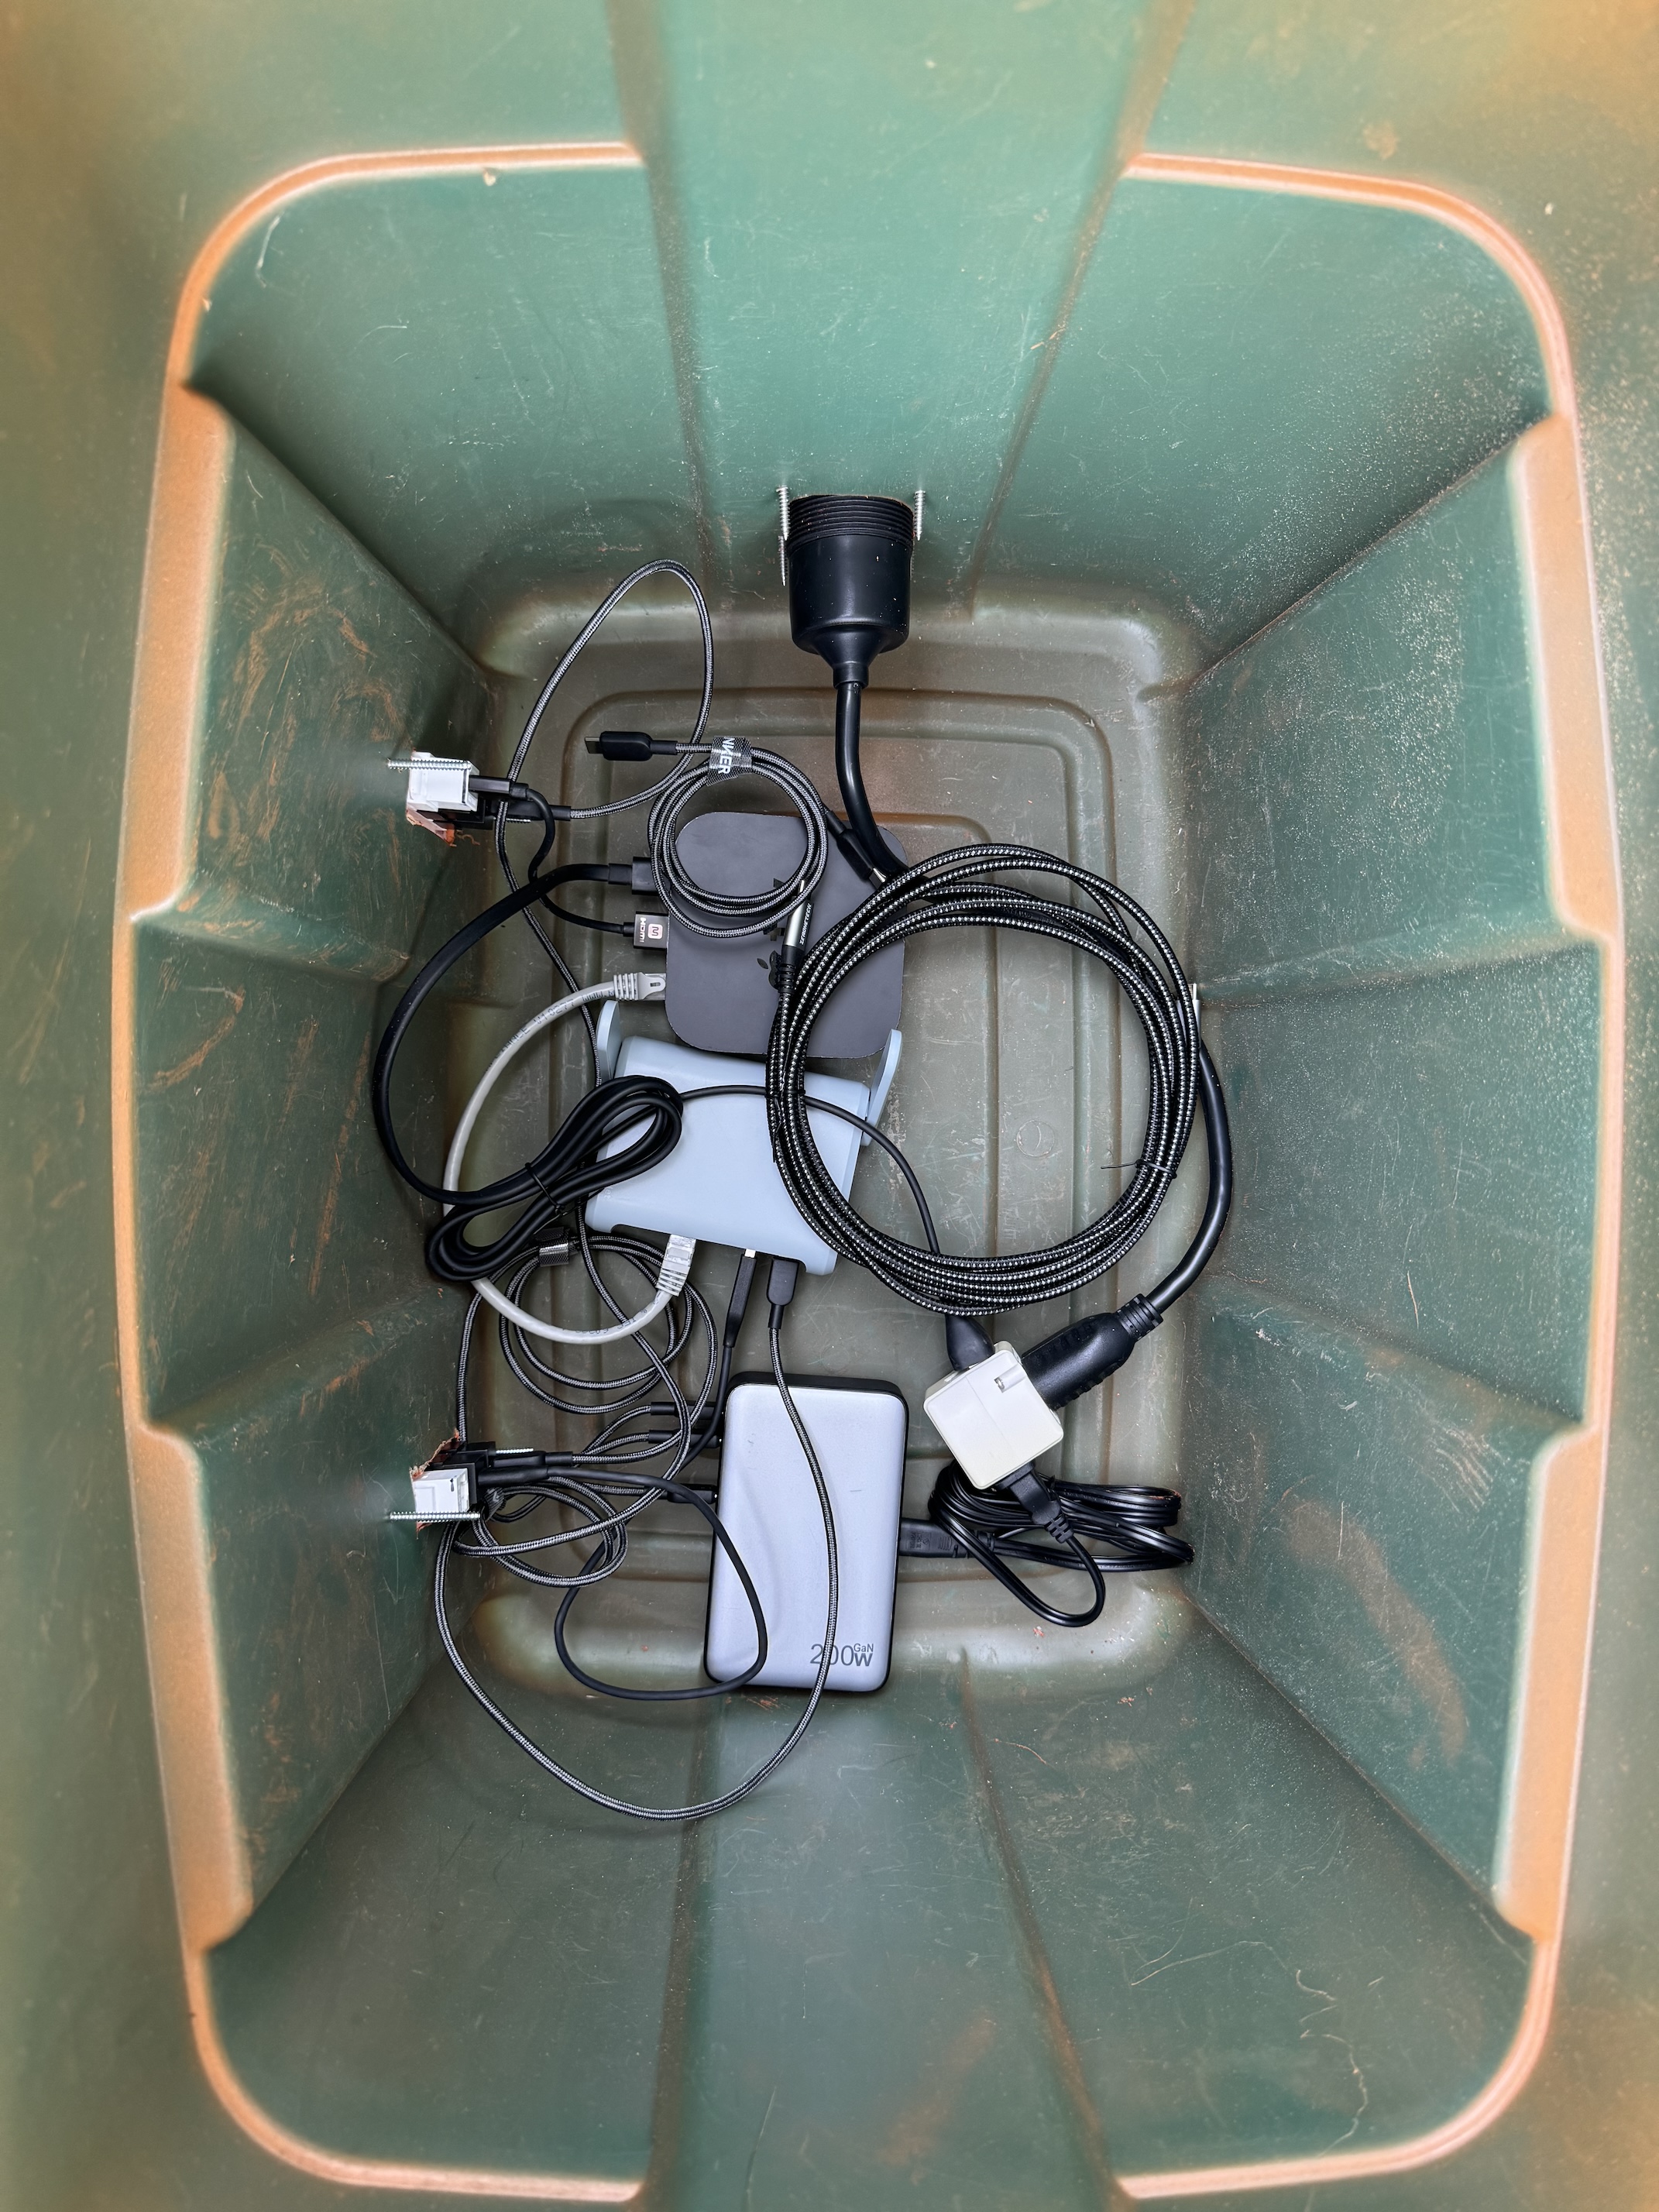
A lot of this could be handled in advance, if I can transport everything as a unit. What if I could put most of this inside a portable box/tub of some sort, and take the tub to/from tailgates? After a bit of planning, I landed on this wiring diagram:
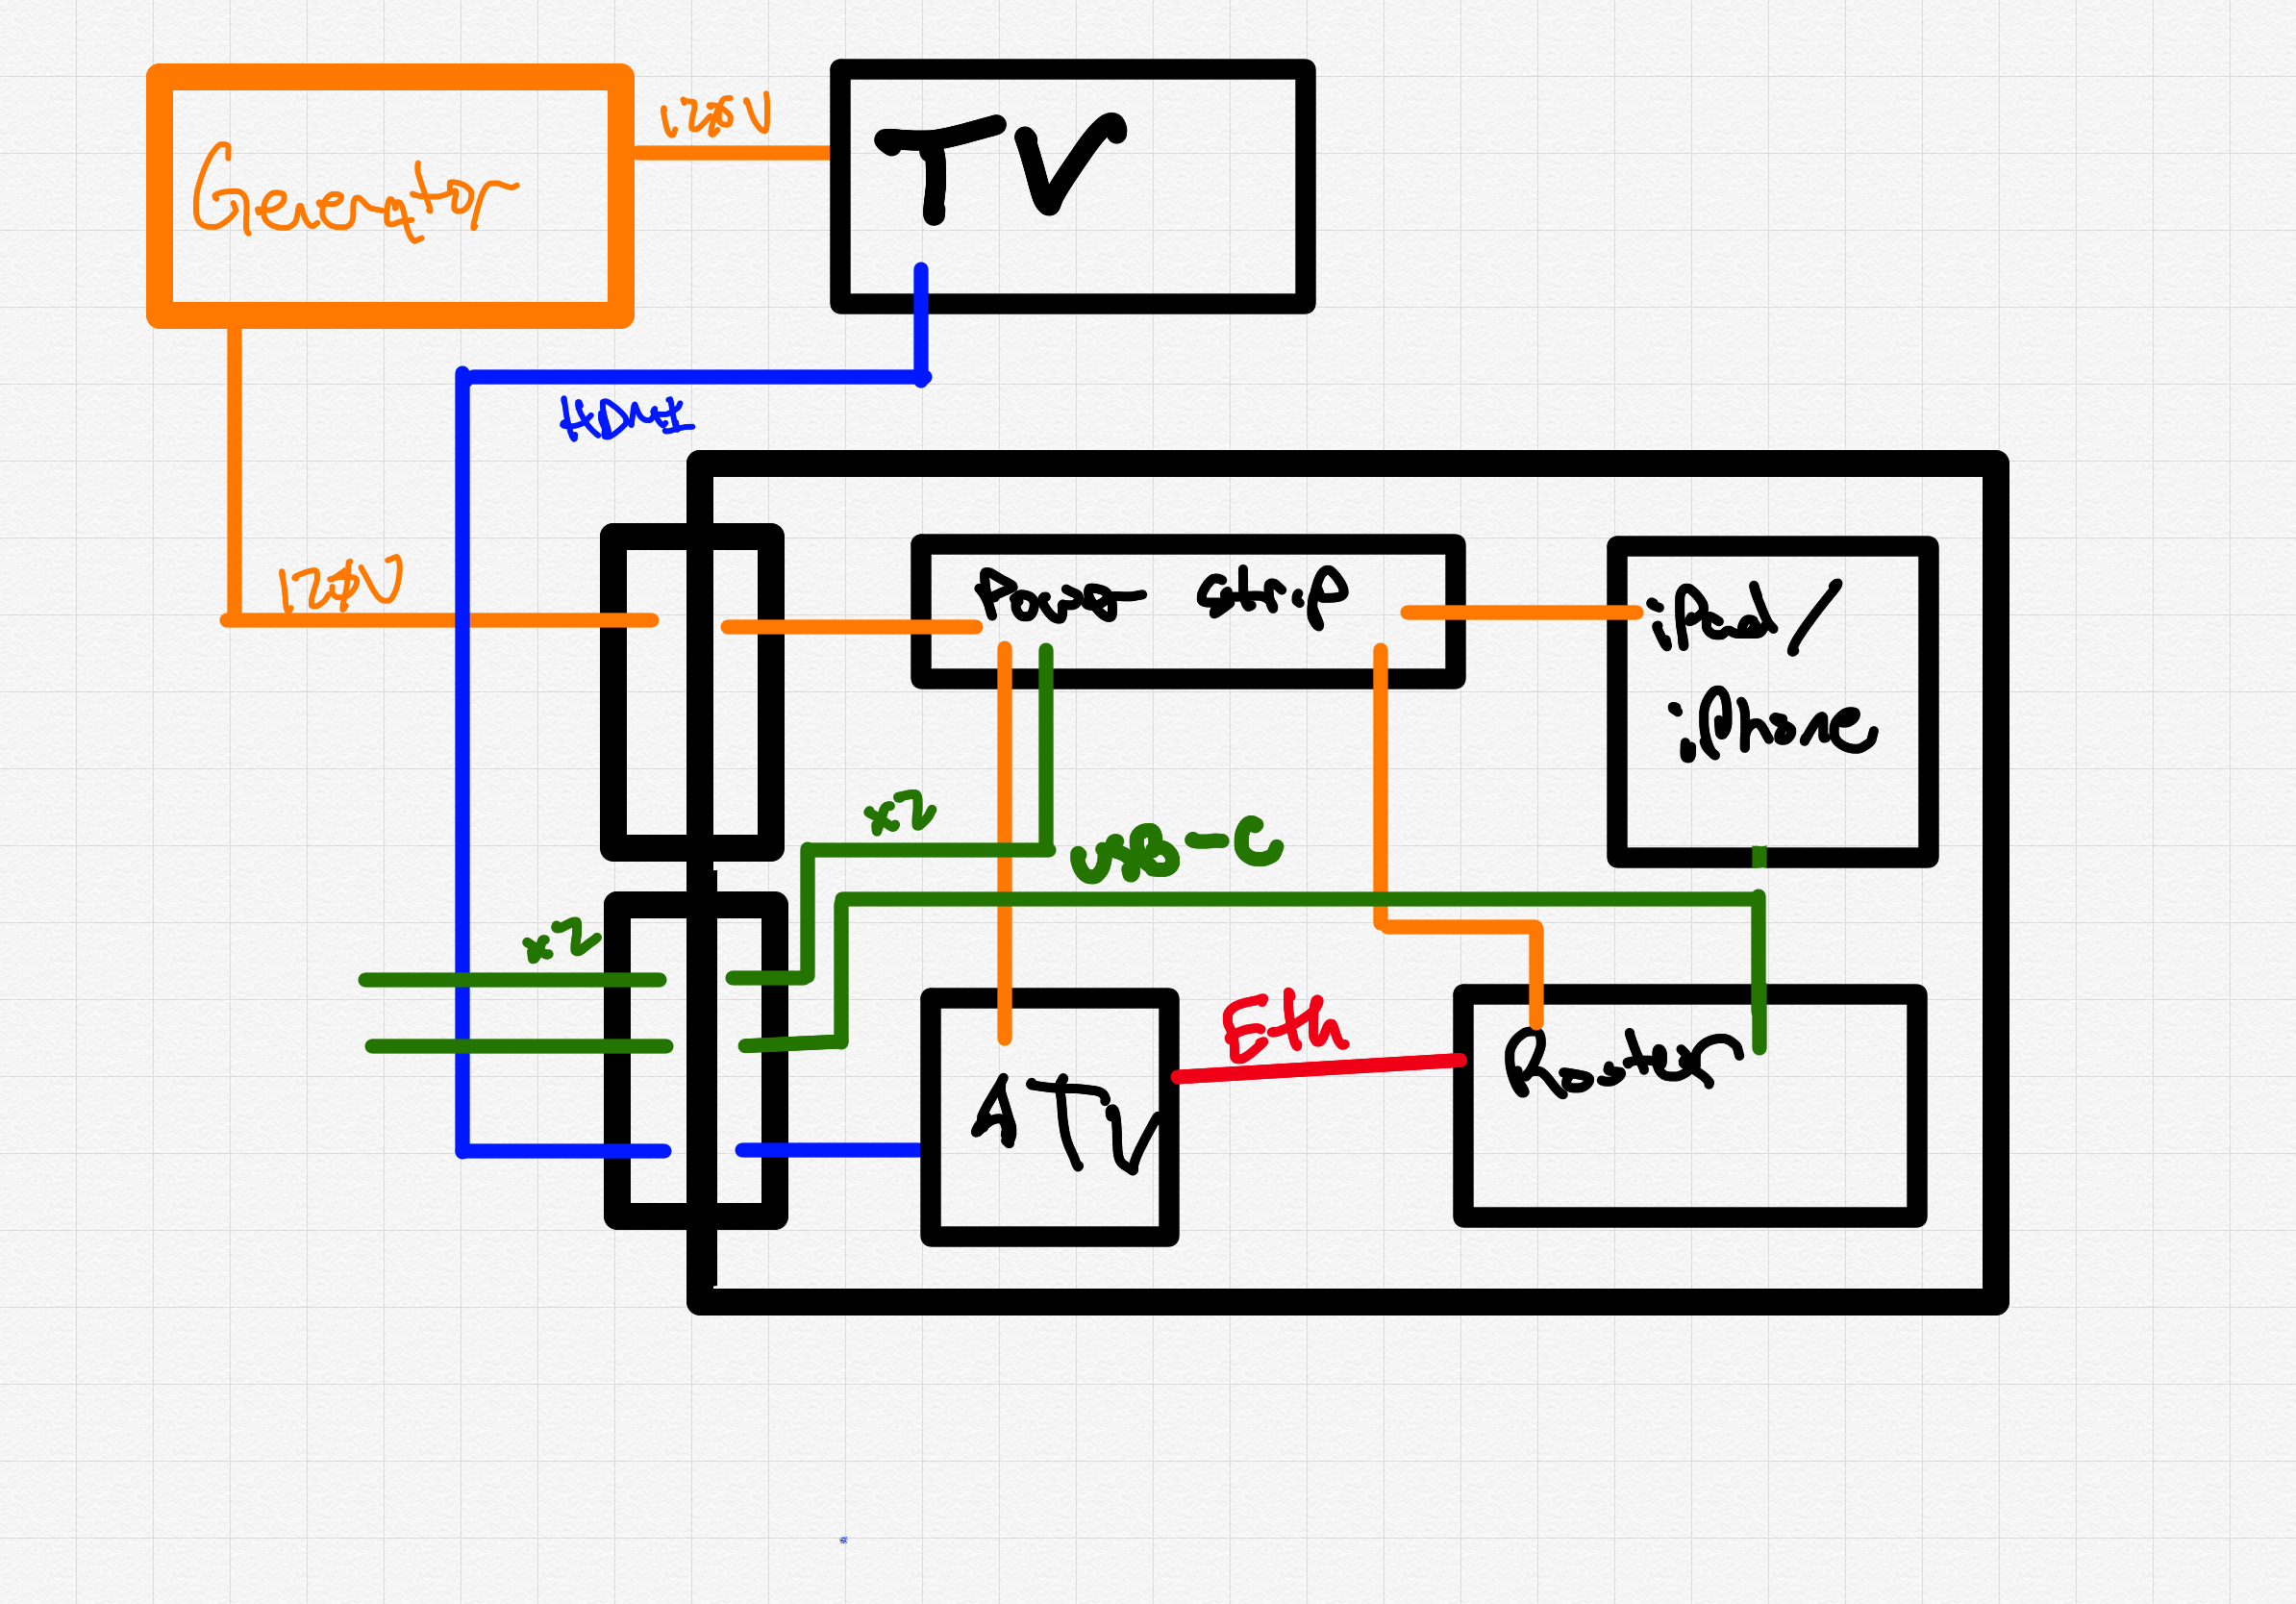
Something like the above should work.
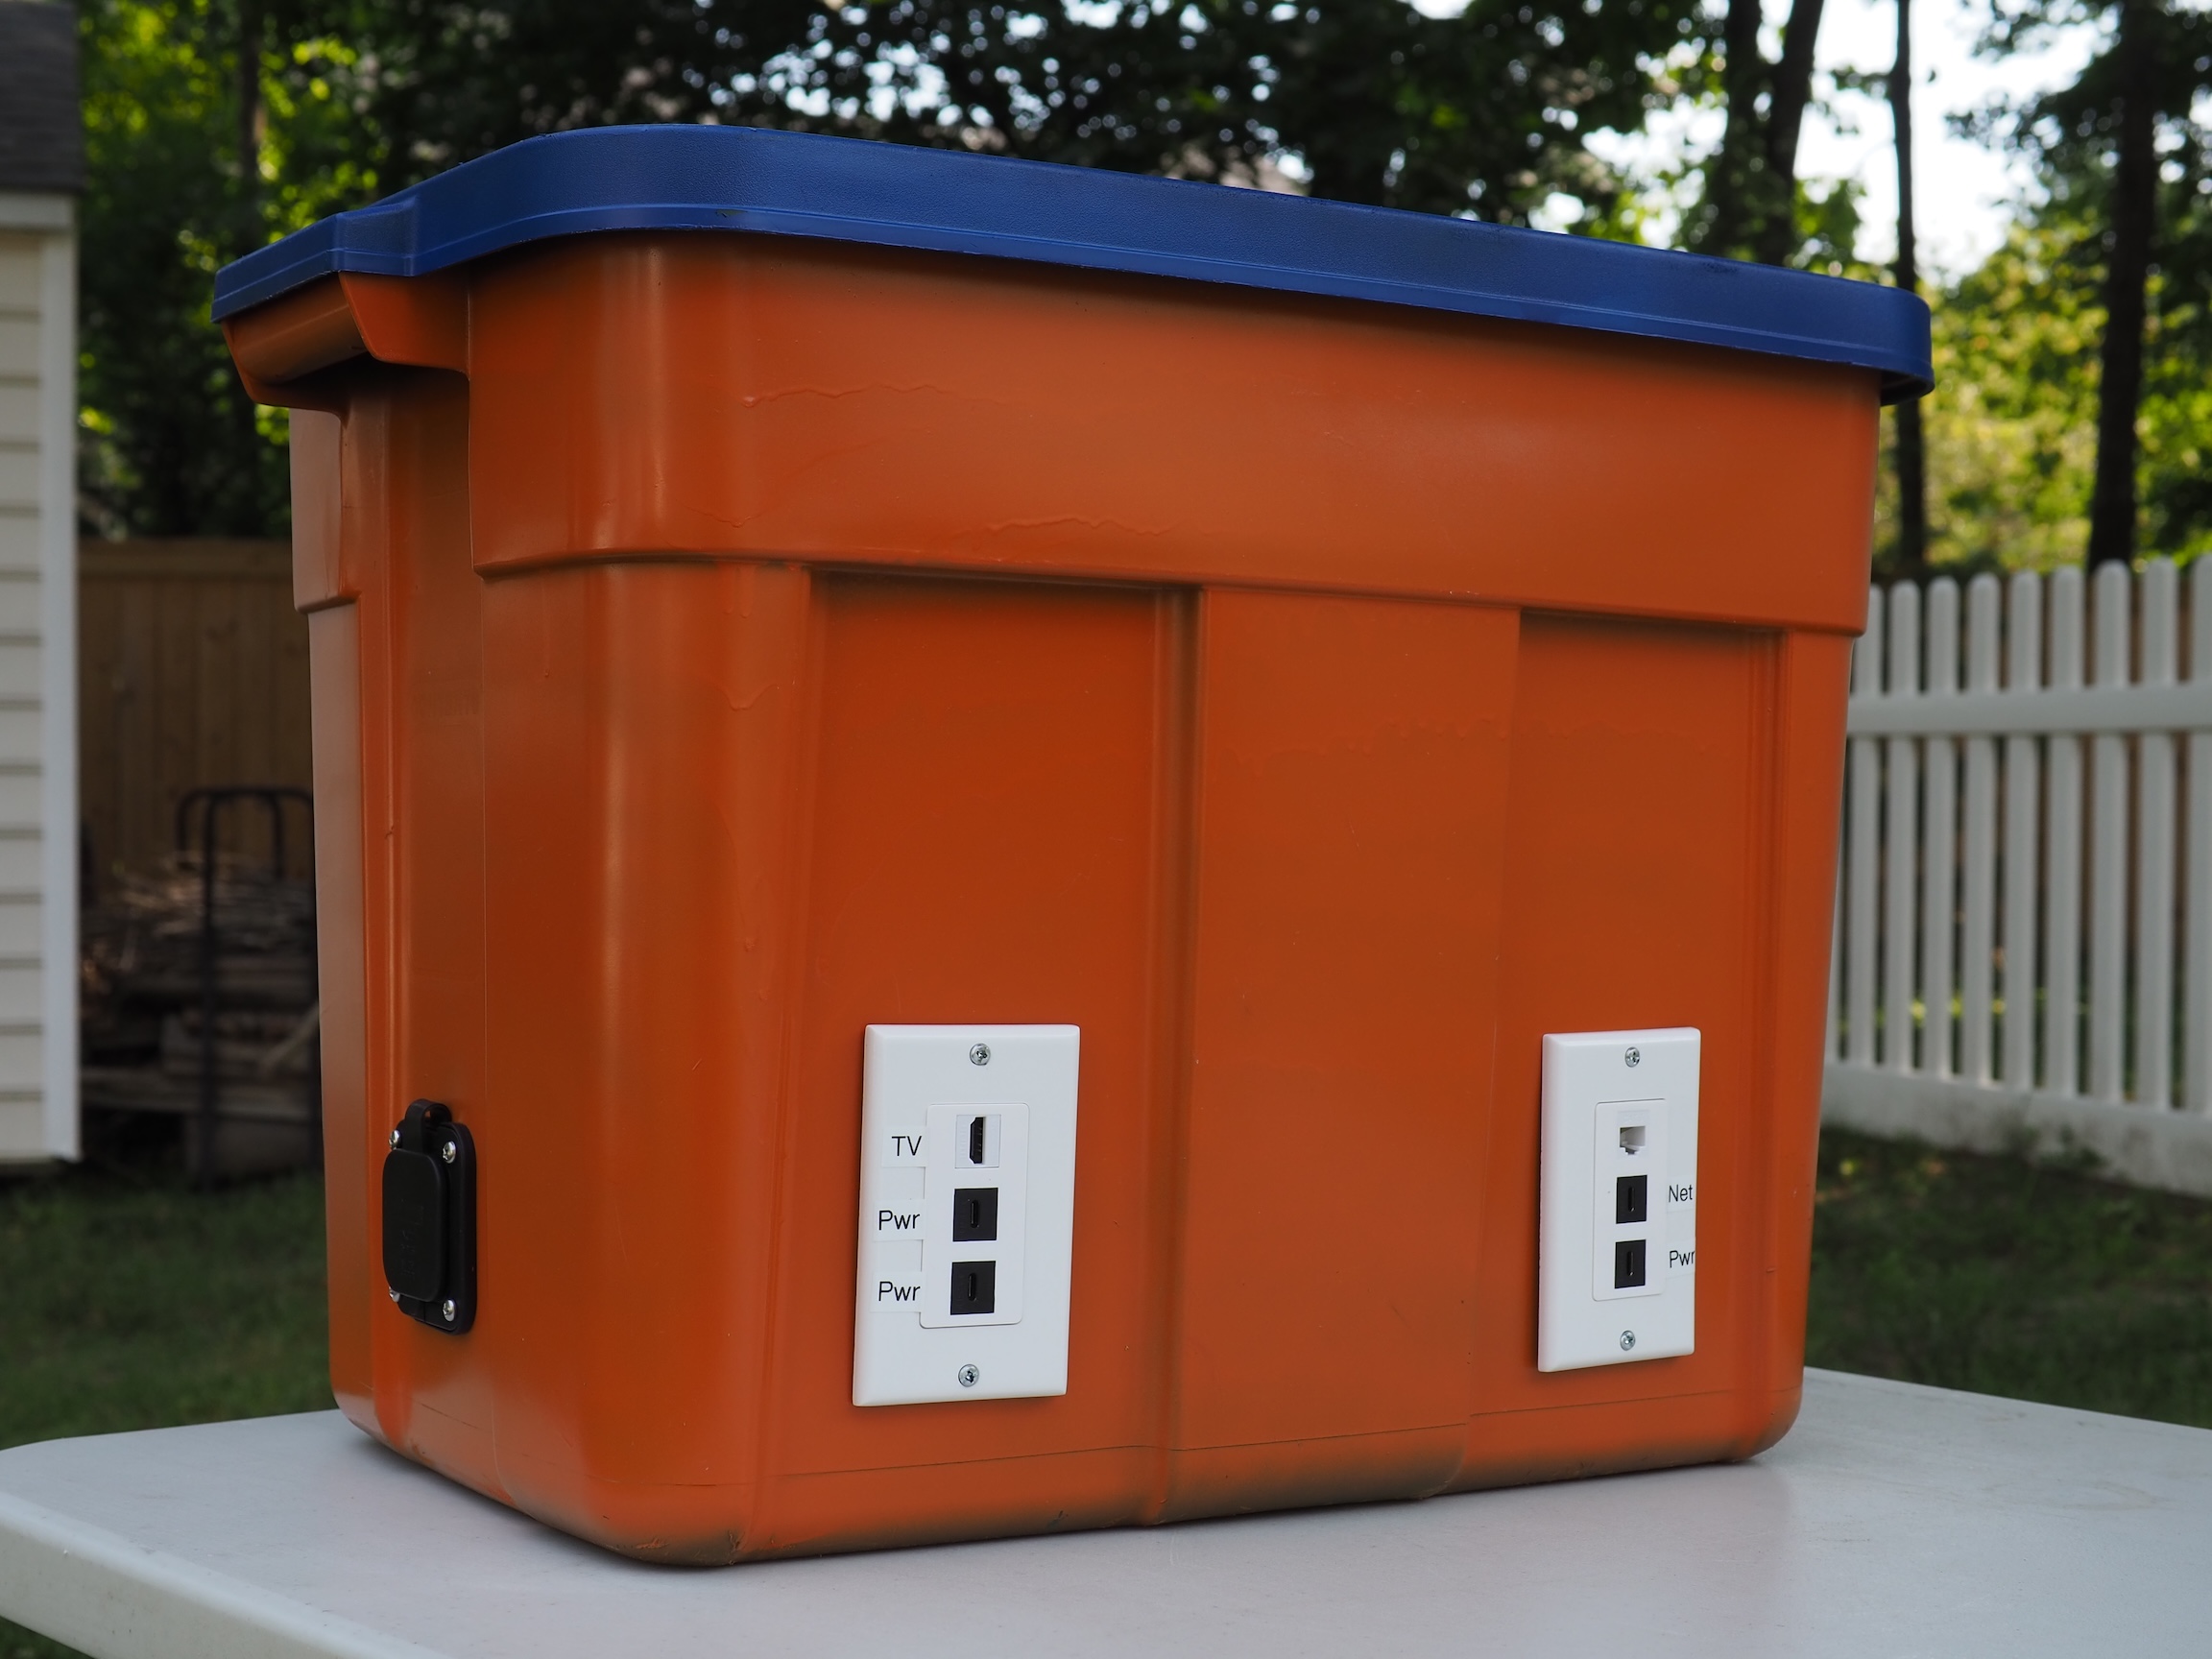
So this — my Tailgate Tub — has been my project for the football off-season. The Tailgate Tub is a portable container that has most of the electronics we need wired internally, with convenient connections for everything else externally. A combination of some keystone jacks and single-gang faceplates could get the low-voltage connections sorted. A marine inlet could handle the high-voltage.
I figured a couple of one-gang three-keystone “outlets” would do the trick:
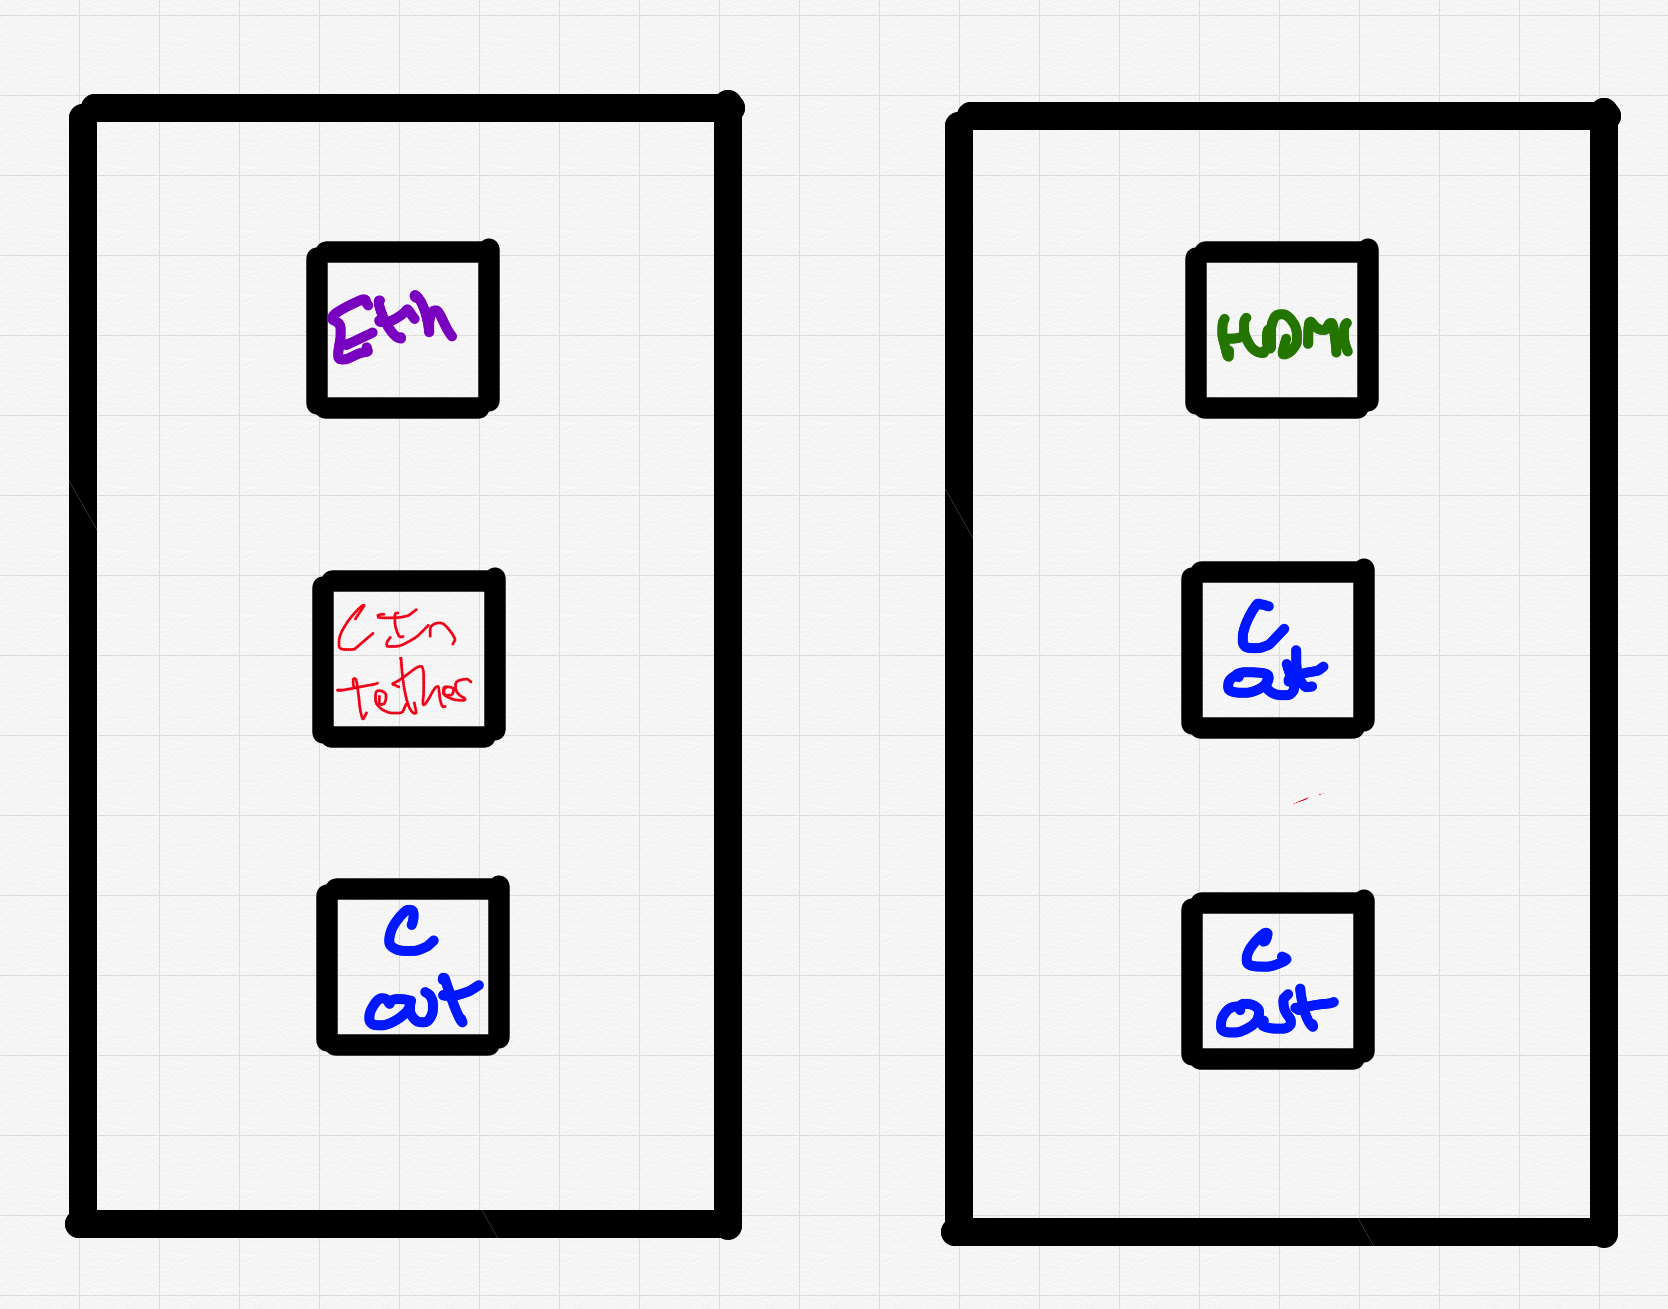
The two keystone panels are in service of:
- Ethernet, in case I need to connect an iPad/Mac for diagnostic purposes
This will almost certainly not happen at a tailgate but will be convenient at home - USB-C in, which would be connected to the travel router, to provide internet
- HDMI, which would be connected to the TV, and internally would be driven by the Apple TV
- 3× USB-C power for charging devices if necessary
These are driven by a USB-C charging “block” and can easily be connected to a USB-C phone, or an older iPhone using a USB-C ↔ Lightning cable
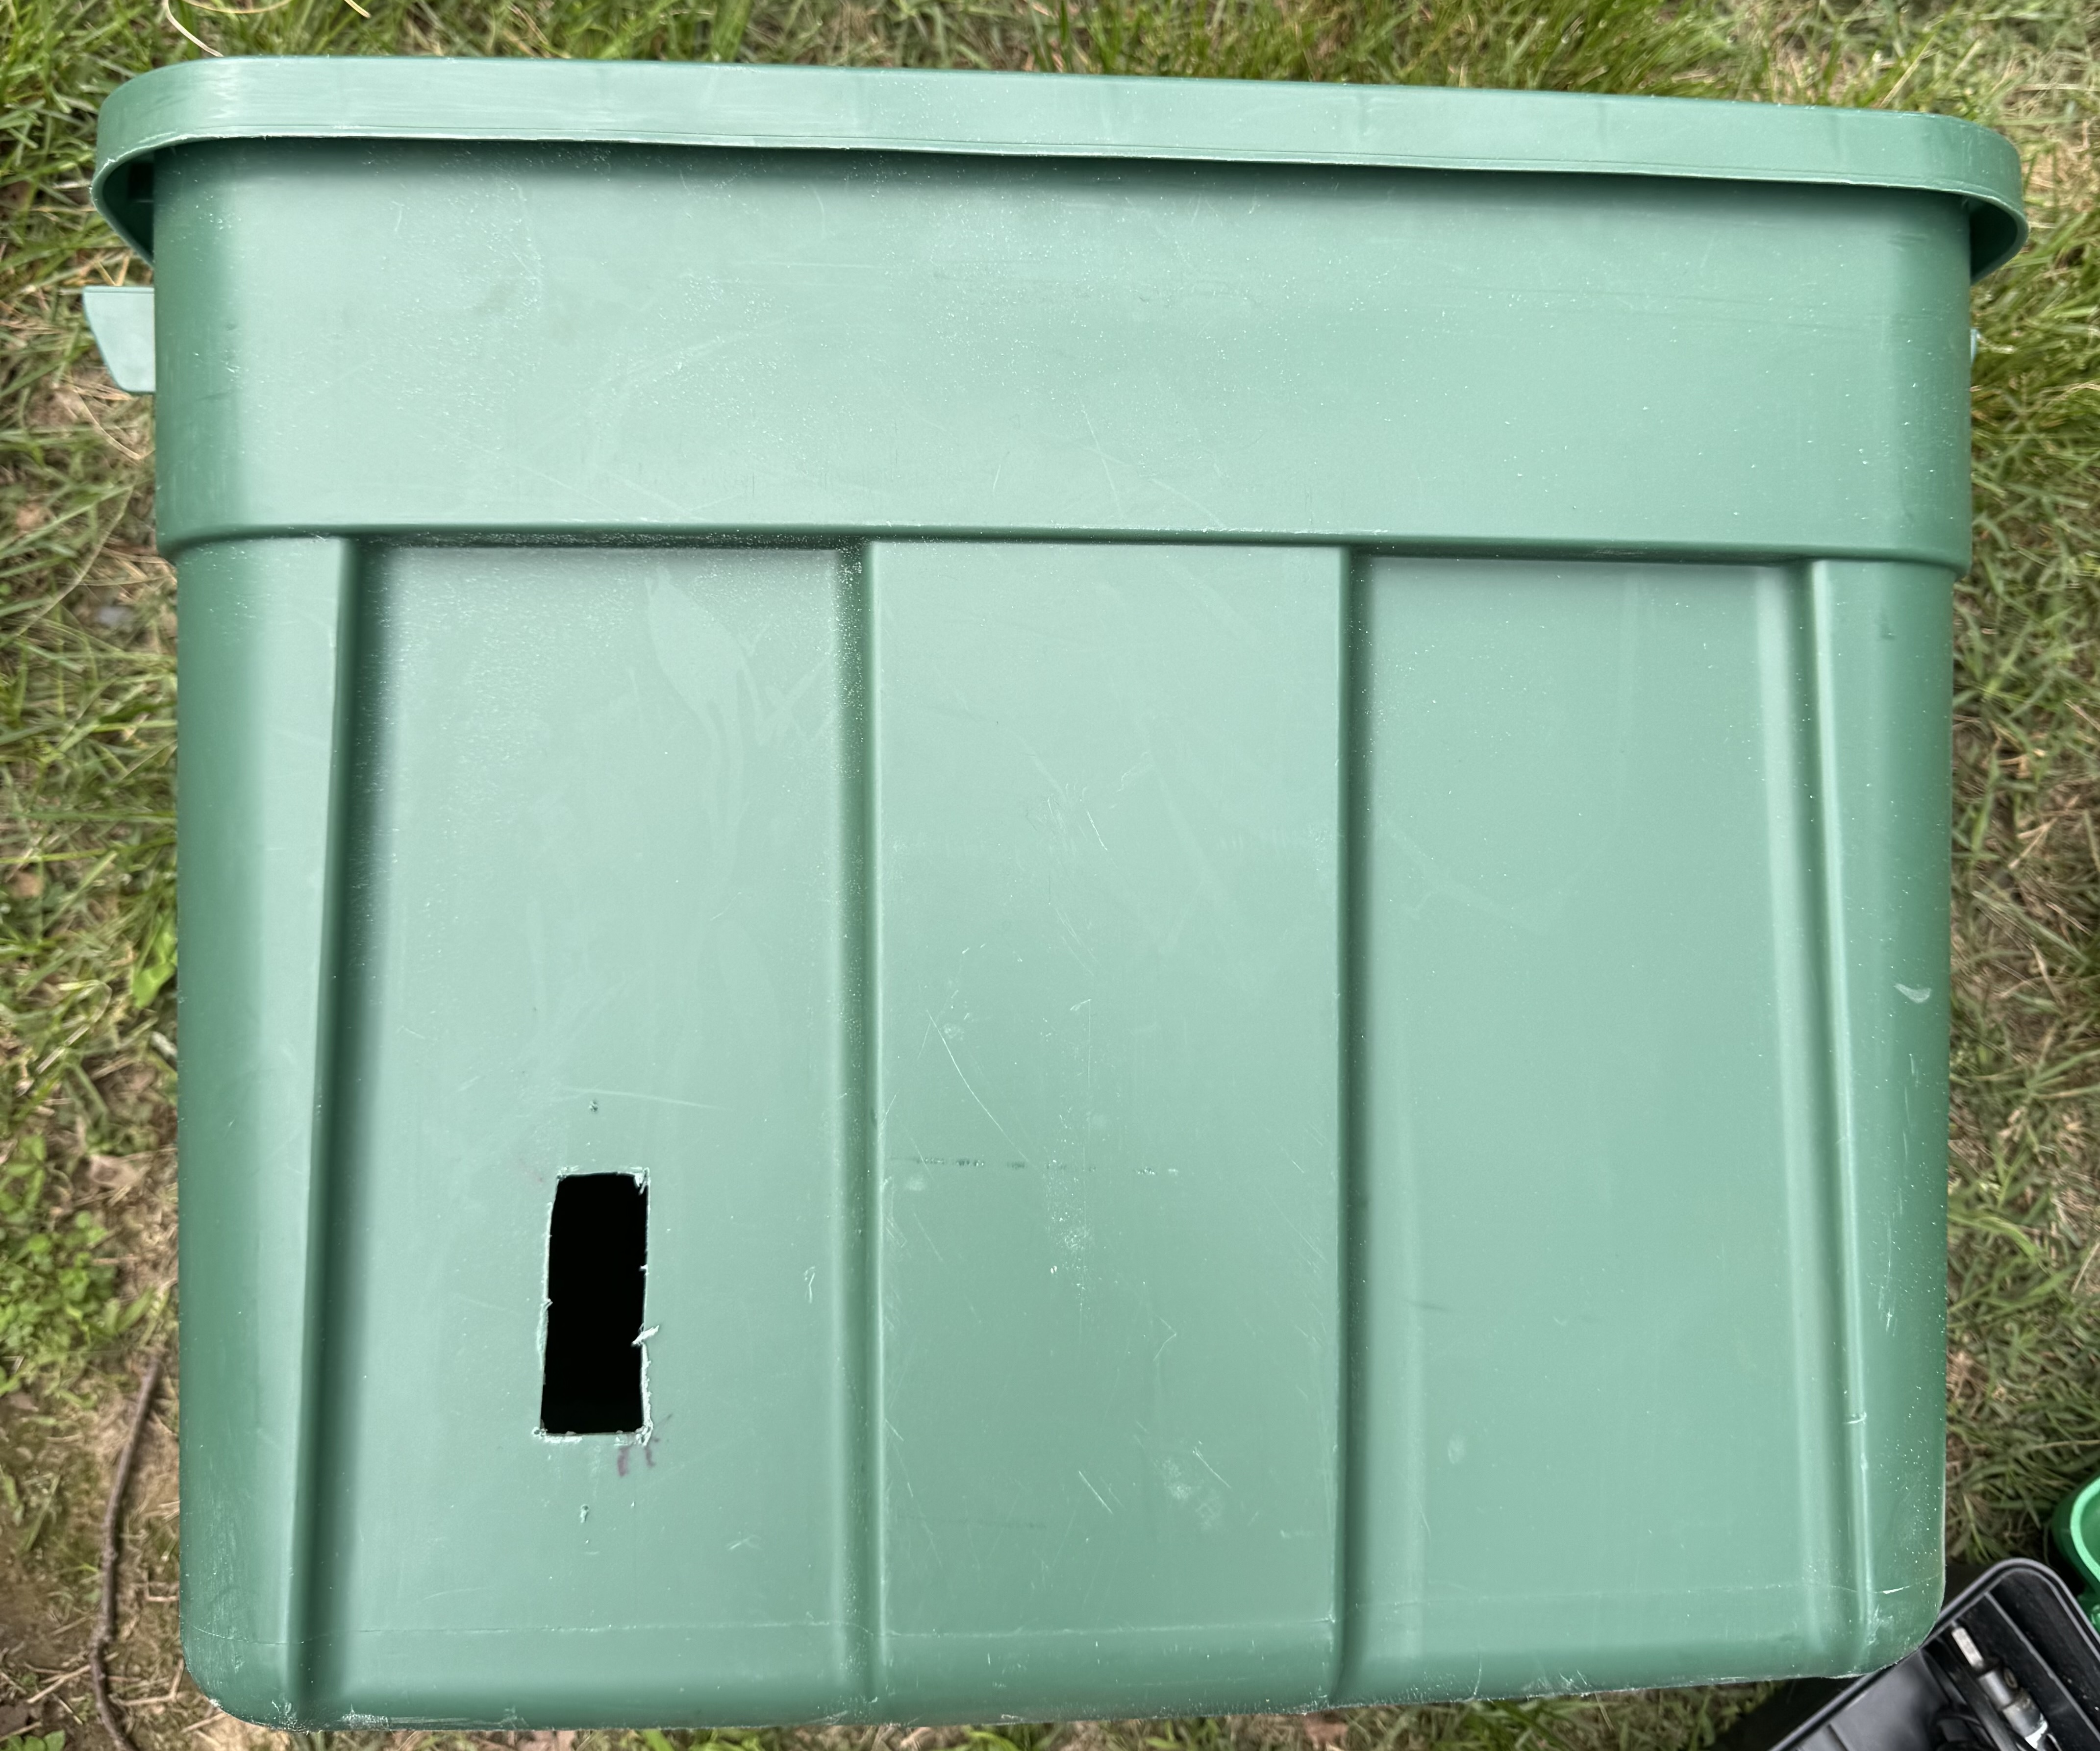
The tub itself is a hand-me-down Rubbermaid from, of all people, my dad, actually. I used a Dremel to cut two holes, one per outlet batch. Here it is after the first one was cut:
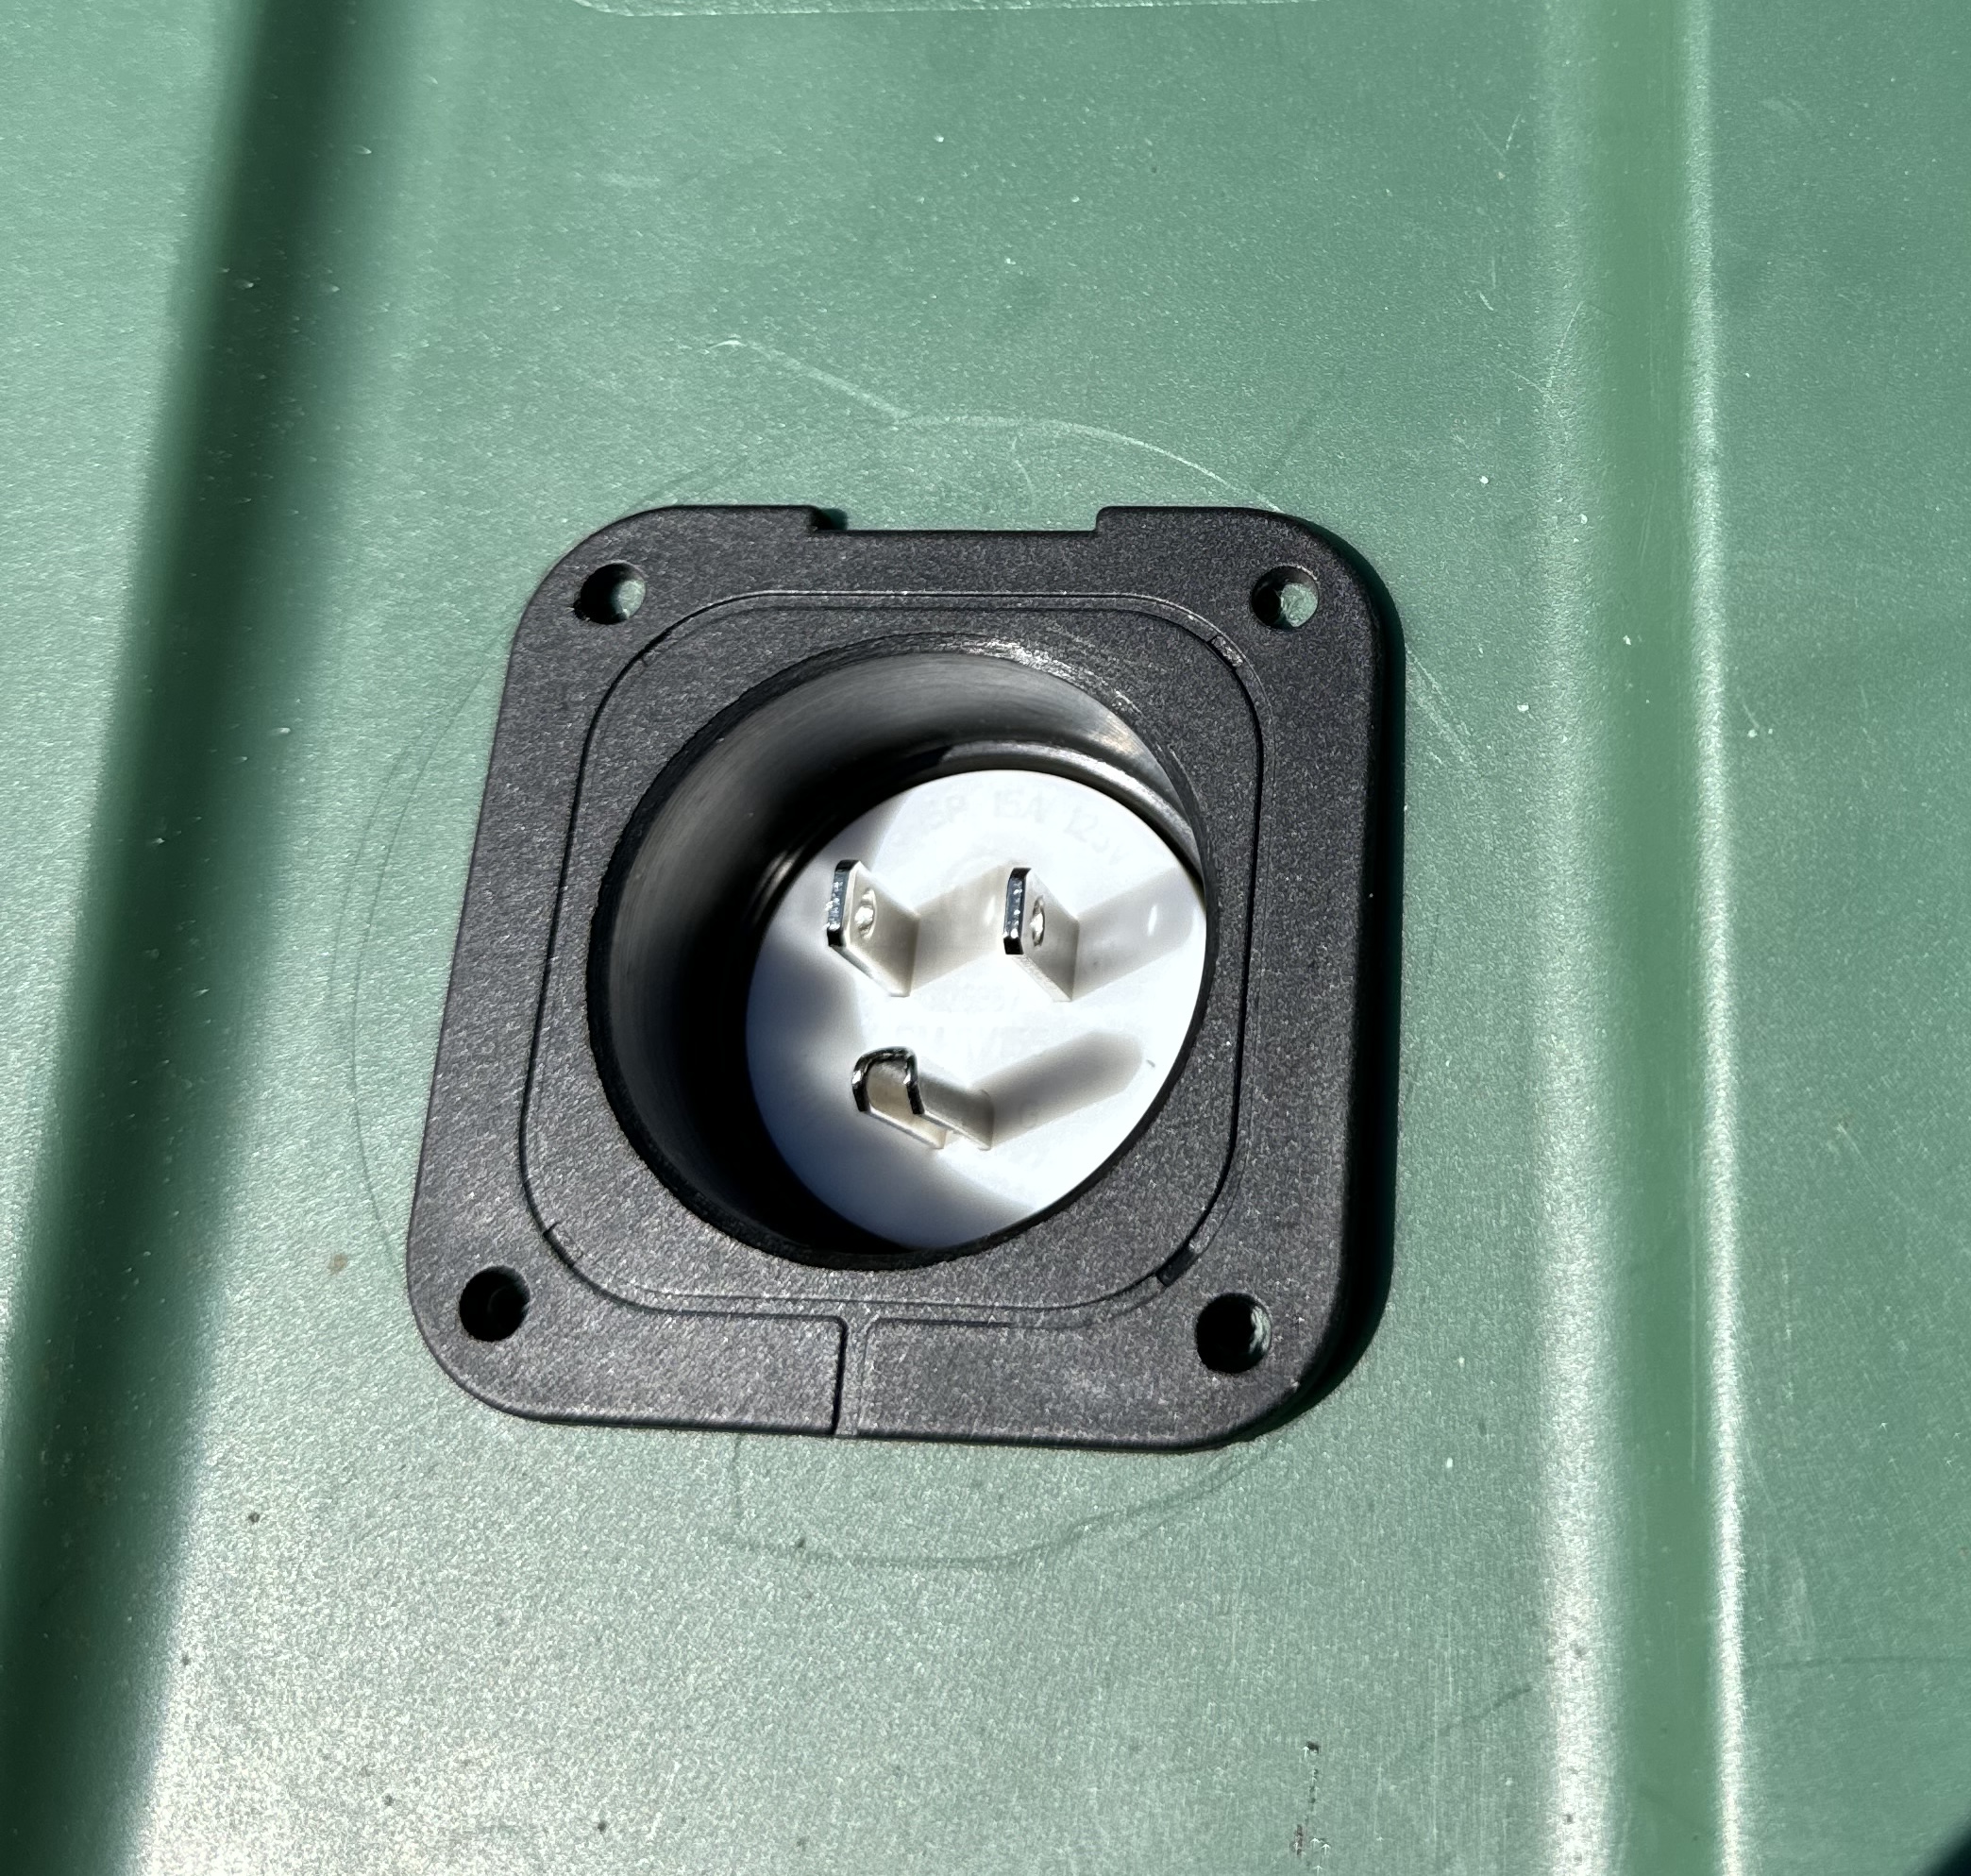
I also used a hole saw to cut a hole for a connection to “shore” power; this will be connected to the generator using a standard extension cord:
Several coats of spray paint later, and we now have a completed Tailgate Tub.
But could we still do better?
We could still do better.
Brian’s generator is very fancy — it’s a Honda inverter generator, producing a pure AC sine wave to keep our electronics safe. It’s quiet, fuel-efficient, light for what it is, and darned near maintenance-free.
It is also not silent, and does weigh ~50 pounds. It’s also smelly — no matter how fuel-efficient it is, it still burns gasoline and makes exhaust fumes. That means we need to cart a couple of long extension cords with us, so we can park the generator far away from our tailgate. These cords can be tripping hazards… especially, uh, towards the end of a tailgate. 🥴
As I was thinking about making our tailgates better and more efficient, I remembered the power problems Jason had a few years back. And I remembered that he solved his issues by getting a big-ass battery that had AC outlets on it.
With that in mind, since late last year, I’ve had my eye on a replacement for the generator, in the spirit of what Jason bought.
I had done some testing on the last tailgate of the year, to see how much juice I would need:
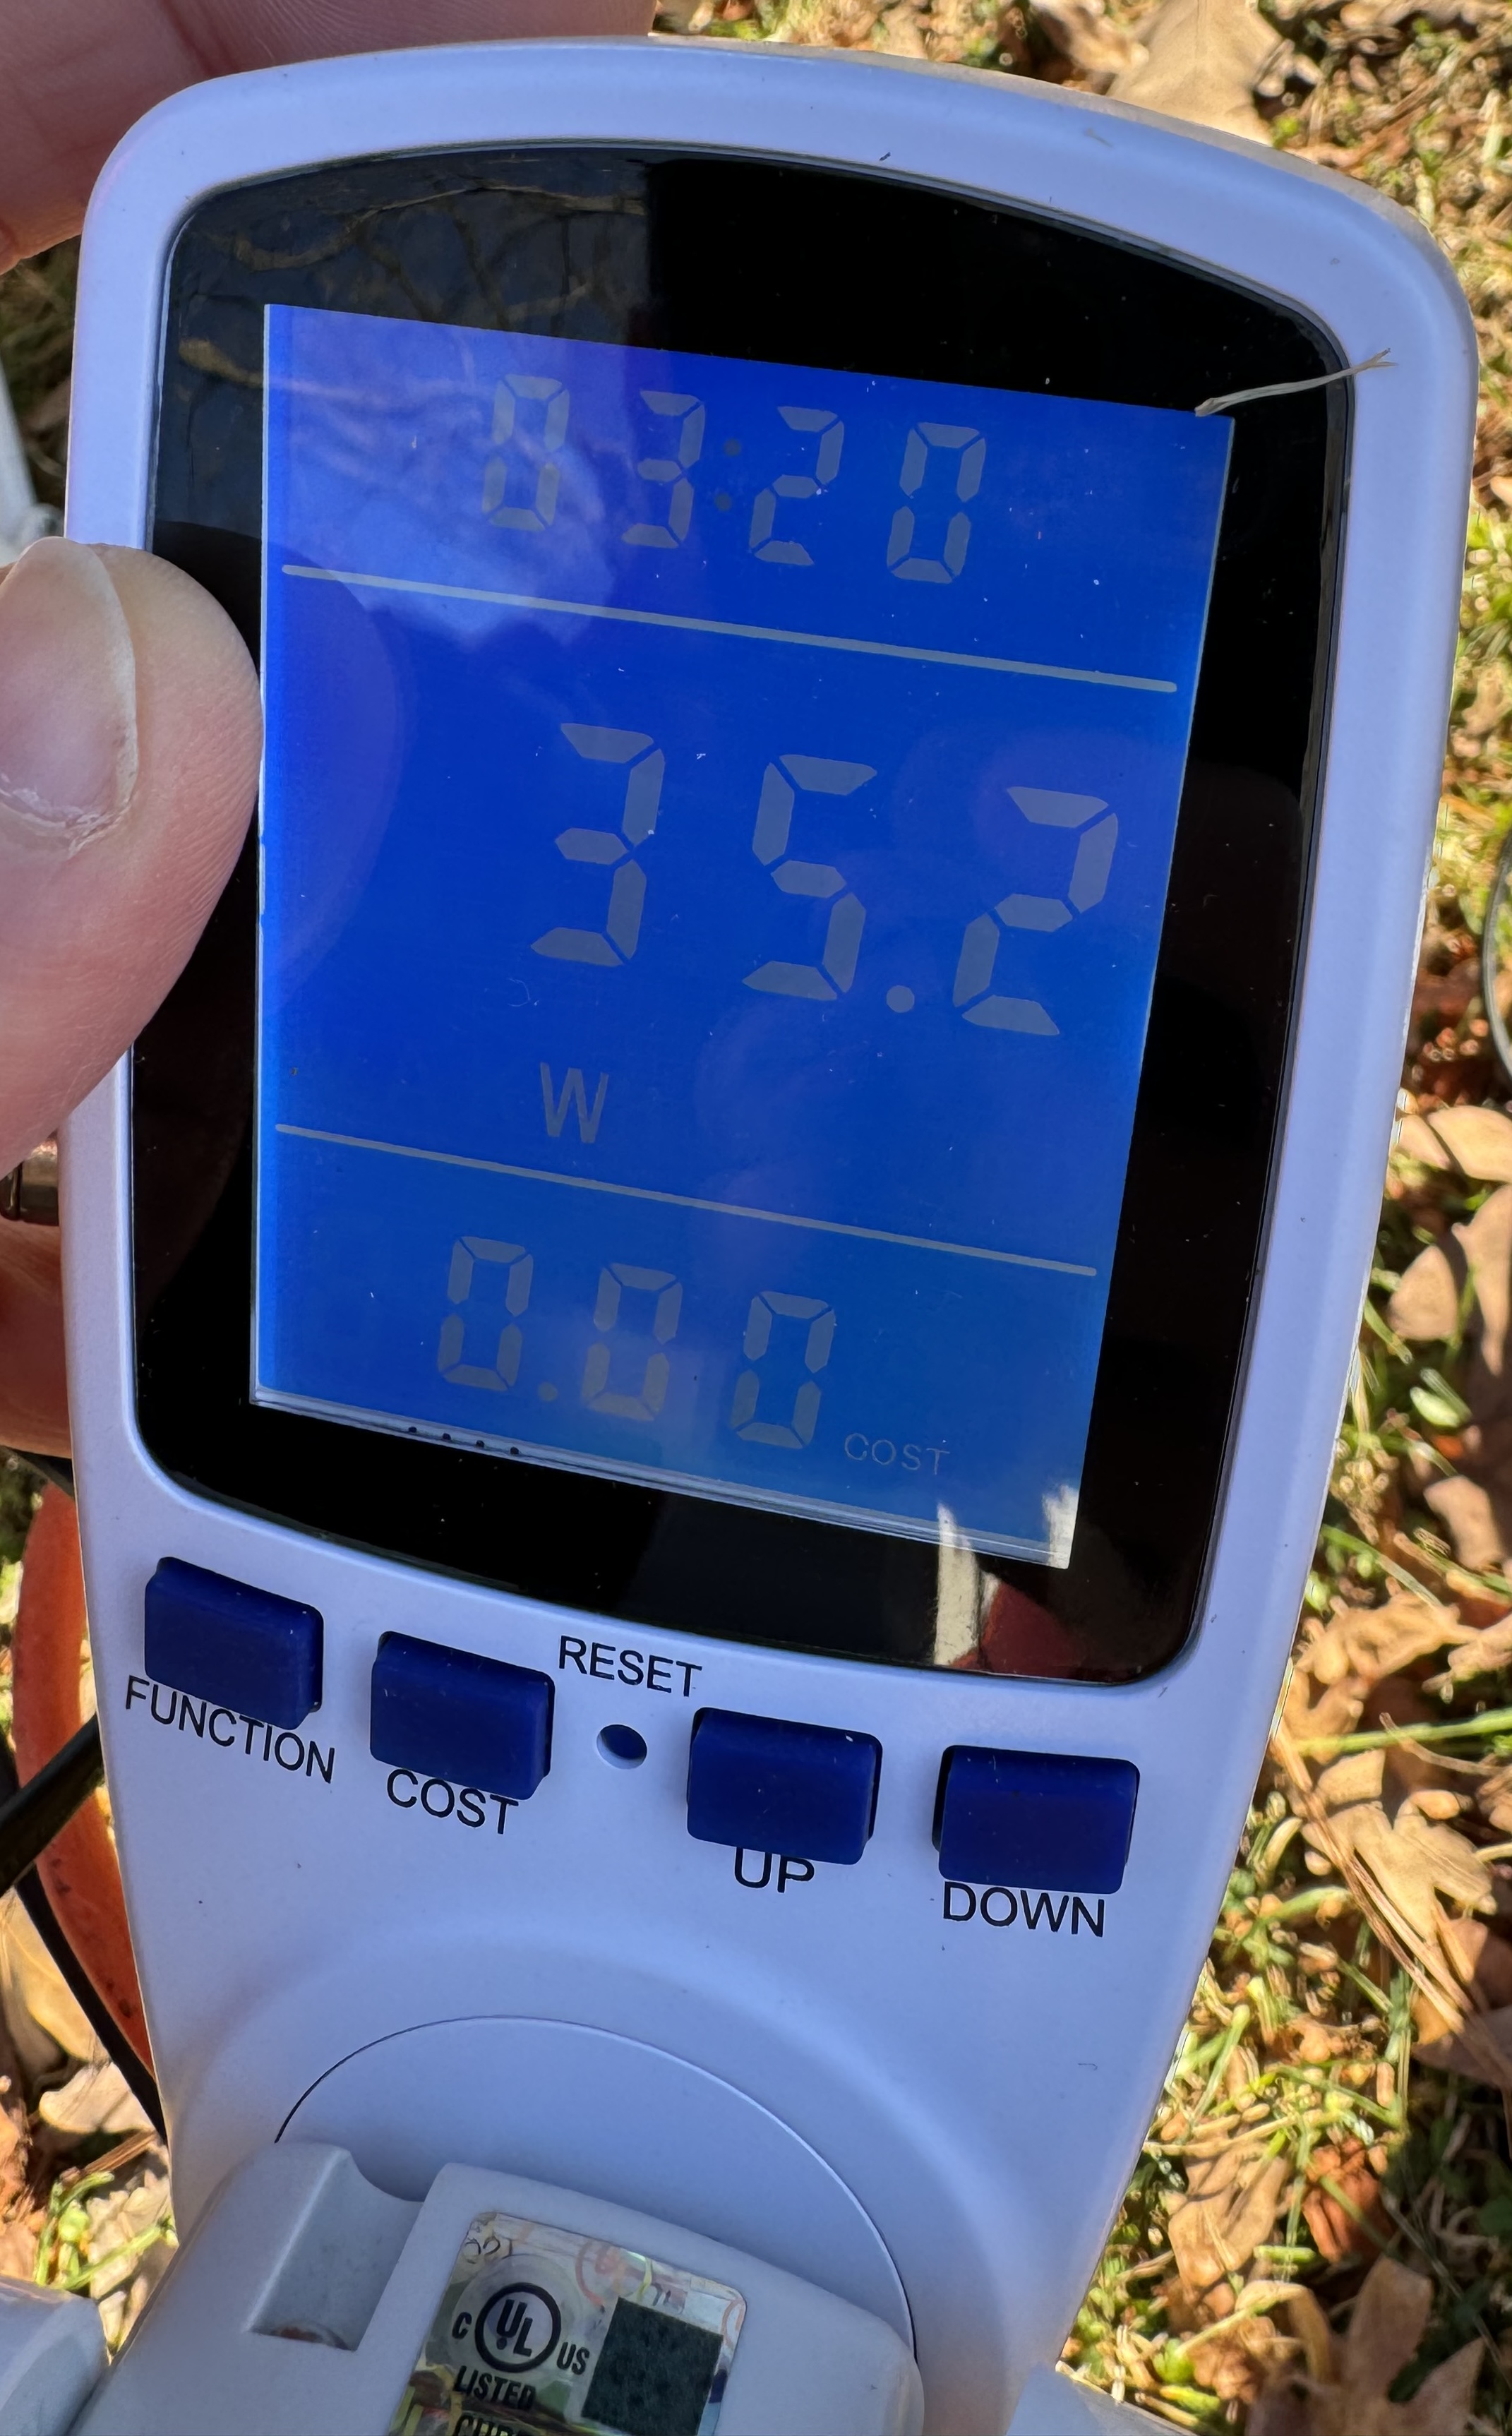
My thought is that I would need enough power to run a ~40 watt tailgate for about ~4ish hours, so roughly 160 Watt-hours at a minimum.
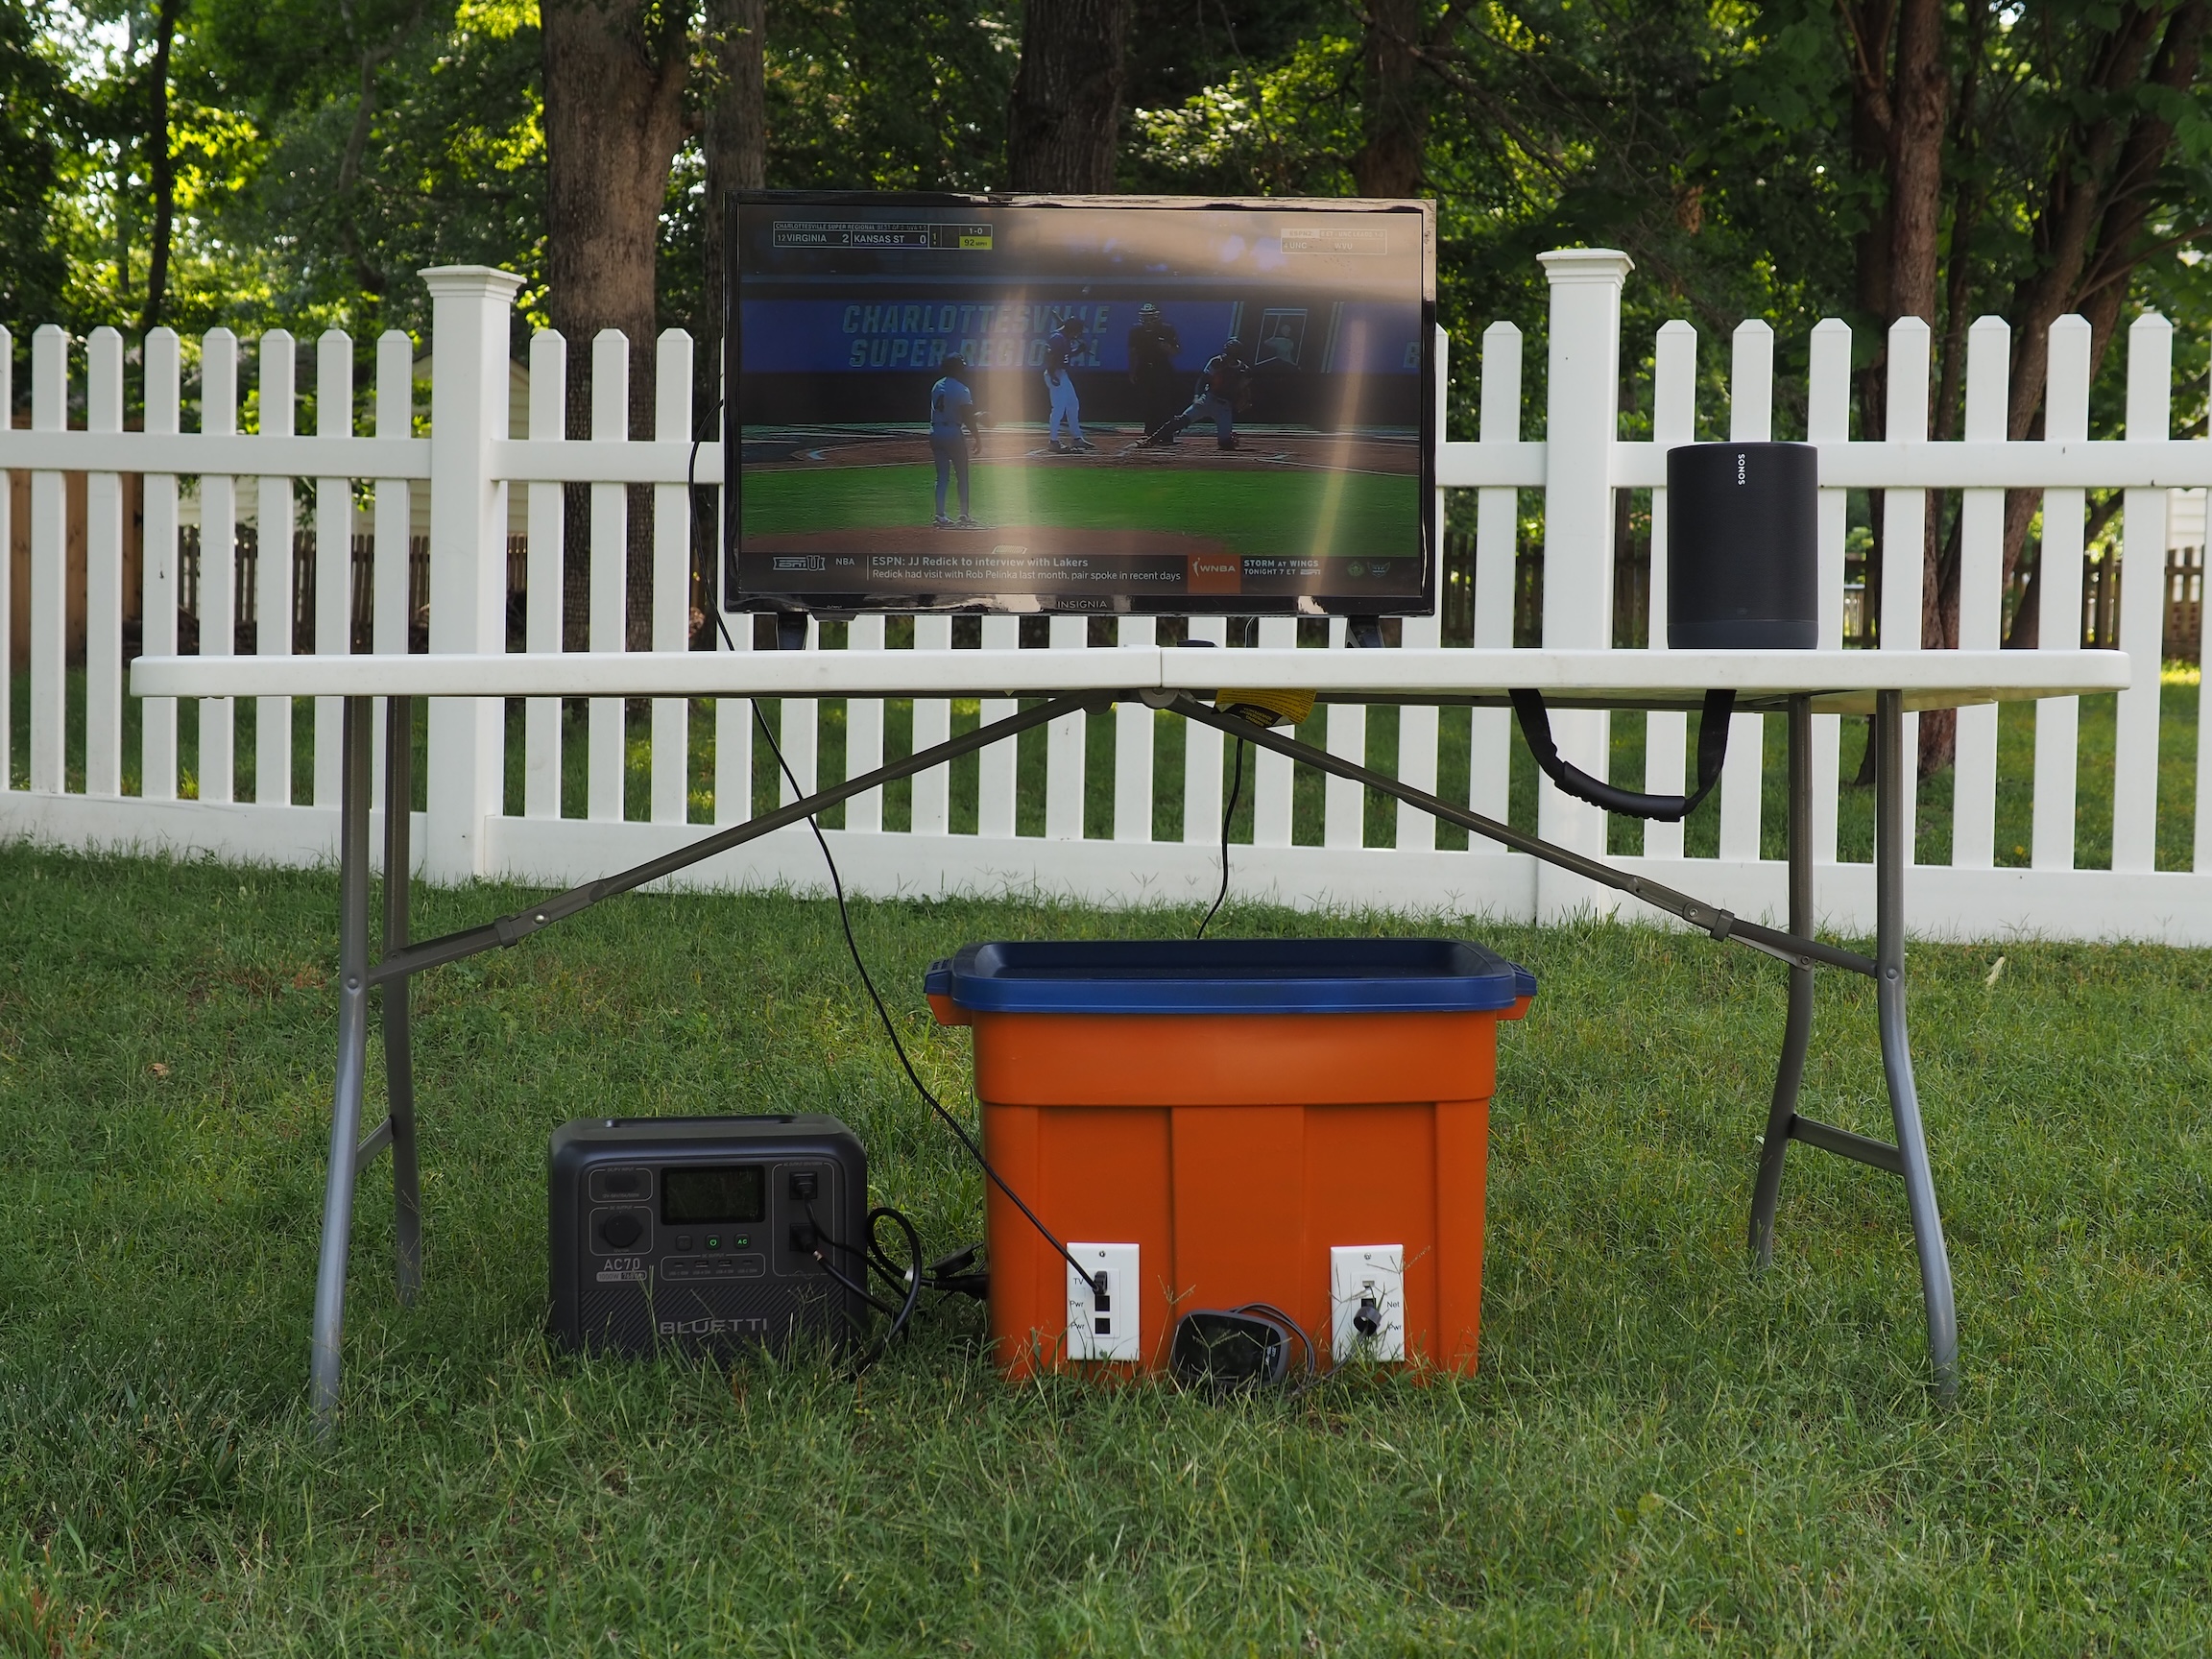
Thanks to an uncharacteristic supply of patience, and CamelCamelCamel, I was able to snag a Bluetti AC70 on a killer deal: $430 at the time of writing. This model has a 768 Watt-hour battery, which should be quite a bit more than I need for our typical tailgate.
Having the portable power station has several advantages:
- Runs very quiet — it has fans but no engine
- Since it runs nearly silent, we can station it under the serving tables
This eliminates the need for a couple of 50-foot (15m) extension cables - It’s far more environmentally-friendly
- It doesn’t require gasoline
- At 20-ish pounds, it weighs roughly 30 pounds less than the generator
So, all told, here’s a backyard demonstration of the setup:
And here’s a close-up of the Bluetti and the tub, sitting in our [tall] grass:

And the inside, before Stephen guilts me into improving my wire management:
The tub is too big for just the electronics within it, but we’ll put other tailgate supplies in the tub as well. I’ll have to fashion some sort of shelf to put down above the electronics, but that’s Future Casey’s problem.
I’m pretty damn pleased, if I do say so myself.
Though I can absolutely use my phone or iPad to serve internet, it turns out that our local library will actually let you check out a T-Mobile hotspot just like you could a book. And a neighboring library — which has reciprocity with our own — will loan Verizon hotspots. So my hope is that for a lot of this season, we can borrow some hotspots and slurp up that internet instead of my limited tethering allotment. ↩
Last week, I was lucky enough to be invited to visit Memphis, Tennessee, to participate in the invite-only St. Jude Play Live+ Summit. Just about 400 game streamers, fashion and fitness influencers, and a handful of podcasters all came to learn more about St. Jude Children’s Research Hospital.
The two-day event was something else. I sent this message in the Relay Slack about halfway through the opening session:
During my time there, I heard many stories that went something like this:
[I/my child/my sibling] was diagnosed with a rare form of cancer. Our local doctors had no idea what to do, and told us [patient] had about a 10% chance of surviving.
We called St. Jude, and hours later, we had plane tickets to Memphis in-hand. Days later, [patient] was getting treated.
Many times, the same story. St. Jude would turn a hopeless situation — often times quite literally a death sentence — to a story of perseverance, effort, and survival.
How can you not love such an amazing organization?
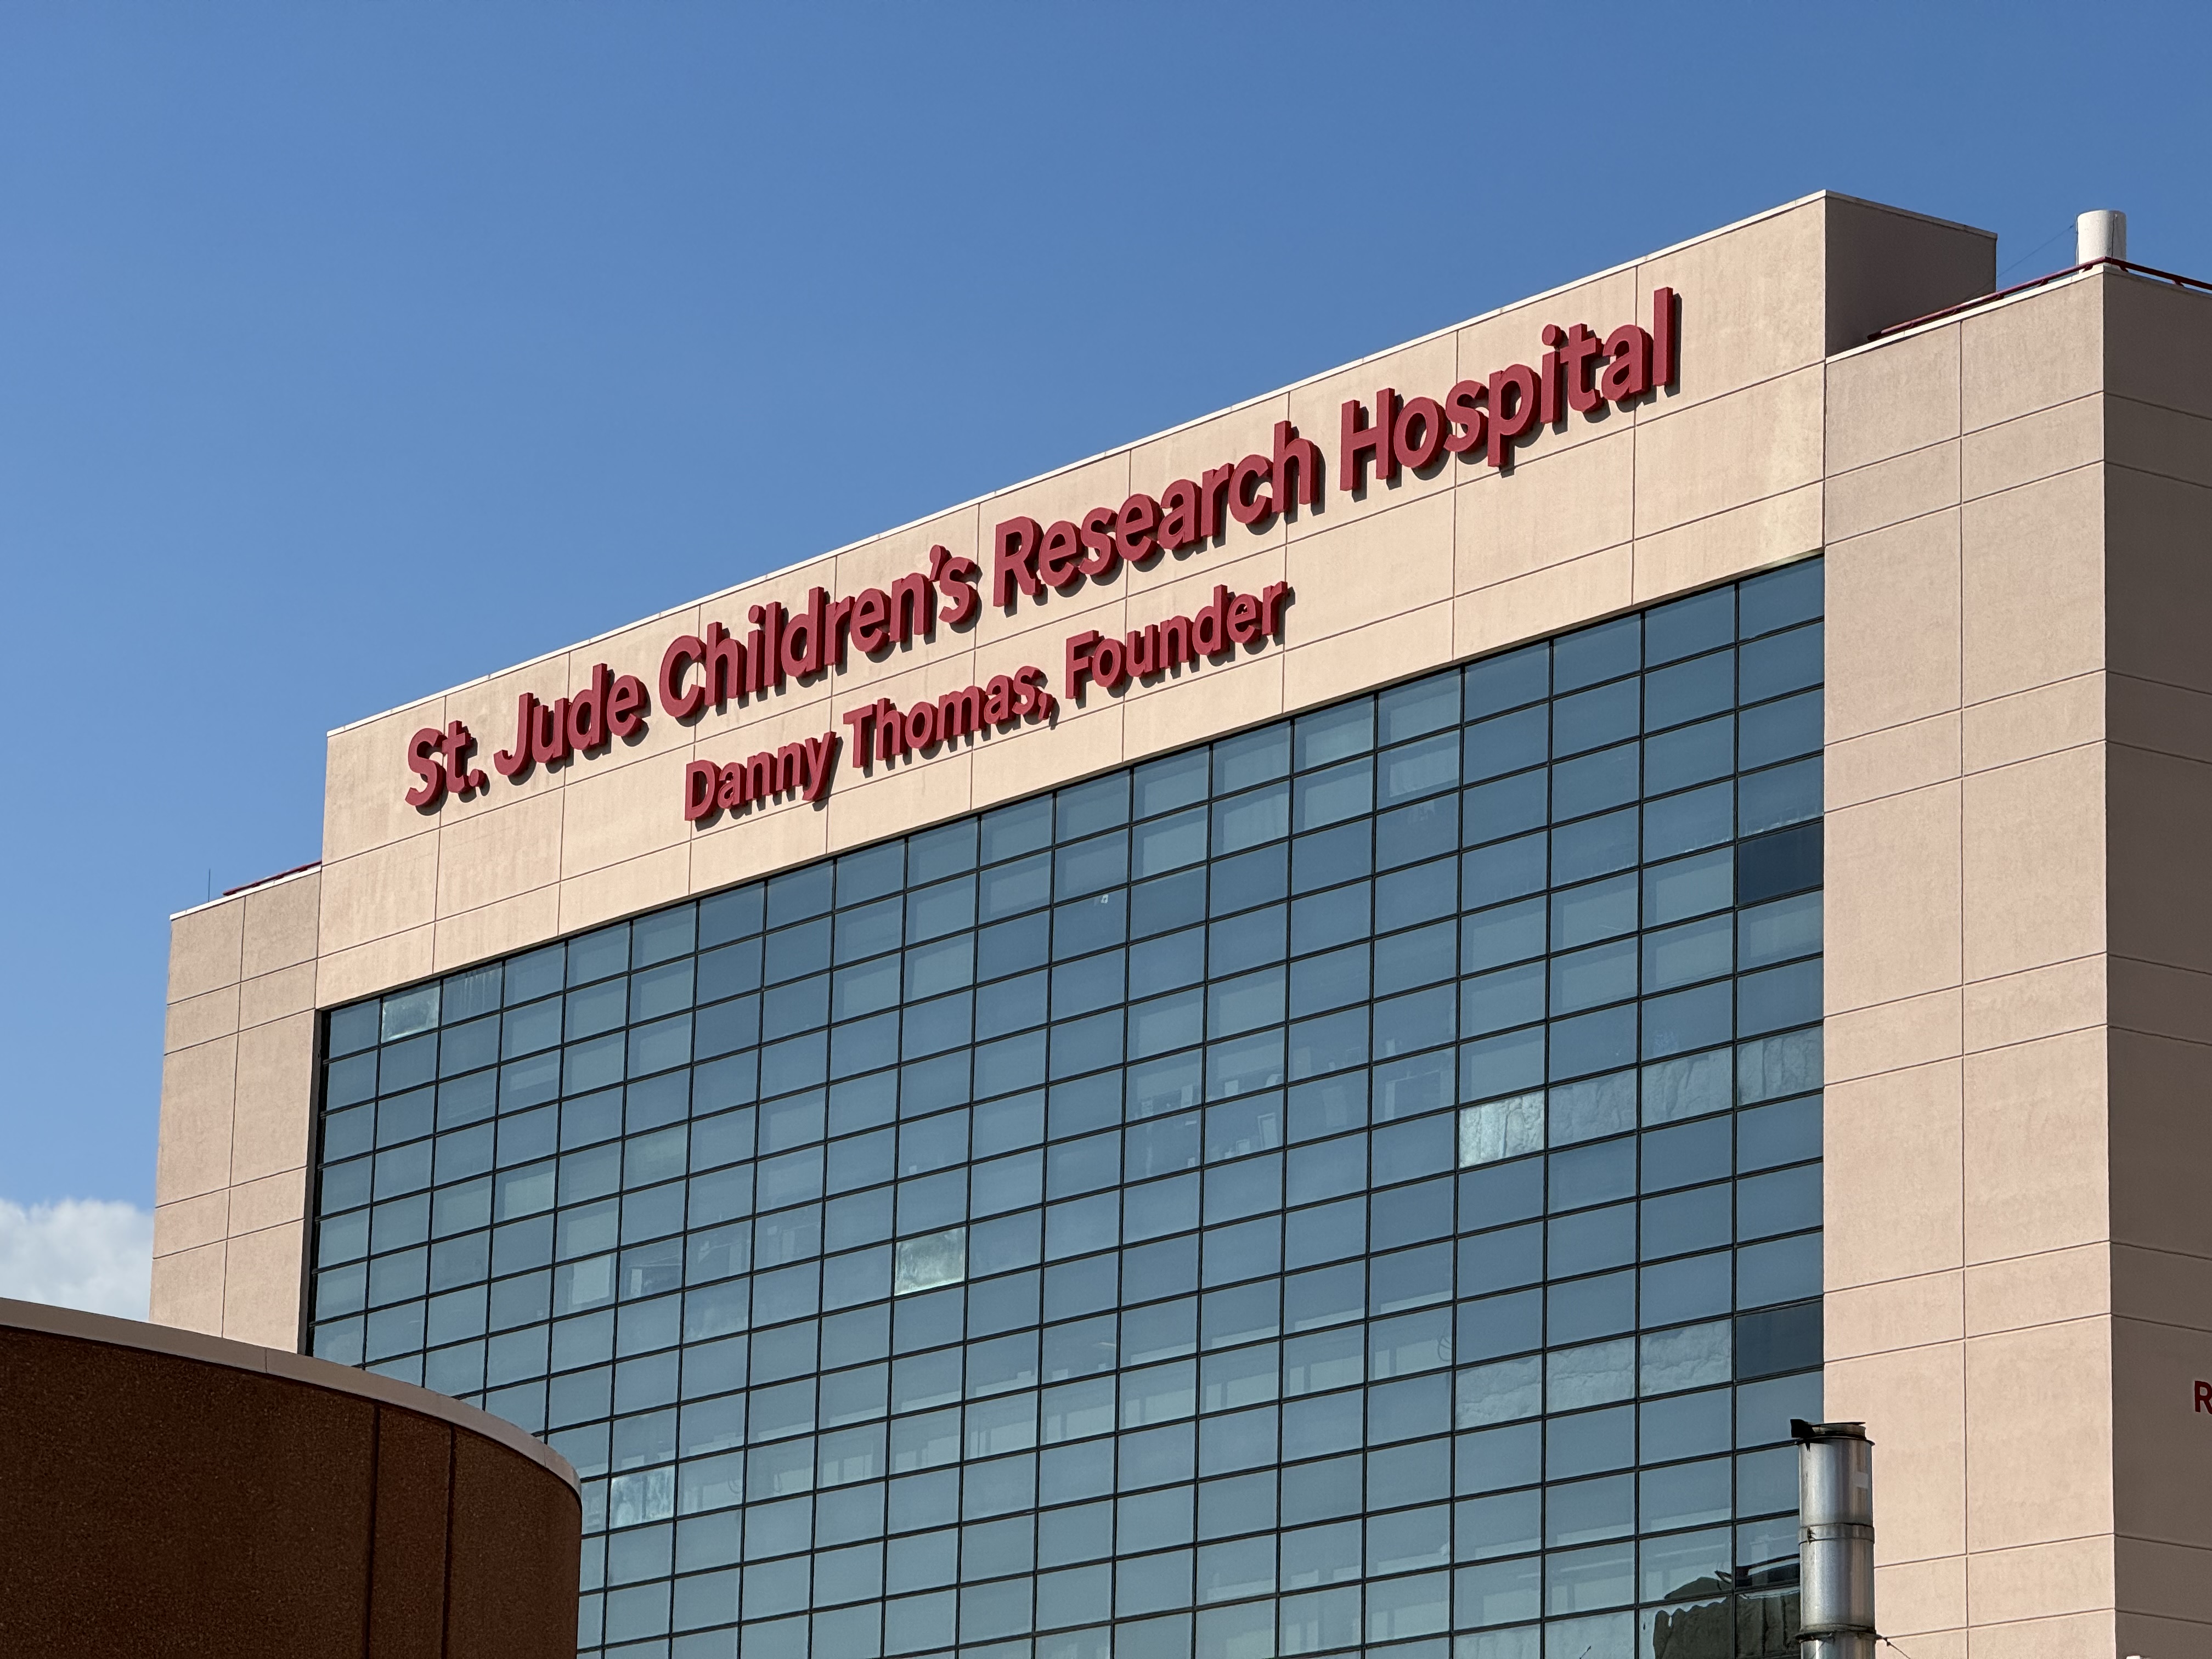
The campus is, of course, amazing. It’s also a bit odd — it’s a place that, at a glance, serves two different masters. On the one hand, their number one priority is the treatment of the patients that come through their doors. But simultaneously, they are doing everything in their power to complete their mission: ensuring no child should die in the dawn of life. That means intense, multidisciplinary, collaborative research. Research that is then given away, so that hospitals around the world have the opportunity to use treatments invented at St. Jude. All this while also doing everything they can to accommodate patient families, including siblings, who are swept along for this terrible, awful ride.
Naturally, St. Jude endeavors to think of everything — including such basic needs as having a salon and school on-site.
To quote my dear friend (and patient dad) Stephen:
The sheer scale of St. Jude is hard to convey unless you’re walking around some of the buildings, learning about the interplay of research and patient care that is unique to St. Jude.
And all of this is accomplished without patient families paying a cent.
It’s a breathtaking place. The magnitude of their mission, the size of the operation, and the staff that believes, through-and-through, that they have a calling to do this. To do whatever they can to help sick kids.
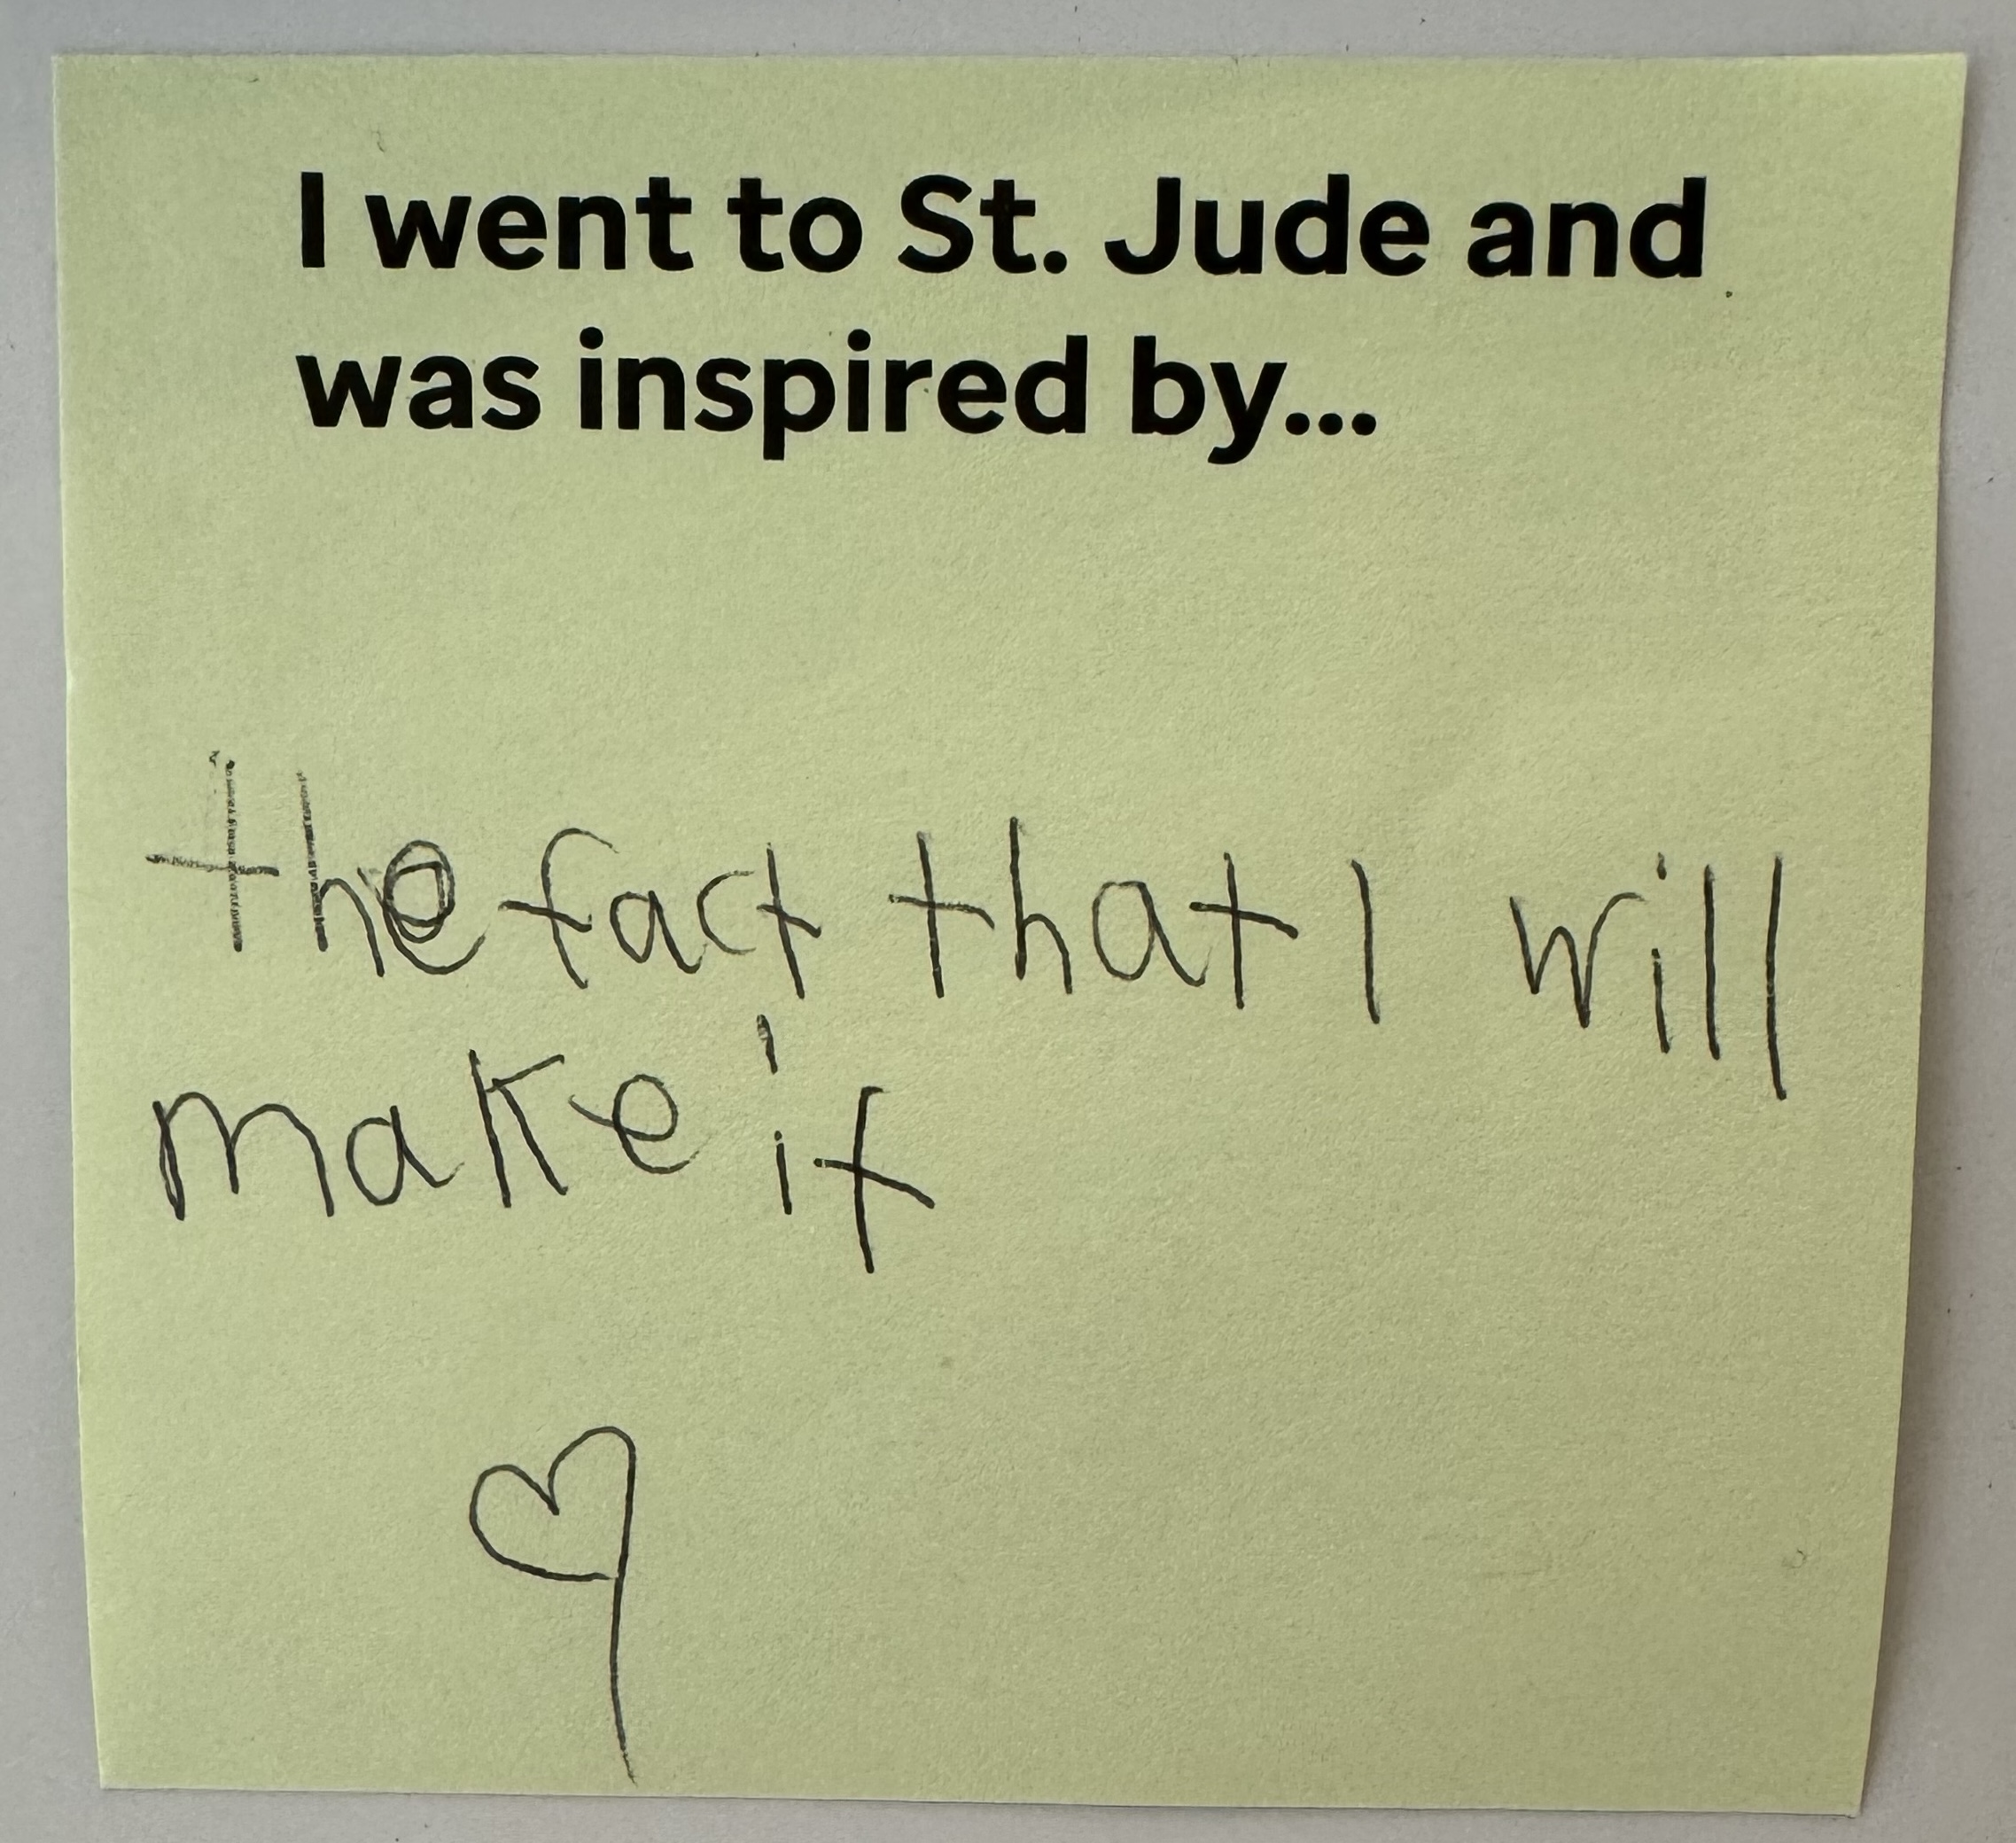
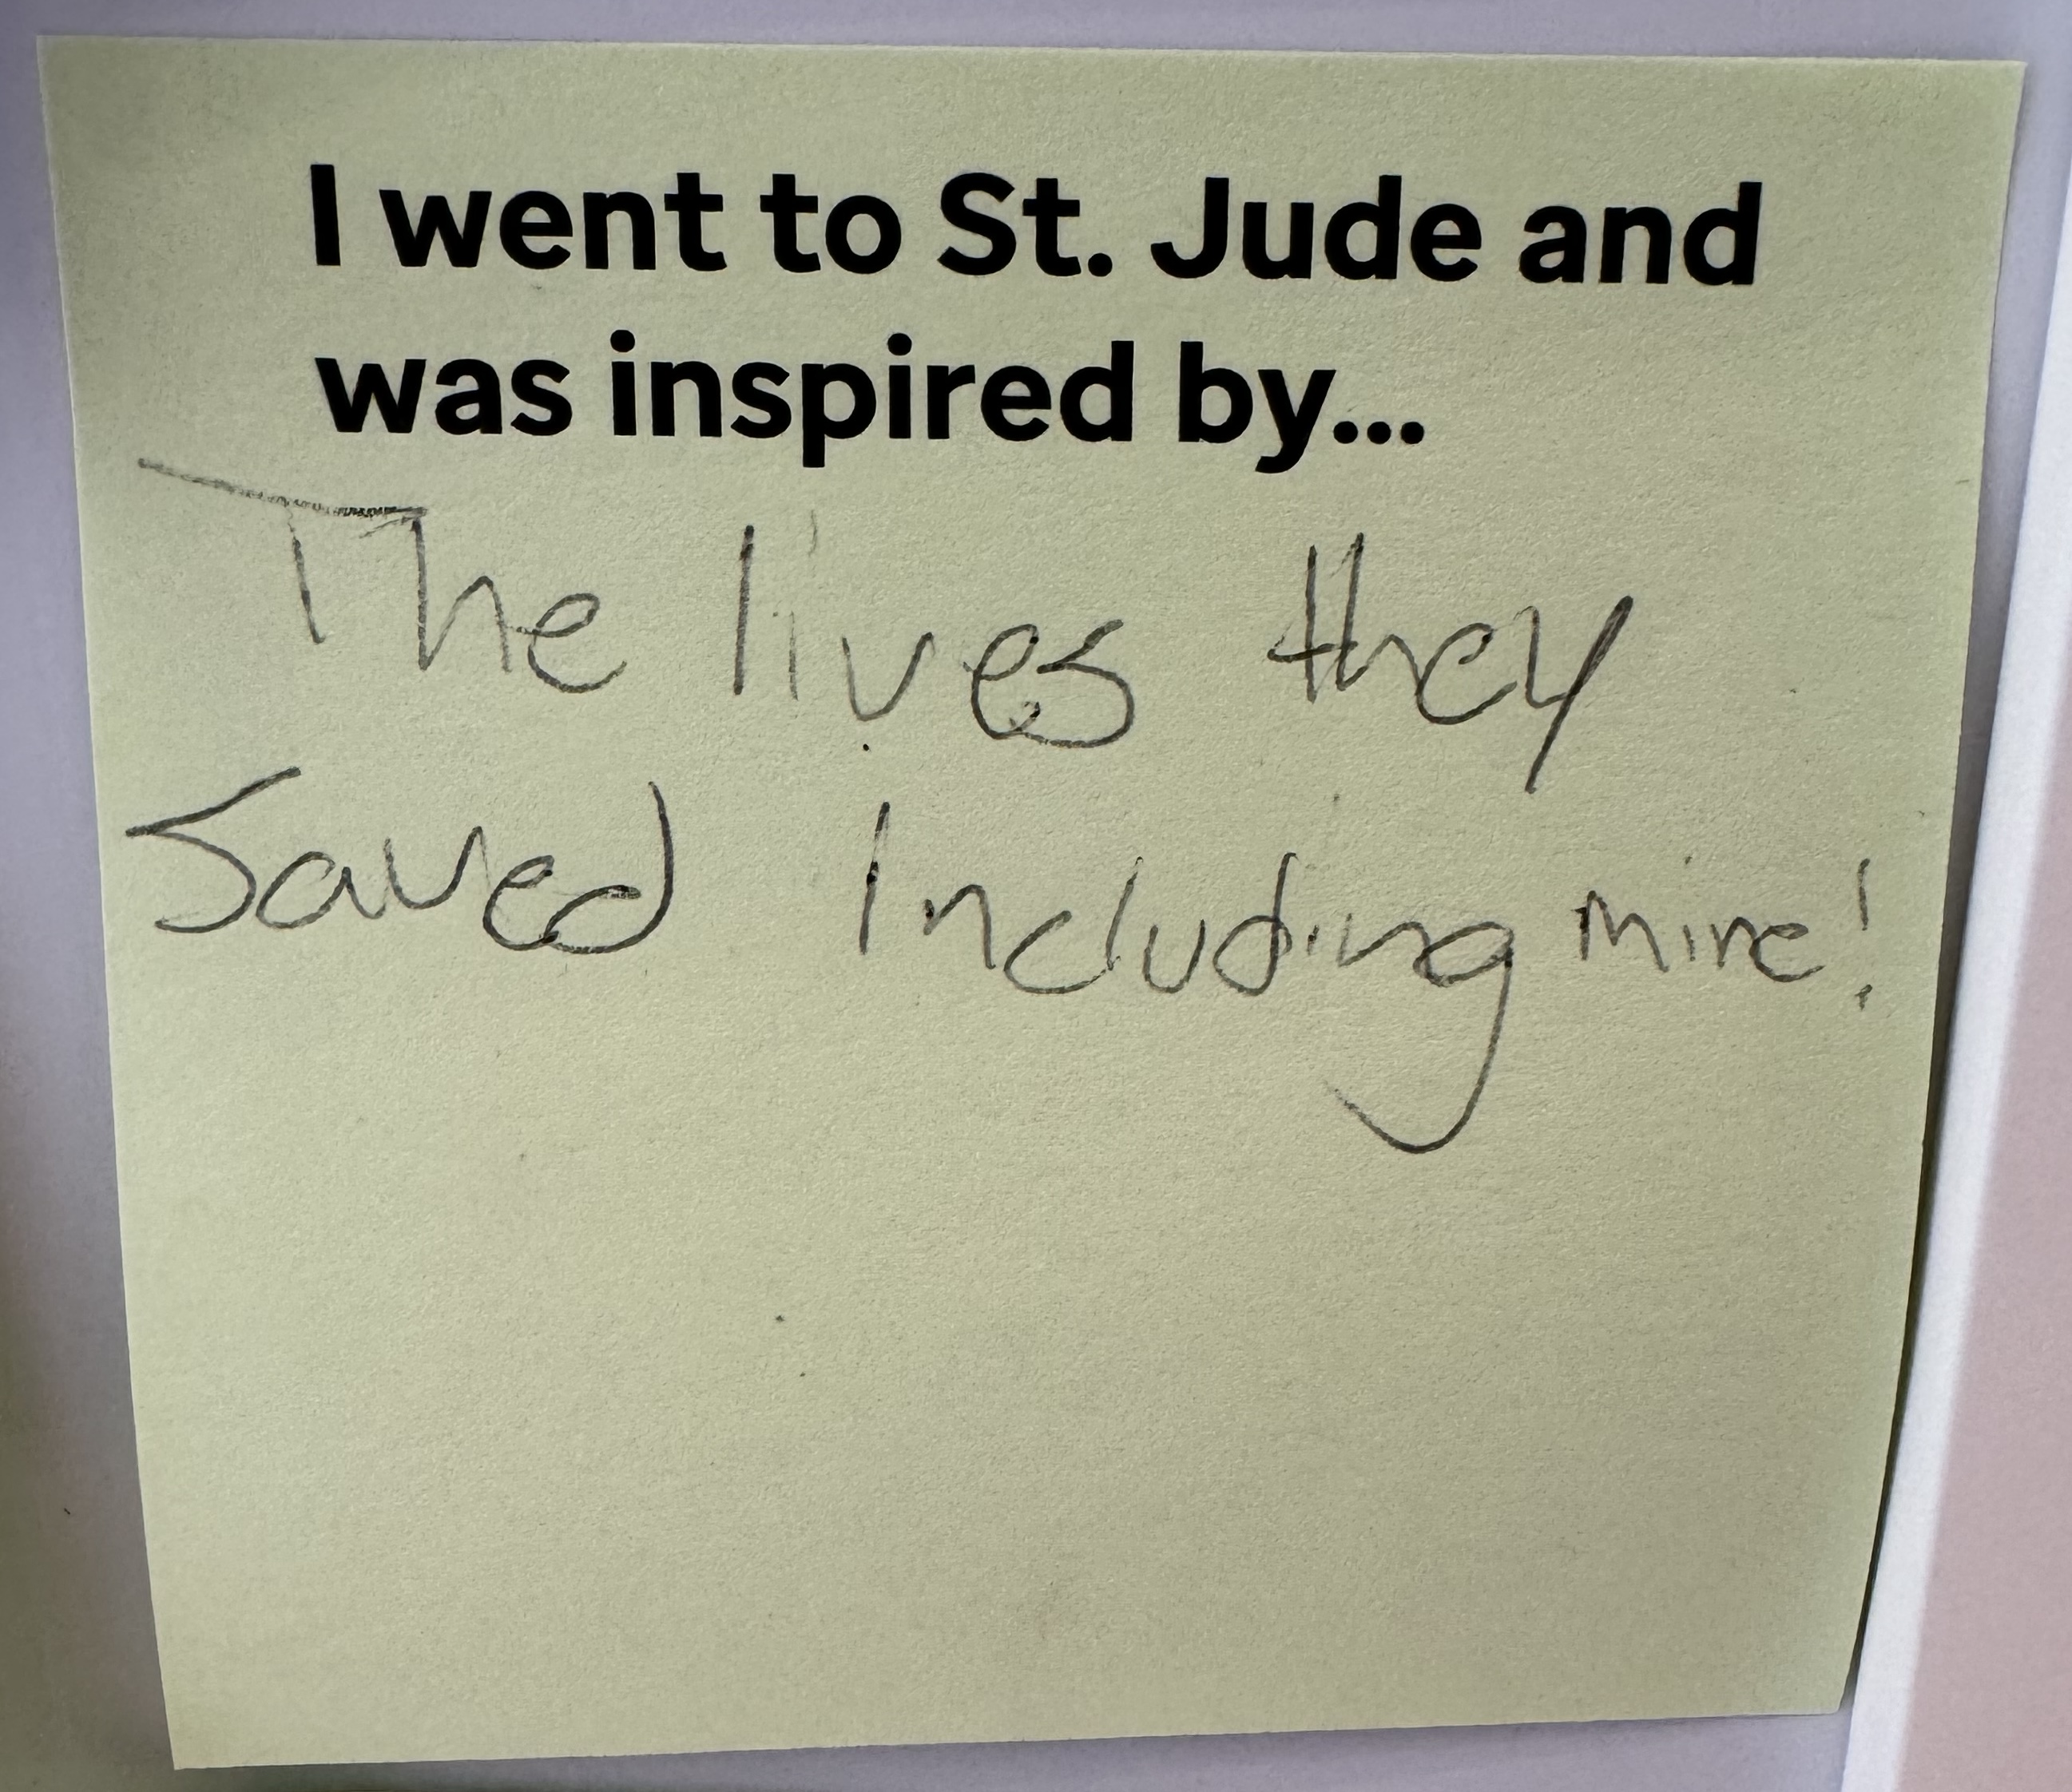
As a part of the tour we took on campus, we spent some time in the Pavilion, which has several exhibits about its history, and that of its founder, Danny Thomas. In there, they had two boards, where you could answer the question “I went to St. Jude and was inspired by…”.

I can’t help but share two post-its I saw while there:
September is Childhood Cancer Awareness Month. If all goes according to plan, I will be joining several of my friends to participate in the 12-hour Relay FM Podcastathon for St. Jude. I’ll be posting about it again when the time comes, but I hope you join us in raising money for this incredibly meaningful cause.