Today we had a “hack day” at my company. We get to spend the day working on something that’s at least tangentially related to what we do day-to-day, but doesn’t have to be directly applicable. Today, I finally got around to trying Sourcery.
Sourcery is a code generation tool for Swift. It is particularly well suited for auto-generating code that is very repetitious; code most developers refer to as “boilerplate”. Some examples that come to mind:
EquatableimplementationsHashableimplementationsstructinitializers- Lens implementations
The documentation isn’t super obvious at a glance, so I’m writing this to serve as a quick primer to get you going.
Let’s start with a basic Mac command line app, just to keep things simple. This app has a basic type:
struct Person {
    var firstName: String
    var lastName: String
    var birthDate: Date
    var age: Int {
        return Calendar.current.dateComponents([.year],
                                               from: birthDate,
                                               to: Date()).year ?? -1
    }
}
This type has a trio of normal properties, and one computed/read-only property.
In Swift, in order to compare the equality of two Person instances, we need to
implement a protocol called Equatable. To do so is trivial—at least in
this case:
extension Person: Equatable {
    static func ==(lhs: Person, rhs: Person) -> Bool {
        guard lhs.firstName == rhs.firstName else { return false }
        guard lhs.lastName == rhs.lastName else { return false }
        guard lhs.birthDate == rhs.birthDate else { return false }
        return true
    }
}
However, imagine doing this across ten types. Across fifty. How many structs
and classes are in your project? Implementing these constantly is rote work,
and not really what I’m being paid for. For repetitive tasks like these, is
there any way to automate them?
There is, and it’s Sourcery.
Sourcery allows you to auto-generate code based on templates. Those templates can be written in several templating languages; for the purposes of this post, I’ll be concentrating on Stencil.
The combination of Sourcery and a Stencil template allows us to auto-generate
an Equatable implementation for every one of our types.
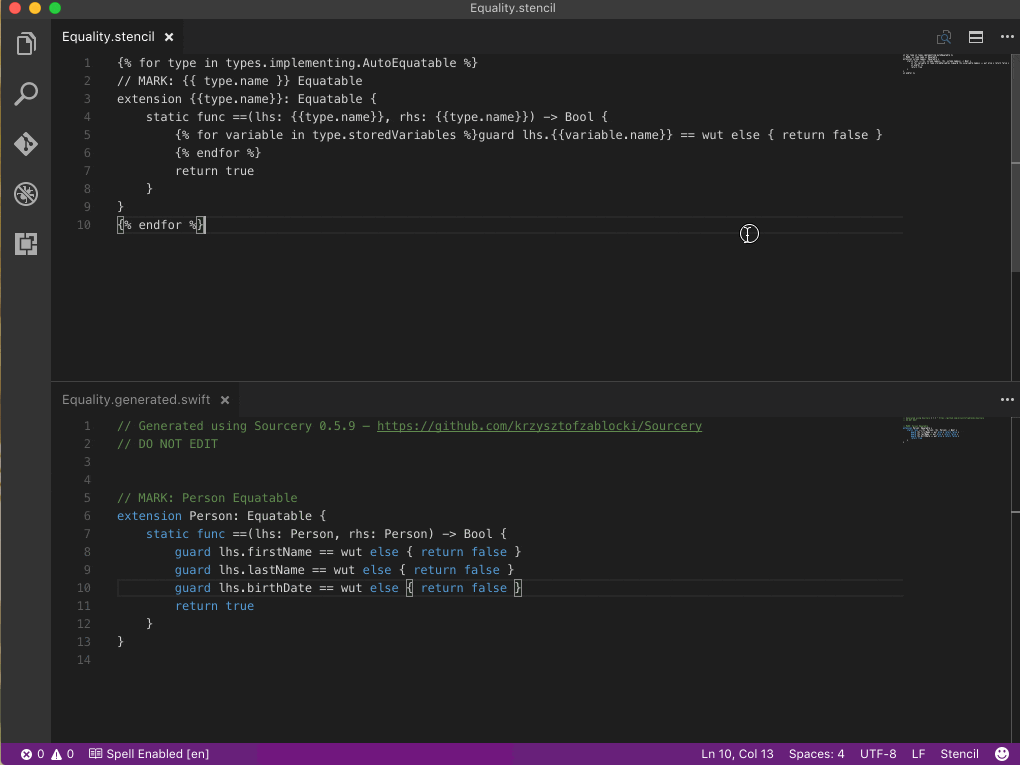
Our template looks like this:
{% for type in types.implementing.AutoEquatable %}
// MARK: {{ type.name }} Equatable
extension {{type.name}}: Equatable {
    static func ==(lhs: {{type.name}}, rhs: {{type.name}}) -> Bool {
        {% for variable in type.storedVariables %}guard lhs.{{variable.name}} == rhs.{{variable.name}} else { return false }
        {% endfor %}
        return true
    }
}
{% endfor %}
Let’s explore the important lines:
{% for type in types.implementing.AutoEquatable %}
Here, we’re enumerating on every type in our project that implements AutoEquatable.
AutoEquatable is simply a marker protocol:
protocol AutoEquatable {}
We use it, in concert with this precondition, to allow us to opt in to
auto-generation of an Equatable implementation. If we want to write our
Equatable by hand, we do so. If we want to have it auto-generated, we simply
add the marker protocol to our type:
extension Person: AutoEquatable {}
Coming back to our template, we are now in our enumeration of all the types
that implement AutoEquatable. For each of those types, we create the
extension for the type in question, and the required function:
extension {{type.name}}: Equatable {
    static func ==(lhs: {{type.name}}, rhs: {{type.name}}) -> Bool {
In this function, we need to do a comparison for each of the stored properties
in that type. Properties like Person’s age aren’t stored, and thus, don’t
need to be compared. Sourcery makes that happen for us too:
{% for variable in type.storedVariables %}guard lhs.{{variable.name}} == rhs.{{variable.name}} else { return false }
The above basically says “for each of the stored variables in this type, do a comparison”. The rest of the template is pretty self-explanatory.
Do note, however, that I’m leaving a lot of stuff out of this template, for brevity’s sake. I strongly encourage you to check out the sample template that Sourcery provides.
Performing Code Generation
Now, we need to use Sourcery to perform the generation. Starting from
our sample app, we can download the Sourcery binaries, and
include them in our project. In this case, I’ve put it in
./Resources/sourcery. You can see it here.
Now, we can run Sourcery on our files.
Assuming we’re in our project’s home folder—the folder that has our
SourceryDemo.xcodeproj in it—we run it as such:
./Resources/sourcery/bin/sourcery
   --sources ./SourceryDemo
   --templates ./SourceryDemo/Templates/
   --output ./SourceryDemo/Autogenerated
You can see the result of Sourcery’s magic here:
// Generated using Sourcery 0.5.9 — https://github.com/krzysztofzablocki/Sourcery
// DO NOT EDIT

// MARK: Person Equatable
extension Person: Equatable {
    static func ==(lhs: Person, rhs: Person) -> Bool {
        guard lhs.firstName == rhs.firstName else { return false }
        guard lhs.lastName == rhs.lastName else { return false }
        guard lhs.birthDate == rhs.birthDate else { return false }
        return true
    }
}
Sourcery has generated exactly what we wanted: a func ==() that will compare
each of the stored properties on Person. Neat-o!
Automatic Regeneration
What happens if we want to make changes to our template, and then very quickly
see the results? Flipping back and forth between our template and Terminal.app
is tedious and frustrating. Luckily, Sourcery has a solution for this. If you
add the convenient --watch option to your command line, it will stay open,
constantly watching for changes in your templates and your source files.
Take this a step further, and you can watch your changes happen in real time. My old friend, Visual Studio Code is a great helper here:
As you can see, the moment I hit ⌘-S to save the template, the Swift code is automatically regenerated. Neat stuff.
It’s worth noting that Visual Studio Code doesn’t ship with Stencil highlighting
by default. To install it, press ⌘-T and then enter the command ext install stencil.
Pre-Build Step
Once you have your templates squared away, presumably by writing them in concert with Visual Studio Code, you still don’t want to generate new ones by hand. What happens if you add a new type? Sourcery will pick this up automatically, but only if you re-run it.
We can easily ensure that Sourcery is run every time we build. We can add a pre-build
step in Xcode. To do so is easy. Select your target in Xcode, and then select the
Build Phases tab. You can add a new one:
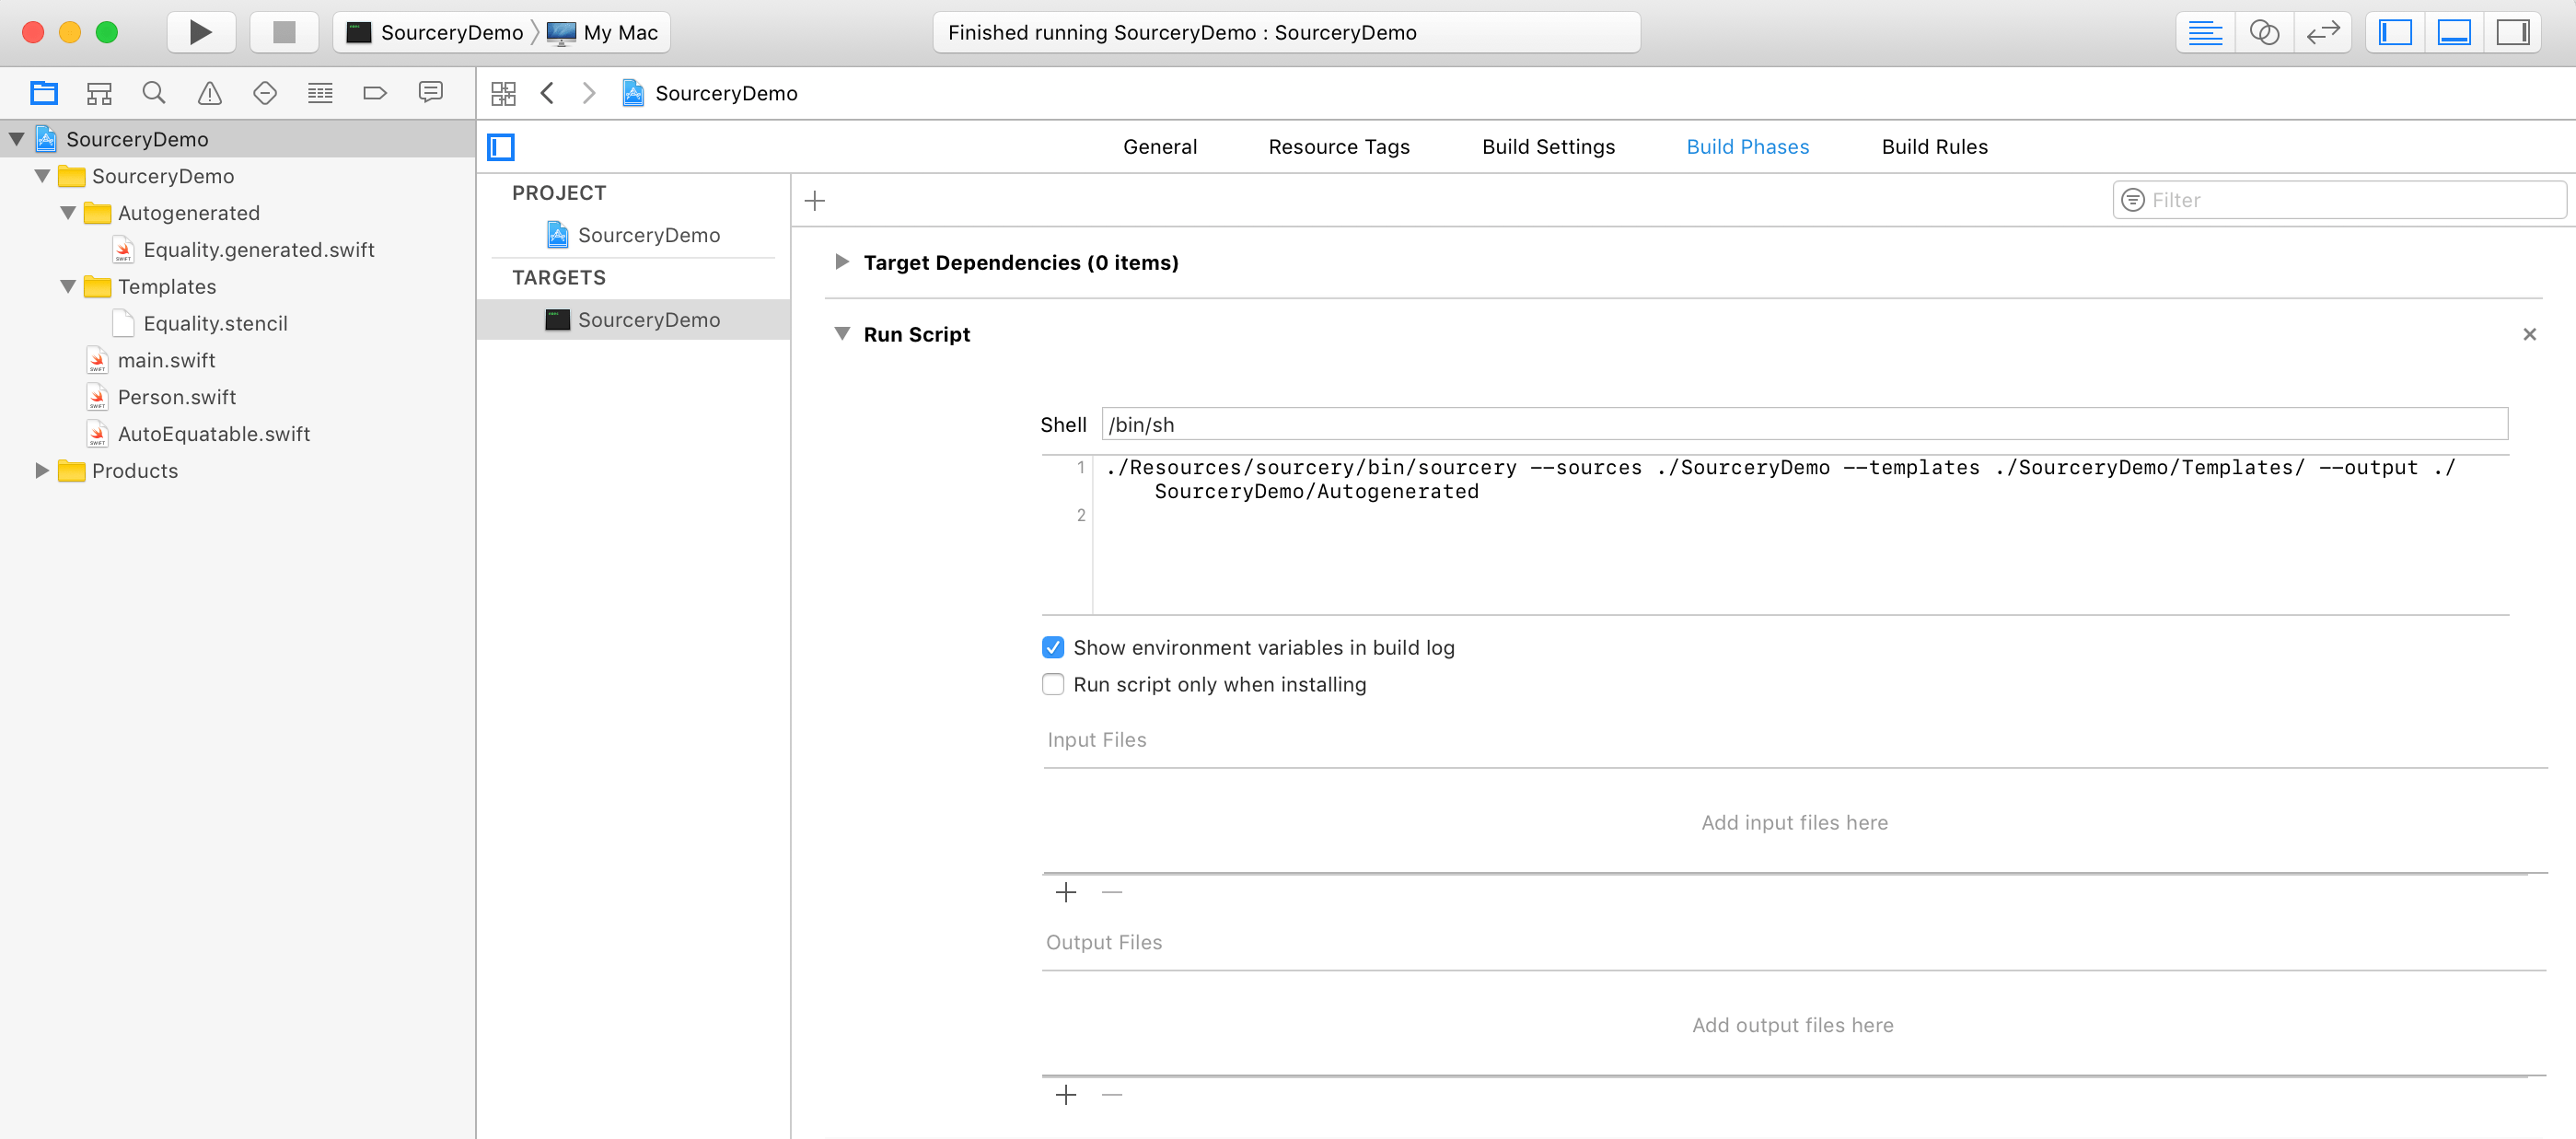
Now, every time we build, the first step will be to refresh the Sourcery output.
Way Forward
Though what I did today was simply a proof of concept, my intention for Monday is to spend some time integrating Sourcery into our real projects.
Should you wish to see my setup, I have put a sample project on Github. If you look at the commit history, you can walk through each step, much like I did with my RxSwift primer.