What with  due any time now, Erin and I thought it was about time we got ourselves a proper camera. Since we only have one chance to grab pictures of baby-, we wanted to ensure we did so using a decent camera. I consider this purchase an insurance policy against hearing or saying “Gosh, I wish this picture was clearer” in the future.
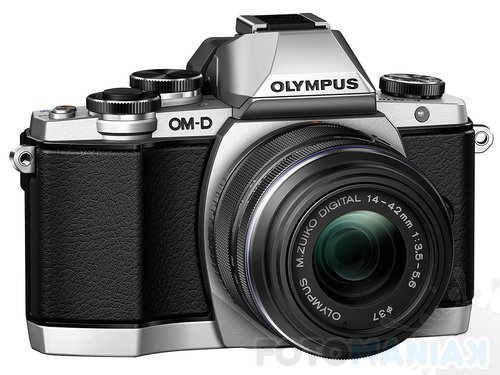
After much deliberation, we settled on the Olympus OM-D E-M10 Micro Four/Thirds camera — the kit version — and the Panasonic 25mm f/1.4 lens. The camera came highly recommended from not only professional reviewers, but also my friend Shawn Blanc.
Having had the camera for a little while now, I’ve noticed a few things I’ve not seen called out obviously elsewhere. Like my iPhone 6 quick impressions, these will be brief.
WiFi
As Shawn discussed in his review, the WiFi connection seems super janky at first, but quickly becomes a very useful feature. The E-M10 does not allow for connections to a network; rather it is designed only for peer-to-peer connections with a phone. Once you’re connected, you can use the Olympus OI.Share app to control the camera, download pictures, or add data to existing pictures.
Having the WiFi connection is actually super handy simply for downloading pictures, as you don’t need a $30 cable to get pictures off the camera while on the go. While not necessarily a common problem, it’s great to have the flexibility.
GPS and EXIF
Part of the reason I settled on the E-M10 is that it supported semi-automated addition of GPS coordinates to the photos it takes. The camera doesn’t have a GPS radio within it, but it can have a WiFi connection to a phone that does.
However, the process was not terribly obvious to me. I had assumed that you would connect the camera to the phone, and then snap away. As it turns out, that’s almost exactly the opposite of the actual procedure.
Instead, the procedure is:
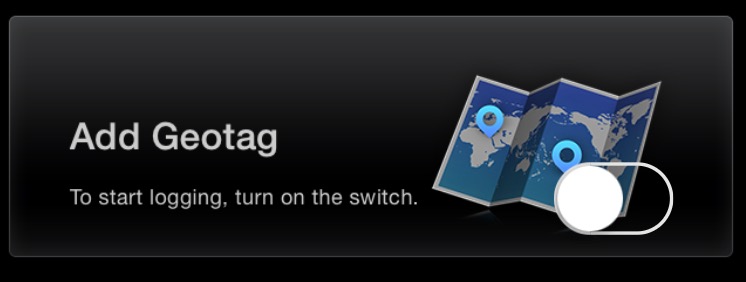
- Open the OI.Share app.
- Turn on GPS logging by turning on the switch at the bottom of the screen.
- Take a bunch of pictures.
- Connect your phone and the camera via WiFi.
- Use the app to add GPS coordinates to the pictures on the camera, using the log you generated in step #3.
As you can see, rather than adding the GPS data as pictures are snapped, you instead add them in bulk when your session is over.
Bokeh
I never realized how much I want to have bokeh in all my pictures until now. Bokeh is, without question, my new favorite thing.