In order to learn about RxSwift, I wanted to come up with a completely contrived demo application that is written entirely in vanilla UIKit. We can then, step by step, convert that application to use RxSwift. The first couple of steps will be a bit hamfisted, but this will allow new concepts to be introduced slowly.
In part 1 of this series, we saw a visual representation of what this app does:
This app is written using a storyboard (generally I prefer XIBs, but
that’s a discussion for another day), and has a single UIViewController.
The entirety of that view controller is below:
import UIKit

class ViewController: UIViewController {

    // MARK: Outlets
    @IBOutlet weak var label: UILabel!

    // MARK: ivars
    private var count = 0

    @IBAction private func onButtonTap(sender: UIControl) {
        self.count += 1
        self.label.text = "You have tapped that button \(count) times."
    }
}
As you can see, there’s not much to it. There is a UILabel to show how many
times a button has been tapped. That button isn’t stored in the class, because
it’s wired up to an IBAction. There’s no need to store it.
Unfortunately, we have to manually keep track of how many times the button has
been tapped. This data is stored in count.
The @IBAction func onButtonTap(sender:) is the aforementioned IBAction, which
is wired up in Interface Builder, and is called by UIKit when the button is tapped.
Naturally, this is all super easy code, and there’s not much to it.
You can see all of this code on GitHub. Note that this is one commit in that repository; if you want to cheat and read ahead, you can look at the commits that follow. Once this series is over, you can walk forward and backward through time by checking out each individual commit.
Converting to Rx
The first step to converting this to use Rx is to think of what the inputs and outputs are. What causes things to happen? What causes us to do a computation, or change what we present to the user?
In such a simple app, it’s quickly obvious that the UIButton being tapped is
what kicks off a computation, and a change in state. As the button is tapped,
we will need to continue to change the value of count.
Marble Diagrams
How would this transition of state look? Let’s model it over time:
---[tap]---[tap]---[tap]--->
equates to
---[ 1 ]---[ 2 ]---[ 3 ]--->
The above is a crude representation of a marble diagram. A marble diagram is a way of representing signals in the Rx world. The bar represents time. Above, quite obviously, we start on the left and work toward the right. Each tap on the upper diagram yields a different value on the bottom diagram.
Marble diagrams are great ways to show how operators work in Rx. A great example
is map: the input is at the top, the output is at the bottom, and the
map operation is in the middle:
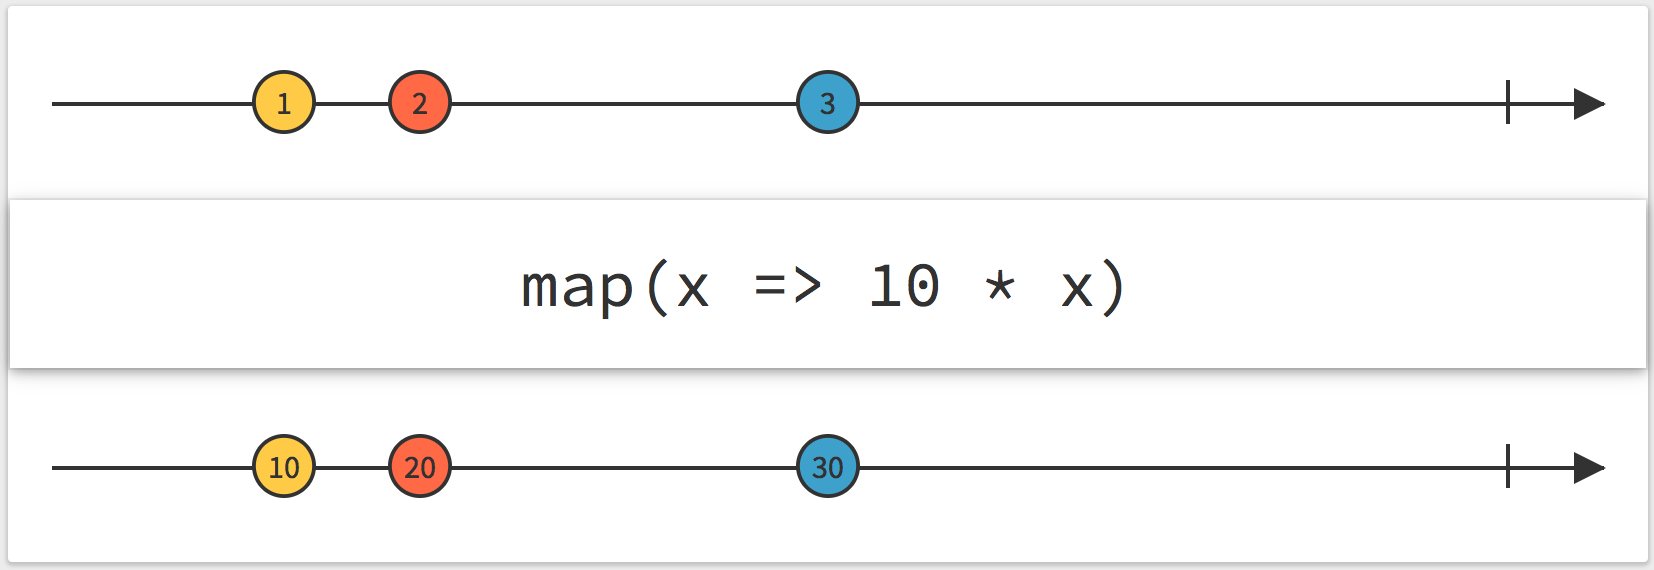
In the example, the map is simply multiplying the input by 10, so 1 becomes 10, 2 becomes 20, and 3 becomes 30.
Aside: You’ll notice in some marble diagrams the arrows aren’t arrows at all,
but actually lines. They’ll end with either | or X. A pipe represents
a stream that has completed. These streams have declared that they will never
signal again. An X represents an error. Streams that error do not continue
to signal events after the error.
Coming back to our streams:
---[tap]---[tap]---[tap]--->
equates to
---[ 1 ]---[ 2 ]---[ 3 ]--->
Clearly, the place we start is with the UIButton being tapped. In order to get
access to that button programmatically, we’ll need to add it to our view controller.
I’ve done so, and called it button:
@IBOutlet weak var button: UIButton!
RxCocoa
RxSwift is a foundation; it works for any sort of Swift and is not specific to user interfaces, network calls, nor anything else. RxCocoa is, in short, UIKit wrapped in Rx. For work done on user interfaces, you’ll need to:
import RxSwift
import RxCocoa
Most UIKit controls will have reactive extensions, and in general, they’ll
be exposed to developers in the rx property.
So, to get to the stream that represents taps of the button in our view controller,
we need to use button.rx.tap.
Observables
button.rx.tap is a variable that returns a ControlEvent. A ControlEvent
is a special kind of something else: an Observable.
Every time that I’ve said “stream”, what I’m really saying is “Observable”.
Observables are the way streams are represented in Rx. You can perform many
operations on observables; that’s what the entire RxMarbles site is for.
Most things that you work with in Rx are related to, or can be converted to,
an Observable. In fact, most higher-order types like ControlEvent can
be converted to Observables by using .asObservable().
At the end of the day, just remember that an Observable is simply a
representation of a stream of events over time.
Subscriptions
Generally speaking, the last operation you’ll perform on an
Observable—on a stream—is to take action based on that stream
signaling. In our case, how do we take action every time the button is tapped?
We will subscribe to that Observable. This allows us to provide a closure
where we run whatever code we need. So, our code now looks like this:
self.button.rx.tap
    .subscribe(onNext: { _ in
    })
So what do we do inside this closure, when the Observable signals?
Wiring Up
For this first step, we’ll simply use the existing method we wrote for the
procedural version of the app: @IBAction func onButtonTap(sender:). This is
not the right way to do things in the Rx world, but let’s take things
slowly, one step at a time. Thus, our new chain looks like this:
self.button.rx.tap
    .subscribe(onNext: { _ in
        self.onButtonTap(sender: self.button)
    }
Since we don’t need onButtonTap(sender:) to be an @IBAction anymore, we can
get rid of the sender parameter. That cleans things up nicely:
self.button.rx.tap
    .subscribe(onNext: { _ in
        self.onButtonTap()
    }
Disposables
In principle, we can build and run right now, and things should work. However, if we do, we’ll see a build warning:

Uh, what‽
In RxSwift, it’s important to clean up after yourself, and terminate Observables,
especially network requests. Without getting too deep into the weeds, there is
basically only one rule: when you see the above warning, add that object to a
DisposeBag.
In our case, we’ll add a DisposeBag to our ViewController. This is because the
lifetime of this subscription is tied to the lifetime of our view controller:
private let disposeBag = DisposeBag()
And then we’ll use it in our subscribe() call:
self.button.rx.tap
    .subscribe(onNext: { _ in
        self.onButtonTap()
    }
    .addDisposableTo(self.disposeBag)
Don’t let this put you off. There’s really nothing to managing resources, and
having a way to reliably dispose of all active Observables comes in very handy
from time to time. After a year of doing RxSwift, I’ve never had to
think about disposal, outside of dropping things in a dispose bag.
Generally speaking, each class/struct that is doing subscribe()ing gets
one shared DisposeBag, and all subscriptions get added to it. That’s it.
Debugging
With the code we have above, it will run, and it will work. However, what if we
want to debug what’s happening within an Observable chain? Naturally, we can
place a breakpoint within a closure–such as the one we’re providng to subscribe().
Sometimes, though, you want to see flow, even in places where we don’t have a
closure to interrupt.
Luckily, RxSwift provides an easy way to handle this: debug(). Let’s change our
chain to include a call to debug():
self.button.rx.tap
    .debug("button tap")
    .subscribe(onNext: { [unowned self] _ in
        self.onButtonTap()
    }).addDisposableTo(disposeBag)
And now let’s run the app, and click 3 times. Here’s the console output:
2016-12-15 19:02:31.396: button tap -> subscribed
2016-12-15 19:02:34.045: button tap -> Event next(())
2016-12-15 19:02:34.584: button tap -> Event next(())
2016-12-15 19:02:35.161: button tap -> Event next(())
The call to debug() will tell us when the Observable is subscribed to, as
well as each time it has an event. As discussed above, Observables can signal:
Next(with a value)Error(with an error; represented by aXin a marble diagram)Completed(represented by a|in a marble diagram)
All of these will be shown by debug().
Though it’s a bit hard to tell above, debug() also shows us what value was
signaled. In our case, the button tap is not just a ControlEvent, but in
actuality a ControlEvent<Void>. That’s because a button’s tap doesn’t have
any other data to it; all we know is, a tap happened. This is in contrast, say,
to the value of a UISegmentedControl, where its value stream is a
ControlEvent<Int>. The Int is the index of the selected segment. What good
would it be to signal that the selected segment changed without the new selection?
Coming back to our button tap, the ControlEvent<Void>, which is a special kind
of Observable, doesn’t really carry a value at all; its value is Void. In
Swift, we can represent Void as (). That’s why you’re seeing Event next(());
this could alternatively be written as Event next(Void).
By contrast, if we were signaling with the current count—perhaps after a
map—the above would read:
2016-12-15 19:02:31.396: button tap -> subscribed
2016-12-15 19:02:34.045: button tap -> Event next(1)
2016-12-15 19:02:34.584: button tap -> Event next(2)
2016-12-15 19:02:35.161: button tap -> Event next(3)
At first, debug() may seem like it’s just cluttering up your console. However,
as we’ll learn in future posts, it’s extremely powerful, and can give you
important insight into how your data is flowing through your streams.
Next Steps
Now we’ve dipped our toe into wiring up a procedural interface with Rx. So far, we haven’t really reaped any benefits. We’re simply calling into our old code differently. Having started here, we’re now one step closer to having a proper, Rx implementation.
In the next post, we’ll start to explore a more Rx-y way of going about
implementing our view controller. This will include the real coup de grâce:
getting rid of var count.