A couple of years ago, the fine folks at Synology were kind enough to give me a DS1813+[1] fully loaded with 8x 3 TB drives. That’s a whopping 24 terabytes of available storage that I have sitting in my home office. More than I need. And I love it.
As discussed on the last ATP, having a stupidly large storage solution in the house is something you can’t live without once you experience it. While the 8-bay Synology I have is probably a bit overkill, there are others at more manageable sizes that may suit you better.
Any of the Synology devices I’ve ever used, regardless of how many bays they have, run their Disk Station Manager software. As you’d expect, it’s web-based, but it’s pretty nice as these sorts of things go.
I really fell in love with my Synology once I went poking around in DSM, and realized that this is more than just network attached storage — it’s an entire server that’s sitting on my home network, always on, ready to help.
One of those things the Synology can do is give you access to your home network when you’re not at home. All you need to do is set up a VPN server.
These instructions are current as of DSM version 5.2.
- To start, sign into DSM using your web browser.
- Once you’re there, open
Package Manager. - In the left-hand pane, select
Utilities. - Find
VPN Server, and chooseInstall.
Once the VPN Server is installed, you can navigate to it from the “Start” button.
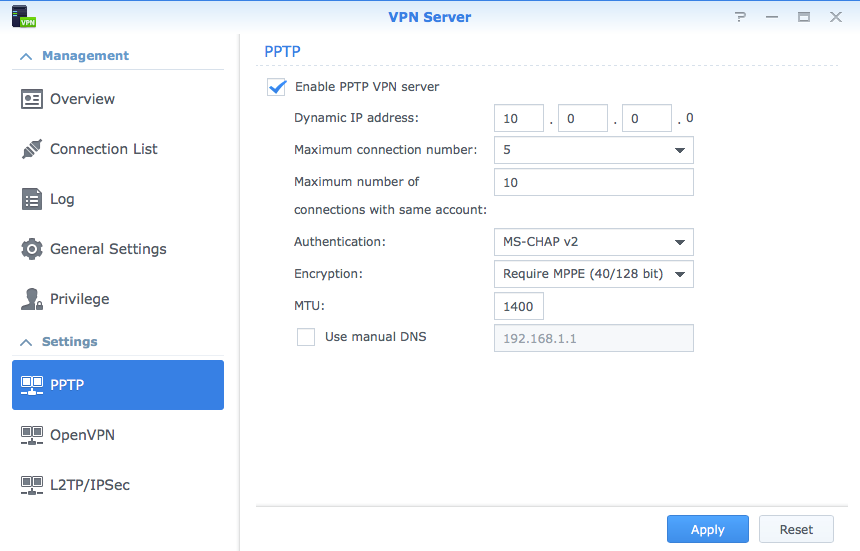
I have mine set up to be a PPTP server. I know that’s not a particularly secure choice, but really the idea is just to be enough of a thorn in a nefarious person’s side that they’ll likely choose some other low-hanging fruit to mess with instead.
To set up the PPTP server:
- In the left-hand pane, select
PPTP. - Check
Enable PPTP VPN server. - Set up the rest of the settings as you see fit. Here is my setup:
The next step is to convince your router that PPTP traffic is approved, and to forward it to your Synology. The mechanism for doing so will vary by router, but the key is that the following need to be forwarded:
- TCP Port 1723
- GRE/IP Protocol 47
Once you have everything set up on the Synology and your router, you need to configure your client. In the case of OS X:
- Use the Apple Menu (or Spotlight, etc) to open
System Preferences - Choose the
Networkpane. - Click the
+at the bottom of the left-hand column. - Set the
Interfaceto beVPN, theVPN Typeto bePPTP, and type a friendly name of your choosing. - Click
OK - Set the
Server Addressto be your home IP address or hostname. As with the router conversation above, there’s a million ways to handle this; it’s left to an exercise for the reader. - Set
Account Nameto your user name on your Synology. - Optionally:
- Click
Advanced - Check
Send all traffic over VPN connection. You probably want this, as it will ensure that your computer encrypts all the things.
- Click
- Click
Apply.
The next time you’re out of your house (or, say, if you tether to your phone),
go back into System Preferences, back into the Network pane, select your
new VPN connection, and then click Connect. Depending on your settings, you’ll
likely see an item in your menu bar indicating you’re connected.
You can also use the Network pane to set the order in which your computer will
attempt to reach out to the internet. Whether or not you completed step 8 above,
you may want to fiddle with this. To do so, return to the Network pane, select
the gear, and then select Set Service Order.... Then simply drag the options
around until they’re in the order you want.
All the networking geeks are currently writing me to tell me that PPTP is so insecure that it’s near-as-makes-no-difference to transmitting data plainly. That’s okay. More than anything else, I just really like being able to get to devices on my home network when away. A VPN server like this allows that.
If I ever get more security conscious, I’ll take a stab at setting up one of the other kinds of VPN servers the Synology offers.